- First head over to:
http://developer.android.com/sdk/index.html
and download the latest (as of December 2012) file:
android-sdk_r21-linux.tgz
IMPORTANT NOTE:
If you are using the 64-bit version of Ubuntu 12.04, you MUST download and install the 'ia32-libs' package since the Android SDK is a 32-bit application and requires the 32 bit library to operate properly. To download and install, open a terminal and execute:
sudo apt-get install ia32-libs - Open a terminal and unzip the downloaded file:
tar xvf ~/Downloads/android-sdk_r21-linux.tgz
This will create a new directory 'android-sdk-linux' in your home directory containing all the unzipped files. Why the home directory? The simple answer is 'to avoid file permission problems'. Note that by installing the SDK in the home directory, only the current user can access it - so security is guaranteed.
If, however, you want the SDK to be accessed by other users, then you may have to install it somewhere else - perhaps the /opt directory. This article will not describe how to do that - it just assumes that the current user is the only one that can access the SDK. - Change directory and execute the android SDK:
cd android-sdk-linux/tools
./android
NOTE:
You can set the PATH environment to point to your Android SDK tools directory so that you can start the 'android' program anywhere. Edit the .bashrc file in your home directory and add the following lines to the end of the file:
# set PATH so it includes user's Android SDK if it exists
if [ -d "$HOME/android-sdk-linux" ] ; then
PATH="$HOME/android-sdk-linux:$HOME/android-sdk-linux/tools:$PATH"
fi
This will only take effect on the next logout/login or restart.
The SDK Manager will start as shown in the screen-shot below. Initial SDK Manager screen
Notice the progress bar at the bottom of the screen - this indicates that the SDK Manager is querying for updates from Google. Wait until this is finished and the 'Done loading packages' message appears. Notice that the 'Android SDK Tools' have already been installed. According to Google, the 'Android SDK Platform-tools' is also required when you install the SDK for the first time - so the first thing you need to do to place a check mark on that item. Then click on the 'Install 1 package' button (see figure below). Android SDK Platform-tools selected
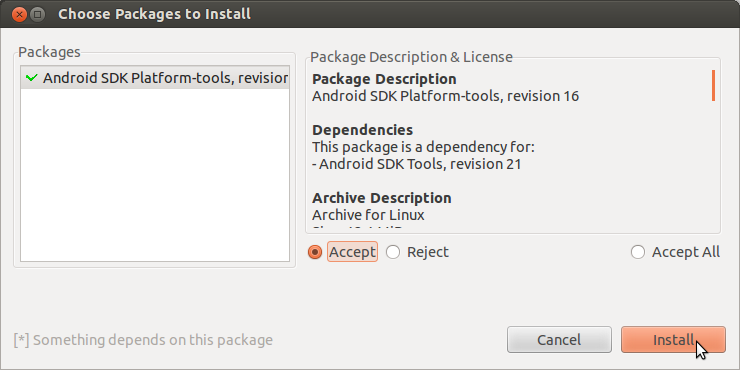
A window will pop-up asking you to confirm - click on the 'Accept' radio button and then the 'Install' button. Confirmation screen
 Accept and install
The platform-tools package will then be downloaded and installed. A log screen (as shown below) may appear if there are problems during install - ignore the 'Stopping ADB server failed (code -1)' message if it appears on the log - this seems to be harmless. Close the log window by clicking on the 'Close' button. Log window
The screen will now look like the one shown in the screen-shot below. Final SDK Manager screen
- You will now have to select at least one set of packages for Android application development. For this article, the Android 4.2 (API 17) package is selected by placing a check mark on this package. Then click on the right-pointing arrow to the left of this item to expand it. You can now inspect the list of packages that will be downloaded and installed. The final screen will look like the one shown below.
 Select packages
Click on the 'Install 6 packages' button - a window will pop up listing all the packages to be installed. Since multiple items have been selected, click on the 'Accept all' radio button - then press the 'Install' button to start the process of downloading and installing the packages. The progress bar at the bottom indicates the status of this process. Also a log screen may appear if there are problems during install - fix the problem and try again if so. The final screen should show that all the packages have been successfully installed as shown.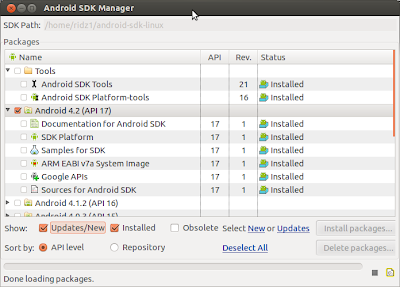 Selected packages installed
That's it - you have installed the latest Android packages necessary for software development. As of December 2012 this is Android 4.2 (API 17) - codenamed Jelly Bean. Is it necessary to install all the other packages (API 3 to 16)? That is entirely up to you - if you really need to develop software only for a specific Android version, then, by all means download and install it using the SDK Manager. - Now we need to set up at least one AVD (Android Virtual Device) on which you can test your developed software. The AVD is an emulator which emulates the ARM processor. To set up the AVD we need to invoke the AVD Manager which is part of the SDK Manager. Click on 'Tools' (in the menu bar) and then click on the 'Manage AVDs...' item. You will see the screen as shown below.
 Android Virtual Device Manager screen
- Click on the 'New' button - a new window will pop-up (see below).
 AVD Manager selections
Give the new AVD a name - for example 'MyJellyBean'.
Under 'Device' select a suitable device - in the example, I have selected '7.0" WSVGA (Tablet) (1024 x 600: mdpi)'.
Under Target, select 'Android 4.2 - API Level 17'.
Leave the 'Keyboard:' and 'Skin:' selected.
Under 'Front Camera:', you can select 'None' (default) or 'Emulated'. If you have a webcam on your PC, this can also be used as the camera.
Change the 'Memory Options:' RAM to at least 768 if you have a minimum of 4GB of system RAM. This will make the AVD load a bit faster.
Leave the 'Memory Options: VM Heap:' as is.
Leave the 'Internal Storage:' as is.
Under 'SD card:' I entered 128 MiB which should be sufficient for testing.
To make the emulator perform even faster, enable GPU emulation by selecting the 'Use Host GPU' under 'Emulation Options'. You can also select 'Snapshot' if you wish.
The final screen will look like the one shown below. Then click on the 'OK' button. AVD Manager data
If there are no errors, you will see a screen like the one below. Press 'OK' - the AVD list will then show the new AVD - MyJellyBean in this case (see figure). AVD Manager results
 New AVD created
- To start the AVD, first select it on the list, then click the 'Start' button (see below).
 New AVD selected for starting
A 'Launch Options' window will pop-up (see below). You can set the display size and wipe the user data from here if you wish - then click on the 'Launch' button. You will then see a 'Starting Android Emulator' screen. AVD Launch Options
 Emulator start screen
While the emulator is starting (may take time depending on the RAM size set and the speed of your system CPU and GPU), a 'thank-you' window from Google may pop-up (see below) - if you wish you can agree to send usage statistic to Google - then click on 'Proceed' to dismiss the window. Google thank-you
The emulator loading screen with a flashing 'Android' sign will be displayed (shown below). Android loading screen
Once the emulator has finished loading, an initial screen will be displayed as shown below. Initial screen
Click on the 'OK' button and the main 'Home' screen will appear (see below). Home screen
- To test the emulator On/Off button, click the 'power' button on the right side (first row of buttons) to switch off and then click on it again to power on. The login screen will appear (see below) - slide (using the mouse) to unlock the device. The 'Home' screen will appear (see below).
 MyJellyBean powered off
 MyJellyBean powered on - login screen
 Slide to unlock
 Home screen
- You can play with the emulator at this stage - close the main window when done. Then close the 'Starting Android Emulator' screen. Close the Android SDK Manager window if you wish.
Note that at the moment, you have start a terminal. change to the android-sdk-linux/tools/ directory and execute the ./android command every time you wish to start the Android SDK Manager. If you had implemented my tip about setting the PATH environment to point to the android executable, then all you have to do is open a terminal and execute the android command. It does seem to be a bit kludgey but it works. Is there an easier way? There are various suggestions on the Internet, found by using Google. If you are using the Unity interface and wish to place the Android SDK Manager launcher in the dock, I suggest the method outlined in the followthegeeks.com website (http://followthegeeks.com/how-to-manually-create-application-launcher-in-ubuntu-12-04-unity/). To reiterate the instructions:
a) Open a terminal and execute:
sudo gedit /usr/share/applications/AndroidSDK.desktop
In the gedit editor window, copy and paste the following text:
[Desktop Entry]
Version=r21
Type=Application
Terminal=false
StartupNotify=true
Icon=/home/ridz1/Pictures/android-sdk-96.png
Name=Android SDK
Comment=Google Android SDK Manager
Exec=/home/ridz1/android-sdk-linux/tools/android
Categories=Application;Development;
Change the items necessary for your system - for example, the location of the android executable (mine is '/home/ridz1/android-sdk-linux/tools/android' - yours may be different. Also make sure that the location of the icon for the Android SDK is valid. Save and close gedit.
b) Now click on the Unity dash and enter 'android' in the search box. The Android SDK will be displayed - click on the icon to start the program. The program will run and the Android icon will appear as an item in the dock. Right-click on that item and select 'Lock to Launcher'. Viola! You now have a Unity dock with the Android SDK permanently present. The screen-shot below shows my Unity desktop in all it's glory. My Unity desktop
That's it - you now have a working Android SDK and you are now almost ready to start developing Android software on your Ubuntu 12.04. The next blog will describe installing Eclipse - a programming environment for developing Java programs - and with the help of several Google plugins for Eclipse - a programming environment for developing Android programs as well.
Sunday, December 9, 2012
Android SDK on Ubuntu 12.04 (Precise Pangolin)
In my previous blogs, I showed how to install various 'flavours' of Java on Ubuntu 12.04 - both 32 and 64 bits versions. Now I will show how to install and configure the Google Android SDK to be used together with Java for Android software development.




Thursday, July 26, 2012
Oracle Java on Ubuntu 12.04 (32 & 64 Bits)
Ubuntu Linux no longer distributes Oracle's
(formerly Sun) Java JDK and JRE. Ubuntu (and Linux Mint) officially
supports OpenJDK implementation of Java which is the base for Oracle's
own implementation. However, if you want to use Oracle's Java 6 and/or
7, you can download them from Oracle's website. This article shows you
how to install and configure both Java 6 and 7 alongside the OpenJDK
versions 6 and 7 previously installed. I will also show you how to
switch between the versions of Java installed.
Note that since Oracle Java is not officially part of Ubuntu, we cannot use the Synaptic Package Manager or Ubuntu Software Center to search for and install the necessary packages (i.e., it is not part of the repository). We have to resort to using the command line to carry out installation. This also means that notifications on new versions (or updates) are to be done manually by visiting Oracle's website once a while to check for new updates.
To download Oracle's Java, visit their website at:
http://www.oracle.com/technetwork/java/javase/downloads/index.html
Navigate the site and download the following files for 32-bit Ubuntu:
jdk-6u33-linux-i586.bin
jdk-6u30-apidocs.zip
jdk-6u33-linux-i586-demos.tar.gz
jdk-7u5-linux-i586.tar.gz
jdk-7u4-apidocs.zip
jdk-7u5-linux-i586-demos.tar.gz
For 64-bit Ubuntu, the following files need to be downloaded:
jdk-6u33-linux-x64.bin
jdk-6u30-apidocs.zip
jdk-6u33-linux-x64-demos.tar.gz
jdk-7u5-linux-x64.tar.gz
jdk-7u4-apidocs.zip
jdk-7u5-linux-x64-demos.tar.gz
These are the latest versions (as of July 2012) available on the website. Note that the Java 6 JDK files are supplied in bin format while the Java 7 JDK files are supplied in tar.gz format. This means that we have to use different methods for installing them.
To install both the JDK 6 and JDK 7, follow the steps below. Note that the steps are for the 32-bit version of Mint. Replace the 'i586' portion of the filename with 'x64' for the 64-bit version.

Note that since Oracle Java is not officially part of Ubuntu, we cannot use the Synaptic Package Manager or Ubuntu Software Center to search for and install the necessary packages (i.e., it is not part of the repository). We have to resort to using the command line to carry out installation. This also means that notifications on new versions (or updates) are to be done manually by visiting Oracle's website once a while to check for new updates.
To download Oracle's Java, visit their website at:
http://www.oracle.com/technetwork/java/javase/downloads/index.html
Navigate the site and download the following files for 32-bit Ubuntu:
jdk-6u33-linux-i586.bin
jdk-6u30-apidocs.zip
jdk-6u33-linux-i586-demos.tar.gz
jdk-7u5-linux-i586.tar.gz
jdk-7u4-apidocs.zip
jdk-7u5-linux-i586-demos.tar.gz
For 64-bit Ubuntu, the following files need to be downloaded:
jdk-6u33-linux-x64.bin
jdk-6u30-apidocs.zip
jdk-6u33-linux-x64-demos.tar.gz
jdk-7u5-linux-x64.tar.gz
jdk-7u4-apidocs.zip
jdk-7u5-linux-x64-demos.tar.gz
These are the latest versions (as of July 2012) available on the website. Note that the Java 6 JDK files are supplied in bin format while the Java 7 JDK files are supplied in tar.gz format. This means that we have to use different methods for installing them.
To install both the JDK 6 and JDK 7, follow the steps below. Note that the steps are for the 32-bit version of Mint. Replace the 'i586' portion of the filename with 'x64' for the 64-bit version.
- Open a terminal and change to the 'Downloads' directory:
cd Downloads/ - Make the JDK 6 bin file executable by executing:
chmod a+x jdk-6u33-linux-i586.bin - Execute the JDK 6 bin file:
./jdk-6u33-linux-i586.bin
This will create a 'jdk1.6.0_33' directory and all the files will be unzipped there. - Unzip the JDK 7 file by executing:
tar -xvf jdk-7u5-linux-i586.tar.gz
This will create a 'jdk1.7.0_05' directory and all the files will be unzipped there. - Unzip the JDK 6 and JDK 7 docs files by executing:
unzip jdk-6u30-apidocs.zip -d jdk1.6.0_33/
unzip jdk-7u4-apidocs.zip -d jdk1.7.0_05/ - Unzip the JDK 6 and JDK 7 demo & sample files:
tar -xvf jdk-6u33-linux-i586-demos.tar.gz
tar -xvf jdk-7u5-linux-i586-demos.tar.gz - Now move the JDK 6 and JDK 7 directories to /usr/lib/jvm - it's 'proper' place.
sudo mv jdk1.6.0_33 /usr/lib/jvm
sudo mv jdk1.7.0_05 /usr/lib/jvm - Now we need to tell the system that we have Oracle's JDK 6 and JDK 7
as alternatives to the OpenJDK. Of course, we can do this manually by
using the 'update-alternatives --install xxx' commands for each item,
but a far simpler method is to run a ready-made script to do this. The
script can be downloaded by executing:
wget http://webupd8.googlecode.com/files/update-java-0.5b
NOTE: If you cannot download it using wget as shown above (ERROR 404: not found), go to this website and click on the file to download it:
http://code.google.com/p/webupd8/downloads/detail?name=update-java-0.5b - Once the script file has been downloaded, execute:
chmod +x update-java-0.5b
sudo ./update-java-0.5b
A dialog box will pop-up showing all the possible candidates - first, select JDK 6 and press 'OK'. The script will run, and make all the necessary changes for you. Now run the script again - this time select JDK 7 and press 'OK'. That's it - you now have OpenJDK versions 6 and 7 as well as Oracle JDK6 and JDK7 as alternatives. To check which Java is set as 'default', run the 'galternatives' utility. The display will look like the figure shown below.

Sunday, July 22, 2012
OpenJDK on Ubuntu 12.04 (Precise Pangolin)
On a fresh install of Ubuntu 12.04, you might be surprised to find out that there is no Java installed as part of a standard installation! This can be easily verified by executing the following command in a terminal:
You should see the following response:
The program 'java' can be found in the following packages:
* default-jre
* gcj-4.6-jre-headless
* openjdk-6-jre-headless
* gcj-4.5-jre-headless
* openjdk-7-jre-headless
Try: sudo apt-get install
Running update-alternatives on Java also results in the message:
update-alternatives: error: no alternatives for java.
You can also confirm this using the Synaptic Package Manager - which is NOT installed by default on Ubuntu 12.04. Install this package by running:
sudo apt-get install synaptic
The following is a screen-shot of the result of an 'openjdk' search.

Since the purpose of this article is to get Java working on Ubuntu 12.04, we need to get all 'flavors' of Java installed - starting with OpenJDK. Follow the steps outlined below to start installing.
(NOTE: The procedure below is for the 32-bit version of Ubuntu 12.04, but they also applies to the 64-bit version - just replace the 'i386' part, whenever they occur, with 'x64' for the 64-bit version.)
That's it, you can now choose freely and easily between versions of OpenJDK Java. Enjoy!
java -version
You should see the following response:
The program 'java' can be found in the following packages:
* default-jre
* gcj-4.6-jre-headless
* openjdk-6-jre-headless
* gcj-4.5-jre-headless
* openjdk-7-jre-headless
Try: sudo apt-get install
Running update-alternatives on Java also results in the message:
update-alternatives: error: no alternatives for java.
You can also confirm this using the Synaptic Package Manager - which is NOT installed by default on Ubuntu 12.04. Install this package by running:
sudo apt-get install synaptic
The following is a screen-shot of the result of an 'openjdk' search.

(NOTE: The procedure below is for the 32-bit version of Ubuntu 12.04, but they also applies to the 64-bit version - just replace the 'i386' part, whenever they occur, with 'x64' for the 64-bit version.)
- Start Synaptic and mark the following packages for installation:
openjdk-6-jdk
openjdk-6-doc
openjdk-6-demo
openjdk-6-dbg
openjdk-7-jdk
openjdk-7-doc
openjdk-7-demo
openjdk-7-dbg
Press the 'Apply' button and wait for the download and install process to finish. - Use the update-alternatives command again to see which OpenJDK is set as the 'default' Java - you should see:

It's clear from the screen that OpenJDK 6 is the 'default' Java and you could use the 'java -version' command to verify this - the output should show:
java version "1.6.0_24"
OpenJDK Runtime Environment (IcedTea6 1.11.3)
(6b24-1.11.3-1ubuntu0.12.04.1)
OpenJDK Server VM (build 20.0-b12, mixed mode) - To switch between the OpenJDK versions (6 or 7), you can either use the command line 'update-alternatives' utility or the graphical front-end for the same command - 'galternatives'. To use 'galternatives', you need, of course, to install it first by executing:
sudo apt-get install galternatives
Alternatively, you could use the Synaptic Package Manager to install this. Once installed, open the dash (if you are using Unity) or the menu (if you are using gnome-shell) and locate the 'Alternative Configurator' utility. Start it, enter your password (the utility requires root privileges), and you should see the following screen:
Scroll down the left-hand pane until you see the 'java' entry (see figure below) - note that OpenJDK 6 is set as the default. You can use the galternatives utility to change OpenJDK versions by clicking on the radio-button under the 'Choice' column. You should also remember to change the other Java related items (those that starts with the letter 'j') whenever you change versions.
- A faster way to switch between OpenJDK versions at one go, is to use the 'update-java-0.5b' utility. This utility can be downloaded by executing:
wget http://webupd8.googlecode.com/files/update-java-0.5b
Once the script file has been downloaded, execute:
cd Downloads
chmod +x update-java-0.5b
sudo ./update-java-0.5b
You should see a dialog box (as shown) pop-up:
Note that the entry '/usr/lib/jvm/java-1.6.0-openjdk-i386' and '/usr/lib/jvm/java-1.7.0-openjdk-i386' are links to the actual directories 'usr/lib/jvm/java-6-openjdk-i386' and 'usr/lib/jvm/java-7-openjdk-i386' respectively - so it really does not matter which one you select - they mean the same thing. Do not select the 'usr/lib/jvm/java-6-openjdk-common' or the 'usr/lib/jvm/java-7-openjdk-common' entries. First select the 'usr/lib/jvm/java-7-openjdk-i386' entry and click 'OK'. The utility will make all necessary changes for you at one go. To verify run 'galternatives' again and you should see:
You can verify that the 'update-java' utility has made other changes by selecting the Java related items on the left-hand pane and seeing the result in the right-hand pane.
Now run the sudo 'update-java-0.5b' utility again - this time select the 'usr/lib/jvm/java-6-openjdk-i386' entry and click 'OK'. Again, the utility will make all necessary changes for you at one go. To verify run 'galternatives' and you should see:


That's it, you can now choose freely and easily between versions of OpenJDK Java. Enjoy!
Wednesday, July 18, 2012
Eclipse+Android on Linux Mint 13 (Maya)
So far, my previous blogs on Linux Mint 13 has described how to install Java and the Android SDK. If you have followed the blogs, you will now be ready for the next step towards Android software development and that is to install a Java programming environment called Eclipse. Of course, first we have to install this (if it has not been installed yet). The install process is very simple - you can use either Synaptic or the command line to carry out this job.
That's it - you are now ready to start developing Android software on your Linux Mint 13. My next blog will show you a simple 'Hello, World' project, a few sample projects and will also describe some of the resources you can use to start program development on Android.
- To use Synaptic, start Synaptic, enter your password, then type 'eclipse' into the search box. The entry for Eclipse will appear - mark it for installation, and the rest of the additional items, and then click on the 'Apply' button. Wait for download and install process to finish, close Synaptic and you are done!
To use the command line, start a terminal, and type:
sudo apt-get install eclipse
Type 'Enter' when prompted, wait for the packages to be downloaded and installed, close the terminal and you are done! - Before you start Eclipse, you need to determine whether the necessary SWT (Standard Widget Toolkit) libraries link are set properly - else Eclipse will complain that it cannot start because it cannot find the swt library. Check the following location in you home directory for 32-bit Linux Mint by typing the following command in a terminal:
ls ~/.swt/lib/linux/x86/
For a 64-bit Linux Mint, the command is:
ls ~/.swt/lib/linux/x86_64/
If you see a message like that shown below, then the swt directory does not exist.
ls: cannot access /home//.swt/lib/linux/x86/: No such file or directory
To create the swt directory on a 32-bit Mint, execute:
mkdir -p ~/.swt/lib/linux/x86/
To create the directory on a 64-bit Mint, execute:
mkdir -p ~/.swt/lib/linux/x86_64/
On the other hand, if the swt directory exist, but nothing is listed (ie, no file links in that directory), then the necessary links are not set. if this is so, execute the following command:
For 32-bit Mint:
ln -s /usr/lib/jni/libswt-* ~/.swt/lib/linux/x86/
For 64-bit Mint:
ln -s /usr/lib/jni/libswt-* ~/.swt/lib/linux/x86_64/
Verify that the file links are set using the ls command again - if set, you should see the following file links:
libswt-atk-gtk-3740.so libswt-cairo-gtk-3740.so
libswt-gnome-gtk-3740.so libswt-pi-gtk-3740.so
libswt-awt-gtk-3740.so libswt-glx-gtk-3740.so
libswt-gtk-3740.so libswt-webkit-gtk-3740.so - Start Eclipse, then answer the prompt (see below) to set a workspace - I use '/home/<username>/Projects/Android (where username is your login name) but you can place it anywhere you like or accept the default of /home/<username>/workspace - then click OK.

Eclipse will start loading and you will then see a screen like the one shown below.
Click on 'Workbench' (near top right corner of the screen) and the main workbench screen will appear (see below).
- Click on Help (on the top menu bar), then on select 'Install New Software'. A new window called 'Available Software' will pop-up (see below) - click the ‘Add’ button at the top of the window. An “Add Repository” window will pop up. Pick a name, (I chose ‘ADT Plugin’ - ADT stands for Android Development Tools), then enter the following URL in the ‘Location’ box and click OK.
https://dl-ssl.google.com/android/eclipse/
NOTE: If you have trouble acquiring the plugin, try using "http" in the URL, instead of "https". For security reasons, https is preferred.

The window will close and a 'Pending' message will appear on the Available Software window - this indicates that the software is checking the URL for the plug-ins. When this is complete, you will see the 2 items listed (see below).
Select the checkbox next to Developer Tools and click Next. In the next window, you'll see a list of the tools to be downloaded (see below) - click Next. Read and accept the license agreements (see below), then click Finish. The plug-ins will be downloaded and installed.

NOTE: Click OK if you get a security warning saying that the authenticity or validity of the software can't be established.
At the end of this process, you will be prompted to restart Eclipse - do so. When you arrive at the main workbench, you will see a window (see below) welcoming you to Android development - here you will have to configure the Android SDK.
Since we have already downloaded and installed the Android SDK (see my previous blog), all we need to do here is specify the location of the SDK which happens to be '/home/<username>/android-sdk-linux'. Then click 'Next' - the next screen (see below) will ask you whether you want to contribute to Google's usage statistics - select 'Yes' or 'No' and then press 'Finish'


That's it - you are now ready to start developing Android software on your Linux Mint 13. My next blog will show you a simple 'Hello, World' project, a few sample projects and will also describe some of the resources you can use to start program development on Android.
Sunday, July 15, 2012
Android SDK on Linux Mint 13 (Maya)
In my previous blogs, I showed how to install various 'flavors' of Java on Linux Mint 13 - both 32 and 64 bits versions. Now I will show how to install and configure the Google Android SDK to be used together with Java, for Android software development.
- First head over to:
http://developer.android.com/sdk/index.html
and download the latest (as of July 2012) file:
android-sdk_r20-linux.tgz
IMPORTANT NOTE:
If you are using 64-bit Linux Mint 13 you MUST download and install the 'ia32-libs' package since the Android SDK is a 32-bit application and requires the 32 bit library to operate properly. To download and install, open a terminal and execute:
sudo apt-get install ia32-libs - Start a terminal and unzip the downloaded file:
tar xvf ~/Downloads/android-sdk_r20-linux.tgz
This will create a new directory 'android-sdk-linux' in your home directory containing all the unzipped files. Why the home directory? The simple answer is 'to avoid file permission problems'. Note that by installing the SDK in the home directory, only the current user can access it - so security is guaranteed.
If, however, you want the SDK to be accessed by other users, then you may have to install it somewhere else - perhaps the /opt directory. This article will not describe how to do that - it just assumes that the current user is the only one that can access the SDK. - Change directory and execute the android SDK:
cd android-sdk-linux/tools
./android
TIP: You can set the PATH environment to point to your Android SDK tools directory so that you can start the 'android' program anywhere. Edit the .profile file in your home directory and add the following lines to the end of the file:
# set PATH so it includes user's Android SDK if it exists
if [ -d "$HOME/android-sdk-linux" ] ; then
PATH="$HOME/android-sdk-linux:$HOME/android-sdk-linux/tools:$PATH"
fi
This will only take effect on the next logout/login or restart.
The SDK Manager will start as shown in the screenshot below.
Notice the progress bar at the bottom of the screen - this indicates that the SDK Manager is querying for updates from Google. Wait this is finished - you will then notice that it automatically selects a set of recommended packages. However it seems to have missed the 'Android SDK Platform-tools' which, according to Google, is required when you install the SDK for the first time. So place a check mark on that item by clicking in the check-box. Also de-select the item 'Google APIs' since this can only be downloaded and installed AFTER all the rest of the marked item has been installed. The final screen will look like the one shown below.
- Click on the 'Install 6 packages' button - a window will pop up (shown below) listing all the packages to be installed. Notice that the 'Accept' radio button is selected - so just press the 'Install' button to start the process of downloading and installing the packages. The progress bar at the bottom indicates the status of this process. Also a log screen may appear if there are problems during install - ignore the 'Stopping ADB server failed (code -1)' message if it appears on the log - this seems to be harmless.
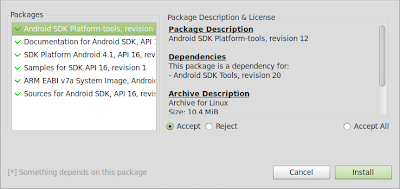
When install is complete, close the log windows (if open) and then place a tick mark on the 'Google APIs' item and press the 'Install 1 package' button. When the package list appears, press 'Accept', then the 'Install' button, and then wait until this package is installed. That's it - you have installed the recommended (and latest) Android packages necessary for software development. As of July 2012 this is Android 4.1(API 16) - codenamed Jelly Baby. Is it necessary to install all the other packages (API 3 to 15)? This is entirely up to you - if you really need to develop software only for an Android version, then, by all means download and install it using the SDK Manager. - Now we need to set up at least one AVD (Android Virtual Device) on which you can test your developed software. The AVD is an emulator which emulates the ARM processor. To set up the AVD we need to invoke the AVD Manager which is part of the SDK Manager. Click on 'Tools' (in the menu bar) and then click on the 'Manage AVDs...' item. You will the screen as shown below.

- Click on the 'New' button - a new window will pop-up (see below). Give the new AVD a name - for example 'MyJellyBaby'. Select 'Android 4.1 - API Level 16' as the target for the AVD.
Then enter the size of the SD card - I use 128 MiB which should be sufficient for testing. Leave the rest at default except for the 'Device ram size' under hardware. To make the AVD load a bit faster and if you have at least 4GB of system RAM, change the size to 768 by clicking on the default '512' and changing it to 768.
Next to make the emulator perform even faster, enable GPU emulation by clicking the 'New...' button and then click on the double arrow on the 'Property:' button and select 'GPU emulation' from the list. Then click on the value item and change it to 'yes'.
The final screen will look like the one shown below. Then click on the 'Create AVD' button.If there are no errors, you will see a screen like the one below. Press 'OK' - the AVD list will then show the new AVD - MyJellyBaby in this case (see figure).


- To start the AVD, first select it on the list, then click the 'Start' button - a window will pop-up (see below). You can set the display size and wipe the user data from here if you wish - then click on the 'Launch' button. You will see a 'Starting Android Emulator' screen (see below) and then the emulator will start loading as shown. Note the 'flashing' Android sign while the emulator is loading.


- While the emulator is loading (may take time depending on the RAM size set and the speed of your system CPU and GPU), a 'thank-you' windows from Google will pop-up (see below) - if you wish you can agree to send usage statistic to Google - then click on 'Proceed' to dismiss the window.

After a while the Android 4.1 'JellyBaby' emulator will appear (see below). The emulator's screen is blank except for 3 notifications on the top right-hand screen. To 'start' the emulator for the first time, click the 'power' button on the right side (above the keyboard) to switch off and then click on it again to power on. The login screen will appear (see below) - slide (using the mouse) to unlock the device. The 'Home' help screen will appear (see below) - click on 'OK' on the help screen and the actual Home screen will be shown (see below).


- You can play with the emulator at this stage - close the main window when done. Then close the 'Starting Android Emulator' screen. To dismiss the AVD list, press the 'Esc' key and you will be beck at the Android SDK Manager window. Close it if you wish.


Subscribe to:
Posts (Atom)