Requirements:
- A free cloning software utility - SuperDuper!
- A free EFI mounter - EFI Mounter v3
- An uninitialized disk of the same size (or greater) than the Mac's
Steps:
- If you had an uninitialized target disk (to be used for the cloned image), then the first screen you would see after switch-on and log-in is a prompt to initialized it (see below).
- Click on the 'Initialize...' button. A screen similar to the one below will appear. This is the same screen as the 'Disk Utility'.
- Move the cursor (or pointer) to the disk you want to use for cloning (the target disk).
- Click on the 'Erase' button and enter the information as follows:
- Enter the name of the target disk. Note that the name is the same as the name of the source disk on the Mac or Hackintosh - you DO want to clone the disk!
- Then click on the 'down arrow' of the 'Format' item and select 'APFS' from the drop-down list. There are other options for APFS - if needed, choose one.
- Then click on the 'down arrow' of the 'Scheme' item and select 'GUID Partition Map' from the drop-down list. Do NOT select other items here.
- The final screen will look like the one below:
- Click on the 'Erase' button. After 'Disk Utility' has finished, the screen will look similar to that shown below. Close 'Disk Utility'.
- Click on 'Finder', and then on Applications. Locate SuperDuper and double-click on it to launch the application (see below).
- Note that SuperDuper will fill in the source disk on the LEFT-hand portion of the screen. Click on the RIGHT-hand down-arrow and select the target disk (which has the same name as the source!). The final screen will look similar to that shown below.
- Make sure that the 'Backup - all files' is shown as in the previous figure, and click on the 'Copy Now' button. Enter your password and click the 'OK' button. You need to confirm your actions by clicking on the 'Copy' button (see below).
- The screen will change as shown below - the copy process will start.
- Wait for the process to finish. A successful copy will be indicated as shown below. Close SuperDuper!.
NOTE: The are two SSD disks in the Mac - the source and the target disks. If you want to know which is which, all you need to do is click on the 'Apple' icon, then 'About This Mac'. The 'macOS High Sierra' window will open - then click on 'System Report...'. On the next window that appears, click on 'SATA/SATA Express' and the information will be displayed on the right.
- Click on 'Finder', and then on Applications. Locate 'EFI Mounter v3' and double click on it to launch the application. Then enter your password when prompted.
- Click on the source disk and click on the 'OK' button (see below). If you don't know which disk is the source, just select any disk - the source disk will have the 'EFI' folder present on it. If you made a mistake in disk selection, remember to unmount that disk first.
- Click on the 'Mount' button (see below) and you will see the contents of the EFI folder for the source disk on your desktop. Note that the source disk will have the 'EFI' folder present (see below).
- Copy the EFI folder to your desktop by dragging it or by using the 'Copy "EFI"' command (see below).
- Double click 'EFI Mounter v3' to launch the application again. Then enter your password when prompted. Click on the source disk and click on the 'OK' button. Click on the 'Unmount' button and you will see the EFI folder icon disappear from your desktop.
- Double click on the 'EFI Mounter v3' to launch it again and enter your password when prompted. Click on the target disk and click on the 'OK' button. Click on the 'Mount' button. Note that the target disk do not have the 'EFI' folder present (see below).
- Now drag the EFI folder from the desktop to the target disk. This will copy the folder to the target disk.
- Delete the EFI folder from the desktop. Double click the 'EFI Mounter v3' again and enter your password when prompted. Click on the target disk and click on the 'OK' button. Click on the 'Unmount' button and you will see the EFI folder disappear from your desktop. Close all Finder window.
- Shut down the Mac and remove the source (original) disk and install the target (cloned) disk in the Mac. Power up the Mac and you will see the result of your work - a perfect clone.
You may have to log-in to Dropbox if you use that application - you can safely this warning if you don't use Dropbox.
This article is an updated 'how-to' for installing Google's Android Studio on a 64-Bit Debian Linux PC. If you wish to develop software on the Android platform on your PC, then this 'how-to' is for you. Note that the version numbers are deliberately left out (unless mentioned) for Debian Linux and Android Studio. This means that this 'how-to' can apply to (almost) any version - unless a specific change has occurred.
There has been a lot of news lately about Google and the future of Android (search the Web for this term to read all the news). First 'fragmentation' then 'updates' and 'Google vs Oracle court case', and 'beyond Linux' and so on. Should you be worried? I suggest that you concentrate on program development for Android and let the chips fall where ever they may. Google is too big to fail - that said, it may take a very long while for it to so. So, for the time being, Android program development is the way to go. Enough of the political bit, and let us concentrate on Android et al.
Note that most necessary steps for Android programming are performed at the command line in a terminal - if you are not familiar with this, I suggest reading about it first before trying out this 'how-to'.
Before we start off on our journey, I will assume that you have installed the latest version of Debian - currently at version 9.4.0 and updated it.
Also, note that I will assume that you have installed the proper propriety video drivers for your PC. The URL for this process is here for Nvidia cards and here for AMD/ATI cards. This is the only way for OpenGL ES (or GLES) to be installed for the PC. OpenGL ES is required by Android to make 2D/3D graphic processing faster through Hardware Acceleration. Note that this 'how-to' is based on a Nvidia video card equipped PC, with the propriety video driver installed.
This 'how-to' was tested on the following hardware and found to be working:
- Gigabyte GA-Z79-HD3 Motherboard
- Intel Core i5-4590 CPU (3.3 GHz)
- Kingston 16Gb DDR3 HyperX RAM
- Nvidia GTX 750Ti PCI-E Graphics Card
You have also set up the PC to give 'sudo' access to the main user. If you have decided NOT to give users 'sudo' access because of security reason, then make sure that you execute 'su -' command for all commands as described from now on - especially before those that have the 'sudo' commands in them. Alternatively, use a root terminal to execute the commands in this 'how-to' - do not enter the 'sudo' command in this case - although it will not harm the PC if you did.
Please note that OpenJDK 8 is now officially supplied with Android Studio and there is no need to install Oracle's Java JDK on the development PC. If you are new to Java, then I suggest you download and install the OpenJDK 8 JDK and a Java IDE (e.g. IntelliJ, Eclipse, Geany, etc) through Synaptic Packet Manager. Installed this way, note that the Synaptic-installed OpenJDK is independent of Android Studio. Also note that any available updates to OpenJDK are automatically applied through Synaptic, while updates to Android Studio (and it's OpenJDK) will be separate.
STEP 1: Install Google's Android Studio
Before you do anything else you need to remember that you are using the 64-bit version of Debian Linux, so it is important to note that Android Studio requires some 32-bit libraries in order to run properly. You must install the necessary packages by executing the following command in a terminal:
apt install lib32z1 lib32ncurses5 lib32stdc++6 lib32gcc1 lib32tinfo5 libc6-i386
Note that, if you fail to install these packages, you will not be able to use Android Studio without running into errors.
Now it's time to download and install Google's Android Studio. Point your web browser to here, and click on the big green button as indicated by the red arrow to start the download (see figure below).
Then place a check mark accepting the terms and conditions of Android Studio and then click the download button as indicated by the red arrow. Save the file and wait for the download to finish.
NOTE: The downloaded file is named 'android-studio-ide-173.4670197-linux.zip' and is the currently the latest version of Android Studio (as of April 2018). The version number shown may be higher than this as Google is constantly updating it. As usual, it is highly recommended that you use the latest version.
Meanwhile, the installation instruction for Android Studio will appear on the web page (see below). Note that the instructions are for Ubuntu Linux and can be safely ignored since you are using Debian Linux.
NOTE: On the same web page (you may have to scroll down a bit), under 'Start building apps', you will find an icon labeled 'Build your first app'. You can click on the blue-colored 'Building Your First App' link (see figure below)) and bookmark that web page for continuation of this 'how-to'.
To install Android Studio, first, start a terminal and then navigate to the Downloads folder. Then execute the following command:
unzip Downloads/android-studio-ide-173.4670197-linux.zip
The command, as shown above, will decompress the contents of the zip file into a new directory called 'android-studio' in your home directory. You are free to install it to another directory by first changing to that directory, use the 'unzip' command, and give the full path of the zip file. If you want other users to access Android Studio, then the /opt directory is suggested.
Assuming that you have installed Android Studio in your home directory, you can start it by executing the following commands on the terminal, one by one:
cd android-studio/bin
./studio.sh
A window similar to the one shown below will appear asking whether you would like to import any settings. If this is the first time you are using Android Studio, it will be likely that you don't have anything to import. Of course, if you had installed Android Studio on Eclipse previously and wish to preserve the settings that were done on Eclipse, feel free to import the previous settings by following the on-screen instructions.
Click on the 'OK' button to proceed. Android Studio will begin loading as shown in the figure below.
After a while, the 'Welcome' window similar to the one shown below, will appear. Then click on the 'Next' button to continue.
The next window ('Install Type') similar to the one shown below will appear. The Standard type of setup is already selected - this is recommended unless you want to customize the setup. Click on the 'Next' button and the next window will appear.
The next window (see below) is the "Select UI Theme' where you can select the type of User Interface (UI) for Android Studio. For this 'how-to' the IntelliJ UI was selected - but you are free to choose any UI which please your eyes.
The next window (see below) is the 'Verify Settings' window where you will find settings like the setup type, the destination folder, and the Software Development Kit (SDK) components to be downloaded next, plus the total size of the downloads. Click on the 'Next' button and the next window will appear.
If you have Intel's Virtualization Technology enabled in your PC firmware (aka BIOS) and Linux kernel, then it will be detected as shown on the wizard's window. You can read up more on this technology at the URL shown on the window. Then click on the 'Finish' button.
The SDK components mentioned in the 'Verify Settings' window will begin downloading as shown below. You can see what downloaded items are by clicking on the 'Show Details' button. If there are any download errors (for example, the Internet connection may drop off), you will be given a chance to retry.
Wait for the download and installation of the SDK components to finish. Once downloading and installation is completed, and you see the 'Android SDK is up to date' message on the last line, click on the 'Finish' button.
The next window shown is the Android Studio Welcome Screen itself (shown below). You have now successfully installed Android Studio Version on your Debian Linux PC.
There are a number of items on the Welcome Screen - some of which you will use very often and some not. There are items which allow you to manipulate an Android project file - from starting a new project, opening an existing project, using Version Control on a project, managing APK files, and importing a project file and Android code sample. There are 2 other items found on the initial IDE - one is for configuring the IDE and the other one is for seeking help. For this 'how-to', only the first item in the list, 'Start a new Android Studio project', and the 'Configure' item will be used. For an explanation of the rest of the items, either use the 'Get Help' item or use the Internet.
NOTE: The latest version of Android Studio has a new look which differs from the previous versions. One of the major differences is the way Android Studio handle updates - if there are any, the last line on the IDE window will contain an additional item - the 'Events' item with a red balloon to the left. Updating will be covered in detail in a later section.
You can now pause and admire your handiwork, then close Android Studio by clicking on the 'x' on the top right-hand corner of the window. Ignore any warnings on the terminal and then close it.
Remember that, at the moment, you have to start a terminal, change to the correct bin directory and then launch 'studio.sh' in order to start Android Studio. Surely there must be an easier way and there is! To place a launcher icon on your desktop, follow the steps outlined below:
- Right-click on an empty portion of your desktop and select 'Create a new launcher here...'
- A window similar to the one shown below will appear. You can now enter a name for the item - 'Android Studio' seems appropriate here. Then for the command, click on the Browse button and select the 'studio.sh' file in your Home > android-studio > bin directory. In the comment field, enter any text you like - 'Google's Programming IDE for Android' seems appropriate here. Leave the 'Launch in Terminal?' field unchecked.
- For the icon, click on the placeholder icon, and navigate to your home directory, double-click on 'android-studio' and 'bin' directories and then select the 'studio.png' file (see figure below). Then click 'OK' to dismiss the 'Launcher Properties' window. A window may pop up asking you whether you want to create a menu item for Android Studio also (see below). Should you say 'Yes', that item will be placed in the 'Other' category.
You can test the launcher on your desktop by double-clicking on it - Android Studio should start up. Then close Android Studio again.
If you had created a menu item, you can also place an Android Studio icon in you Debian panel. Click on the 'Menu' and then locate the Android Studio item under the 'Other' category in the menu. Right-click on this item and then select the 'Add to panel' item. The Android Studio icon will appear in the panel (see below) - single click on this icon to start Android Studio.
If you want to launch Android Studio from anywhere using 'studio.sh' on a command line, it is recommended that the system-wide path include the 'android-studio/bin'. To do this, execute the command:
nano /etc/bash.bashrc
In the 'bash.bashrc' file make sure to include the 'android-studio/bin' in the PATH - for example:
export PATH=$PATH:$HOME/android-studio/bin
Save the file and close nano. To make sure that this new path takes effect, log out and then log in again. Now you can launch 'studio.sh' in a terminal from any directory.
STEP 2: Configure SDK Manager
Launch Android Studio again if you have not already done so. Notice the 'Configure' on the last line of the window - click on it and then click on the 'SDK Manager' item (see below).
The 'Default Settings' window similar to the one shown below will appear.
Note that the 'Android SDK' item is automatically selected in the left pane of this window. Other items are listed in the left pane and are available for you to use, but for the time being, keep the selection on the 'Android SDK' only in the left pane.
The column to note is the 'Status' column at the right-hand side of the window - it is where the window indicates whether the package has been installed or any updates are available for any package. For the purpose of this 'how-to', a 'package' can include other packages - but this window will only show the 'main' package.
The location of the 'Android SDK' is clearly stated at the top of this window, and you can change its location if you wish - but for the purpose of this 'how-to', keep it as it is.
Note also that the tabs below the SDK location are preselected for the 'SDK Platform'. To change tab, all you need to do is to click that tab - for example, click on the 'SDK Tools' tab, and you will see the contents of that tab (see below).
NOTE: There are lots and lots of SDK tools listed here. Only those tools that are essential to initially build a project have been installed. You are free to install any other extra tools as you so wish.
If you see any items with a minus sign instead of a check mark and you see the text 'Update Available: xx.x' (where x can be any number), then it indicate there are updates available for that item.
NOTE: From now on, I suggest that you check if there are any updates by using the Events red balloon or the SDK manager. This should be done every time you start Android Studio.
If you click on the 'SDK Update Sites' tab, you will see URL's for the sites (see below) - do not change anything on this window at this time.
Now click the 'SDK Platform' tab again - keep it at that tab for the moment. Note the 'Show Package Details' box at the bottom of the window - at the moment it is not selected (i.e., no check mark has been placed there). Click on the box to select it - the display will change as shown below.
This display window will show more details on the packages installed so far - including their API level, its revision number and as mentioned previously, it's status. Note that it even includes packages for the new Android P. If you want to try this preview, select the item for downloading as described below.
NOTE: If you decide to use the latest Android P do so as the latest Android version is backward compatible.
Based on your requirements, you may decide to install more packages. For example, the author has a Google/LG Nexus 5X smart phone running on Android 8.1 (Oreo) - so it was decided to install the additional packages (plus the Android P) as shown by selecting the box next to its names. Note the 'Download' icons that appear as soon as you select the boxes for the items (see below).
You are free to select any packages to download and install, depending on the actual Android devices that you possess. Just select them (you have to scroll down the display for more packages).
Then click on the 'Apply' button. The 'Confirm Change' window will appear (see below). Then click the 'OK' button.
The 'License Agreement' window will appear next (see below). Click on 'Accept', followed by a click on the 'Next' button. Note that if you have multiple items such as the one shown, don't forget to click on the 'Accept' button as many times as required.
The 'Component Installer' window will appear next (see below) and download of the components will start.
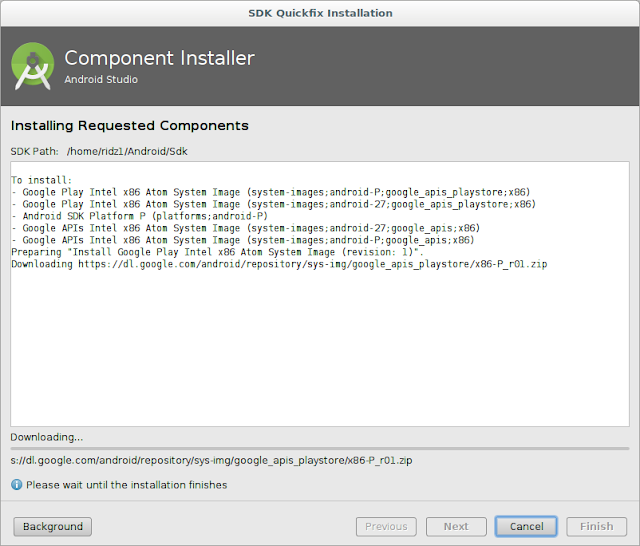
NOTE: If you deal with Android TV and/or Android Wear, make sure that you download these items.
The ARM system image more closely matches most Android devices using these processors, but requires the processor to be emulated and is thus very slow. The Intel x86 Atom system image is potentially quite a bit faster, using the Linux's KVM support mechanisms to execute the code in a partially native way. You can try the x86 for speed, and fall back to the ARM if you have compatibility problems.
Support for Google specific Android APIs like the Android Google maps API, are not provided with the standard Android system images. They need to be installed separately using the SDK manager. To use these APIs with an x86 system image you need to also install the Google APIs (x86 System Image) for the same API level.
The difference between a 32-bit and a 64-bit processor is self-evident and can be found easily on the Internet. Examples can be found here or here.
Wait for the download to finish (it may take some time to complete), then click the 'Finish' button (see below).
You will be back at the 'Default Settings' window of the Android SDK (see below). Inspect the packages that were downloaded and installed to make sure that they are correct. If any errors are found - such as downloading errors - then try again. Once this is successful then click the 'OK' button.
You will be back at the welcome screen of Android Studio (see below). Close Android Studio by clicking on the 'x' on the top right hand of this window.
STEP 3: Create a New Project Using Android Studio
Now that you have successfully installed Google's Android Studio and configured it, it's time to use it to develop software for the Android platform. We start off by using Android Studio to write a short and simple 'Hello, world' program, which you can run either on your Android Virtual Devices (AVD), or your actual Android device.
Launch Android Studio if it is closed, then start a new project by clicking on the 'Start a new Android Studio project' item from the welcome screen (see below).
The 'New Project' window as shown below will appear - fill in the details for the 'Application name' to 'Hello World', and 'Company Domain' to 'any.company.com' as shown. The directory in which this project reside can be anywhere on your PC. In the example shown, I have placed the project in my home folder's 'Projects' directory but you are free to use any directory you wish. Then click on the 'Next' button.
NOTE: You can change the package name by clicking on the 'Edit' button on this window - but I suggest that you keep this package name - at least for this 'how-to'. Likewise, you can also enable C++ and Kotlin (search the Internet if you are not familiar with this) support by enabling the appropriate boxes - but for this 'how-to', leave them off.
The 'Target Android Devices' window will appear next (see below). Make sure that the 'Phone and Tablet' item is selected. The 'Minimum SDK' is pre-selected to be 'API 15: Android 4.0.3 (IceCreamSandwich)' and the reason why is as stated in the note below this field. If you are unsure on which minimum SDK to select, you can click on the 'Help me choose' item. For this tutorial, leave it at the preselected minimum SDK. Then click on the 'Next' button.
NOTE: If you are developing any projects for Android Wear and/or TV, then select the appropriate buttons. The Android Auto item enables you to add support for it to your existing application. It will enable your app to work on both car and phone screens. Android Auto handles most of the work to adjust each application's user interface to the screen on which it is displayed. Note that to enable your app for Wear/TV, your app must target Android 5.0 (API level 21) or higher. Likewise, for Android Things, your app must target Android 7.0 (API level 24) or higher.
The 'Add an activity to Mobile' window will appear next (see below). Select the 'Empty Activity' item if it is not preselected. Then click on the 'Next' button.
NOTE: There are lots of activities to choose from - you can scroll through the available ones and pick one to suit your app. According to Google, activities are one of the fundamental building blocks of applications on the Android Studio platform. They also serve as the entry point for your interaction with an application and are also central to how a user navigates within an application or between applications. For further reading, go here.
The 'Configure Activity' window will appear next (see below). Change the 'Activity Name' to MyActivity and the rest of the items below will change as shown. Then click on the 'Next' button.
NOTE: There are two other radio boxes that you can use - one is labeled 'Generate Layout File' and the other is labeled 'Backwards Compatibility (AppCompat)'. The 'Generate Layout File' allows you to generate an XML file for the activity, while 'Backwards Compatibility (AppCompat)' is letting you know that if you uncheck it, then you'll be including and using the library Activity instead of AppCompatActivity. At the moment, both of these are enabled (i.e., they both have check marks). Leave them enabled for the time being. Use Google to search for more information on these items.
The 'Component Installer' window (see below) may appear next and this is where Android Studio checks for any components that may be required to be downloaded and installed. Once that is done, click on the 'Finish' button.
Android Studio (the 'Gradle' part anyway) will then start building the project as shown below. Note that your project is a basic 'Hello world' app that contains some default lines so you do not have to enter those lines into the project. Later you can view the Java source code for this 'Hello world' project in the Android Studio IDE.
After the system has finished loading, a window similar to the one shown below will appear.
If a 'Tip of the Day' window appears (shown below), you can safely close it by clicking on the 'Close' button. You can, if you wish to, also clear the box labeled 'Show Tips on Startup' to disable this feature.
NOTE: For those users who are new to Android Studio (and the IntelliJ) user interface, the various buttons, menu items, tabs, etc, poses a very big challenge - for example, what are the purpose of the various buttons? Do not despair as the Android Studio User Manual is available online here. They will help you to familiarize yourself with the various parts of the IDE. For those who are interested, a guided tour around the IntelliJ IDE user interface (on which the Android Studio is based) is also available here. Take some time to familiarize yourself with the functions of the various components of the IDE. For those of you who are familiar with a programming IDE, you can safely disregard this note and proceed with the 'how-to'.
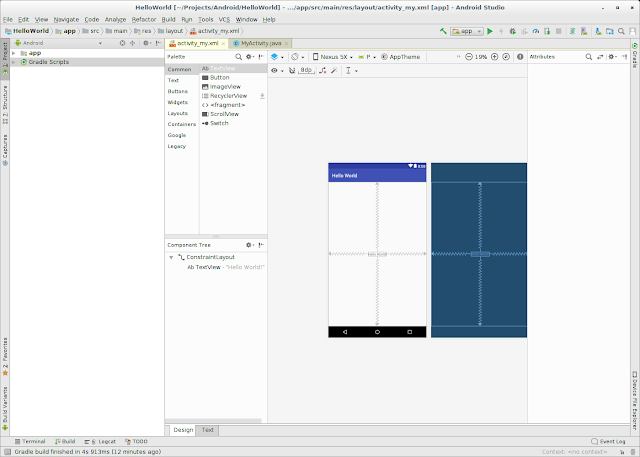
After a while, the project window will appear (see below). Note that this window shows the source for the package 'MyActivity' Java class.
Click on the 'activity_my.xml' tab and the screen as shown below will appear. Note that it does contain a graphic of a Nexus 4 device with the 'Hello World!' text on it. This, however, is NOT the output of the project.
If any error occurs during the project build, Android Studio will display the error message and will offer a 'Tip' to try out ways of solving it.
Notice that the graphics shown is a Nexus 4 device. If this is acceptable to you, then don't change anything. However, since the author has a Nexus 5X device, it was decided to change the graphics to show such a device. This can be achieved by simply clicking on the downward pointing arrow beside 'Nexus 4', and then selecting 'Nexus 5X' from the drop-down list. Of course, you are free to choose any other Android device from the list depending on the actual device in your possession. Note that there will be no change in the graphics shown (see below) since the 'Nexus 4' device is similar to that of 'Nexus 5X'.
STEP 4: Create a New Emulated Android Device
If you have closed Android Studio, launch it again and make sure that the 'Hello World' project is on the screen. Notice in Android Studio's toolbar an icon with the Android logo on it. Hover the cursor over the icon and you will see 'AVD Manager' - that is the icon I am referring to - then click on it (see below). Alternatively, click on 'Tools' in the menu, followed by a click on 'Android' and finally on 'AVD Manager'.
No matter which path you took to activate the AVD manager, the window will change to 'Your Virtual Devices' as shown below. If you are running Android Studio for the first time, no virtual devices have been set up and the '+ Create Virtual Devices...' button will be shown. Click on that button.
The 'Select Hardware' window will appear next (see below). It already pre-selects the Nexus 5X device with the specifications shown.
Note the 3 buttons at the bottom of the screen. The 'Hardware Profile' button allows you to create an Android device other than that in the list.
The 'Import Hardware Profiles' allows you to import a profile stored on your computer into Android Studio.
The 'Clone Device...' button allows you the clone the currently selected device (the Nexus 5X in this case), and use this as a base for a new device similar to the Nexus 5X.
For the time being, do not press any of the 3 buttons - instead just press the 'Next' button to proceed.
The next screen is where you specify the 'System Image' to use for the AVD. Note the message that 'We recommend these Google Play images because this device is compatible with Google Play' on the right. The 'Recommended' tab is already selected and the cursor is already resting on 'P' item.
Note that the other item is labeled 'Oreo' and 'Nougat' and you are required to download this items before use.
As mentioned previously, the author has Android 5X device and the system image recommended meets the requirement since that device is running Android 8.1 (Oreo). Hence, this item was selected from the list (see below).
Note that there 2 other tabs for the window - the 'x86 Images' and the 'Other Images' tabs. These allow you to select other images to use (you have to download and install some of these before they can be used). Click on the 'x86 Images' tab and the screen will change as shown below.
If you are unsure which system image to use, click on the link that says 'API level distribution chart'. A distribution chart will be displayed to guide you with selecting the right image to use (see below). When finished with the chart, click on 'Close' to dismiss the chart window.
If you click on the 'Other Images' tab, you will see a window similar to the one shown below. Note the warning message at the bottom of this window. It says that 'A system image must be selected to continue' - since you have not made a selection yet, you can safely ignore this warning. There is also another warning message (in red color) in the right panel of this window - it reads 'Consider using an x86 system image on an x86 host for better emulation performance' - since you have not made a selection yet, you can safely ignore this warning also.
Now click on the 'Recommended' tab and make sure that your cursor is on the 'Oreo' item, then click on the 'Next' button.
The 'Android Virtual Device (AVD)' window will appear next. Note that you can change (if you wish) some things on the window. For example, if you wish to change the name of the AVD all you have to do is to click anywhere on the field and make the changes. You can also change the AVD device and/or the Android OS by clicking on the 'Change' button. The Startup Orientation is also changeable - portrait or landscape mode. Likewise the Emulated Performance and Device Frame.
You can also click on the 'Show Advanced Settings' button for more settings to set and configure (see below). This button will reveal the Camera (Front and Back), the Network (Speed and Latency), the multi-core CPU, the Memory and Storage, the Boot Options, and the Keyboard settings. You can change any of these settings if you so wish. Verify all the settings - then click on the 'Finish' button.
You will be back at the 'Your Virtual Device' window (see below) with the newly-created AVD listed as shown. From the icons in the 'Actions' column, you can either launch the AVD (using the right-pointing arrow), edit any AVD settings (using the 'pencil' icon) and perform any other actions (using the down arrow) by clicking on any icons in that column. You can also define a new AVD by clicking on the '+ Create Virtual Device...' button. For now, close this window using the 'x' on the top right-hand of the window and you be back at the project window.
STEP 5: Running The Project Using An Emulated Android Device
On the Android Studio project window's toolbar, there will be a green-colored icon that looks like a right pointing arrow (see below). If you hover your cursor over the icon, the words 'Run 'app' (Shift+F10)' will appear below the button.
Click on the icon (or press the Shift+F10 keys) and the 'Select Deployment Target' window will appear (see below). Note the warning message (on a yellow background) stating that 'No USB devices or running emulators detected'. You can safely ignore this message - you have not connected an actual Android device and the emulator has not started yet. Also, note that the Nexus 5X emulator has been preselected by default. If you want, you can set this AVD as the device that will be selected in future by clicking on the box labeled 'Use same selection for future launches'. Note you can also a create a new virtual device by clicking on the appropriate button. Now click on the 'OK' button.

NOTE: The extended controls allow you to set several parameters such as Location (GPS), Cellular network, Battery level, Phone/SMS calls, Directional pad (useful on a tablet), a Microphone device, Fingerprint device, Virtual sensors (accelerometers, etc), Settings, and lastly, Help.
You can now play around with the AVD and test it. To close the AVD, click on the exit button that looks like an 'x' located on top right-hand of the control window. You will be back at the project screen.
You can close the 'Hello World' project any time by clicking on 'File' menu and selecting 'Close Project'. You will be back to the welcome screen and the 'Hello World' project will be listed on the left-hand side pane (see below). To restart (or reload) the same project, click on that item (or press the Enter key) - the project will then be started.
STEP 6: Running The Project Using An Actual Android Device
We have successfully tested the 'Hello World' project on the AVD emulator. However, our ultimate goal is that the project should run on an actual Android device (a smart phone, for example). In order to do this, you need to connect that device to your development computer (the Debian PC on which Android Studio is currently running) using a proper USB cable and the proper USB ports.
First, you need to enable USB debugging on your Android device. Usually, this setting can found under 'Settings' and 'Developer options' but it can vary from device to device. The newer Android devices with Oreo (Android 8.1) has 'Developer options' under 'Settings' -> 'System' but is initially hidden. To reveal this 'Developer options' you need to follow the steps outlined below.
- Tap 'Settings' followed by 'System' and at the bottom, you will find an 'About phone' item.
- Tap on it and scroll to the bottom, where you will find an item labeled 'Build number'.
- Tap on this item 7 times and you will see the message 'You are now a developer'.
- Now go back to the previous screen where you will find the 'Developer options'.
If unsure on this process, consult your 'User's Manual' or the manufacturer's web page for the information on how to enable USB debugging. In any case, Google has the same steps online here.
The screen shot shown below is the already revealed 'Developer options' for the Nexus 5X and show that the USB debugging switch has been set to 'On'.
The screen shot below it shows the message that pops up in the smart phone asking you to verify USB debugging by clicking on 'OK'.
If you find an item labeled 'Revoke USB debugging authorizations' on your Android device, tap on that.
A message will pop up and ask you for confirmation. Then clear all previous authorization by selecting 'OK'.
Now click the Android device 'Back' button to exit the 'Developer options', 'System', and 'Settings'.
Now check if you had previously run/installed the same 'Hello World' application on the Android smart phone. This can be done by pressing the 'App' button on the 'Home' screen of the smart phone (the middle lower button that looks like a round button with two rows of 3 dots on it), and then searching for it on the 'App' screen - delete it if found. Then close the 'App' screen - you should be back at the 'Home' screen.
Next, we have to make sure that the proper USB cable is used. The manufacturers of your Android device usually provide you with one - use that cable and none other. Unfortunately, the author's Nexus 5X smart phone comes only with type C USB connectors at both ends so it would be impossible to make connections to a Debian PC with type A USB connectors. Should this be the case with your Android smart phone and your Debian PC, it would mean getting another USB cable for the connection between your Android smart phone and your Debian PC. Purchase one with a type A USB connector on one end and a type C USB connector at the other end. Also, consider purchasing a Belkin USB cable - the author did and they proved to be in perfect working order.
You also have to make sure that the USB port to be used on your Debian PC is working. Test this port out first by plugging in a thumb drive (or any other USB device) and if the Debian PC recognizes this device, you can safely say that the USB port is working.
Now make sure that Android Studio is running the 'Hello World' project. Then connect your Android smart phone to your Debian PC using the USB cable. You will note the connection is valid by the figure (as pointed out by the red arrow below) on your Android smart phone Home screen.
Make sure that you have configured the USB connection as for transferring files (or photos), and not for charging the battery. This is easily done by swiping down the round figure on your Home screen (see figure above) on your Android smart phone Home screen. Tap on the 'USB charging this device' item and the figure as shown below should appear on the smart phone. Select 'Transfer files' or 'Transfer photos (PTP)' and the screen should disappear. If the PC's file manager opens, dismiss it by closing the window.
Then click on the 'Run' button your Debian PC Android Studio's toolbar. As usual, the 'Select Deployment Target' window will pop up as shown below.
You will also need to authorize the USB debugging connection to the smart phone with the RSA key by selecting 'OK' on your smart phone (see below).
Note that, as soon as you press the 'OK' button on your smart phone, the window on your Debian PC will show the correct device as the connected device. Then, make sure that the 'LGE Nexus 5X (Android 8.1.0, API 27' item is selected on the 'Select Deployment Target' window on the Debian PC. Then click the 'OK' button to run the project on your Android phone device.
If everything is set up correctly, you should see the 'Hello world!' message displayed on your Android smart phone device's screen (see below).
If not, see if there are any messages on your Android Studio event log screen of your Debian PC. If the message in it mentions authorization (for example), then, most probably you have forgotten to set USB connection authorization on your device. Do it now and retry running the project again.
The important thing to remember here (if unsuccessful) is that Android Studio will display some message in the event log and this usually gives you a clue on what is wrong. If you still run into problems, then I suggest searching the Internet for your problem.
You can now close the window on your Android device (usually using the 'Back' key). If you examine the apps on your smart phone, you will find an app labeled 'Hello World' (see below). This is, of course, the 'Hello World' app file (usually with a .apk extension) which Android Studio has downloaded for you. You can delete this file if you so wish.
By the way, before you put your Android device aside after testing more new apps developed using Android Studio, remember to disconnect the smart phone from the PC first, and then switch off USB debugging.
To close the 'Hello World' project on your Debian PC, click on 'File' and the 'Close Project' menu items on Android Studio. You will be back to the welcome screen and the 'Hello World' project will be listed on the left-hand side pane (see below). To restart (or reload) the same project, click on that project and the project will then be started.
Updating Android Studio
If you start Android Studio and see an extra item on the last line, listed as 'Events' (indicated by the red arrow in the figure below), then it is time to apply updates. Below are some example screen shots of this process - these are examples only and may not reflect on what you see on the screen exactly. Note that the update notifications may appear on your welcome screen or your projects window.
Note that there are two types of updates - one is to the Android Studio itself (and indirectly, IntelliJ) and the other is to the SDK. One would require a restart to Android Studio and the other do not. The example shown for the first is an illustration for updating Android Studio 2.3.2.
If you see the window with the green-colored 'Event' balloon, first click on the 'Events' item followed by a click on the 'update' item as shown below.
Then click on the 'Update and Restart' button (see below) and the update process will start.
Next, the patch file will be downloaded and installed as shown in the figure below.
When done, Android Studio will be restarted and the figure below will be shown. Notice that there is no more 'Events' item. You are done updating Android Studio itself.
The following will illustrate the second type of update - the one to the SDK. You should see the Android Studio window with the green-colored 'Events' balloon (see below).
Then click on the 'Events' item followed by a click on the 'update' item as shown below.
Then click on the 'Update Now' button (see below) and the update process will start.
First, on the License Agreement window that appears next, click on the 'Accept' button. This is followed by a click on the 'Next' button.
The Component Installer window will appear (see below) and the downloading of the file will start.
When completed, the download file will be installed - this will be repeated for all files. Then click the 'Finish' button (see below).
The Android Studio window will reappear with an empty 'Event' balloon denoting that all updates were applied.
Summary Of Steps
- Download and install Google's Android Studio.
- Configure SDK for Google's Android Studio.
- Create a new project on Google's Android Studio.
- Run the new project on the AVD to test it.
- Run the same project on an actual Android device.
Final Words
That's it. You now have a Debian PC which can be used to develop Android software. What was outlined in this 'how-to' is only the 'tip-of-the-iceberg' - there are more, lots more that you need to discover and learn!
If you are an experienced IntelliJ, Android Studio, Java, and Android programmer, enjoy! For those people who are new to Android Studio or Java programming, here are some links which I recommend you visit in order to learn about Android programming.
To learn how to use Android Studio for developing Android software, visit here for a tutorial on this. To read the User Guide for Android Studio, visit here for this. No matter how experienced you are, I urge you to read this manual.
To learn about the IntelliJ IDE (on which the Android Studio is based), visit here for a tutorial on this.
If you are new to Java, then I would recommend searching the web for tutorials and the books 'Java For Dummies, 7th Edition' and 'Head First Java, 2nd Edition' as a guide.
If you are new to Java Programming for Android, then I would recommend searching the web for tutorials and the book 'Java Programming For Android For Dummies' as a guide. There is also another book by the same author but is more 'advanced' and is targeted towards Android developers. The title of this book is 'Java Programming For Android Developers For Dummies'.
Happy computing!


