I will not bore the readers on how I assembled the PC and installed Linux Mint 13 OS with MATE on it - suffice to say that everything works!. I now realized that I have the perfect opportunity to update my blog on Android software development with Linux Mint 13 using the latest Google ADT (Android Development Tools) bundle - which also includes the latest Android SDK and a pre-configured Eclipse IDE, using my colleague's PC. So this whole blog is on that subject - hopefully it will be of use to anyone who, like my colleague, is about to start developing Android software on a brand new PC.
Of course, the first task would have to install a Java JDK on the PC - but which Java - OpenJDK or Oracle's Java? And which version 6 or 7? Based on my past experience, I decided to go with OpenJDK 6 as I do not see any advantage of having all the 'flavors' of Java on my colleague's PC - it will only complicate matters.
These are the steps I used to set up the PC into an Android development system:
- Open Synaptic (Menu >> Administration >> Synaptic Package Manager), enter your password for Authentication, click Close on the Quick Introduction window (if it appears) and you will be at the Synaptic main window (see below).
 Synaptic intro window
 Synaptic main window
 - In the Quick filter field, enter 'openjdk' and the package windows will show all the possible entries for this item (see below).
 Synaptic openjdk search
 Mark additional
Mark all the packages listed below for installation (including any other additional items required):
openjdk-6-jdk
openjdk-6-demo
openjdk-6-doc
openjdk-6-dbg
default-jdk
default-jdk-doc
Click on the Apply button to start installing all the packages - be patient as it will take some time for the download and install process to finish.
- To verify that the Java JDK has been successfully installed, open a terminal (Menu >> Accessories >> Terminal) and enter the following command:
java -version
You should get something like the following output:
java version "1.6.0_24"
OpenJDK Runtime Environment (IcedTea6 1.11.5) (6b24-1.11.5-0ubuntu1~12.04.1)
OpenJDK Server VM (build 20.0-b12, mixed mode)
Do not close the terminal yet - you will need it later. Now that Java has been installed, the next task is to download and install the ADT Bundle from Google - follow the steps below.
- The ADT Bundle can be found here (http://developer.android.com/sdk/index.html). Since my colleague's PC is a 32-bit one, I selected 'adt-bundle-linux-x86.zip' to download. If you are using the 64-bit version of Linux Mint, make sure that the 'ia32-libs' package has already been installed, then download the 'adt-bundle-linux-x86_64.zip' file.
- Now unzip the downloaded file (normally to the 'Downloads' folder), by executing the following command in the terminal.
unzip ~/Downloads/adt-bundle-linux-x86.zip
or
unzip ~/Downloads/adt-bundle-linux-x86_64.zip
This will create a new folder 'adt-bundle-linux-x86' (or adt-bundle-linux-x86_64) in your home directory which will contain all the unzipped files. Under the 'adt-bundle-linux-x86' folder, there will be 2 sub-folders, one called 'eclipse' (which contains the Eclipse IDE) and the other called 'sdk' (which contains the Android SDK).
- The Eclipse IDE can be started in a terminal by executing:
cd adt-bundle-linux-x86/eclipse
./eclipse
A much better way is to create a program launcher on the desktop by first right-clicking on the desktop, and then clicking on the 'Create Launcher...' item. A 'Create Launcher' window will appear (see screen-shot below) - fill in the 'Name:', 'Command:' (browse to /home/(username)/adt-bundle-linux-x86/eclipse/) and 'Comment:' as shown. The Eclipse icon will be used by default. Click 'OK' to create the launcher - it will appear on the desktop. Double-click on it to start Eclipse. Create Eclipse launcher
 - Since this is the first time Eclipse is started, it will prompt you for a workspace directory (see below) - I use '/home/(username)/Projects/Android/' (where username is my login name) but you can place it anywhere you like or accept the default of /home/(username)/workspace. You can also set this as the default and not ask again - then click 'OK'.
 Set Eclipse workspace
You may see a screen like the one shown below asking you to contribute usage statistics - choose 'Yes' or 'No' and click on the 'Finish' button. Usage stats window
The Eclipse IDE will then be displayed (see below) with a welcome message from Google - close this tab when you have finished reading it. Eclipse welcome screen
The main workbench of Eclipse (see below) will now be displayed. Eclipse main workbench screen
 - Note that Eclipse is already loaded with the Android Developer Tools plugin and the SDK is ready to develop Android software. However, we will tweak it a bit here. Click on the Window item in the menu, and select Android SDK Manager. After a while, the Android SDK Manager window (shown below) will appear. I have resized this window to show all the items.
 SDK manager screen
Notice that both the Android SDK Tools and Android SDK Platform-tools have already been installed along with some of the files for Android SDK (API 17). You can, at this stage, download and install the rest of the files like Documentation for Android SDK, Samples for SDK, Google APIs and Sources for Android SDK but all the files needed to start developing Android software has already been installed. I do encourage, however, that the samples and documentation be downloaded and installed.
To do this, place checkmarks on the 'Documentation for Android SDK' and the 'Samples for SDK' files. Then click on the 'Install 2 packages...' button. The Choose Packages to Install window will pop up (see below) - select 'Accept All' followed by clicking on the Install button. The items will start downloading - progress of the download and install process will be shown on the SDK Manager window. Once the process is completed (the status bar at the bottom will show 'Done loading packages'), close the SDK Manager. Install packages screen
 - You can now set up one or more Android virtual devices (which correspond to your actual Android device(s)) so that you can test the developed software to see whether they work or not on the device.
Click on the Window item in the menu, and select Android Virtual Device Manager. After a while, the AVD Manager window (shown below) will appear. AVD manager window
If this is the first time you are using the Android AVD Manager, there will be no virtual devices and the list of available AVD's will be empty. To create a new virtual device, click the 'New...' button.
A window will appear in which you need specify what type of device you are going to create(see below). First enter the AVD Name of the device - for example 'MyJellyBean' - any name will do, as long as you remember what type of device it represent (an Android 4.2 Jelly Bean device in this case). New AVD window
Next you need to specify a Device to emulate - in my case, I decided to use a 7" WSVGA Tablet as this closely resemble the actual tablet that I have in my possession.
Next you need to specify the Target - i.e., the version of Android targeted - click on the right-hand downward arrow and click on a suitable one from the list. Note that this list will only contain all the versions that you have previously installed using the Android SDK Manager. In my example, there is only one - the Android 4.2 - API Level 17. The CPU/ABI will be automatically entered - in my case 'ARM (armeabi-v7a)'.
Leave the Keyboard and Skin at the default. Then select a Front Camera to use by clicking on the right-hand downward arrow and click on a suitable one from the list. Since I have a webcam on my PC. I selected 'Webcam0'. Note that this item will not be listed if you do not have a webcam - if that is so, select 'Emulated' instead.
For Memory Options and if you have enough RAM on your system, I suggest that you increase the RAM to greater than 768 MiB. Leave the VM Heap and Internal Storage values at the default.
You can now specify the size of the SD Card to emulate (in KiB, MiB, or GiB) - in my case I entered 128 MiB. Under Emulation Options, enable 'Use Host GPU'. Leave the rest of the fields at the defaults. The final screen will look something like the one shown below. New AVD settings
Click on the 'OK' button - the newly created virtual device will now appear in the AVD list (see below). New AVD created
 - To test whether the newly created virtual device works, select the device and click on the 'Start' button - click 'Launch' on the Launch Option window that appears next (see below). The starting emulator window will then be displayed (see below). If you see the 'Warning: No DNS servers found' message like the one shown, just ignore it for now - it will be fixed later.
 New AVD start
 AVD launch options
 AVD starting window
After a while, the Jelly Bean Android virtual device will appear on the desktop with a flashing 'Android' figure (see below). This denotes that it is still loading - be patient.
 AVD loading
Once the AVD has finished loading, you will be greeted with a screen similiar to the one below - just click on the OK button and the home screen will appear.
 AVD loaded
 AVD home screen
Test the AVD on/off button by clicking on the power button (rightmost button on the first row). If this works, then the AVD's screen will go blank, signifying a power off condition (see below).
 AVD off
Click on the power button again. The login screen (see below) will appear if everything works.
 AVD login screen
Just like a real Android device, you have to slide the padlock to the right to unlock the device - do so and the Home screen will reappear.
- Notice that both the 'Hardware Buttons' and the 'DPAD' on the Jelly Bean AVD has not been enabled. This means that the Home, Menu, Back and Search buttons (the second row of buttons on the AVD) as well as the DPAD (the navigation pad on the AVD) cannot be used at the moment. Try pushing any of these buttons - nothing will happen. In order to activate this (along with fixing the no DNS servers found message), follow the steps below:
- Close the AVD.
- Close the starting emulator window.
- Close the AVD Manager.
- Close Eclipse ADT.
- Open a terminal and execute:
nano .android/avd/(avdname).avd/config.ini
where (avdname) is the name of the AVD created. - Change the line that reads hw.dPad to 'yes' instead of 'no'.
- Change the line that reads hw.mainKeys to 'yes' instead of 'no'.
- Save the changes and exit the editor.
- While in the terminal, execute:
sudo dpkg-reconfigure resolvconf
Select 'Yes' when prompted.
NOTE: This will fix the 'Warning: No DNS servers found' message during the starting of the AVD. You will also be able to access the Internet in the AVD after this fix.
Reboot the PC to make the changes. - Start Eclipse ADT again.
- Start the AVD Manager again.
- Start the AVD (MyJellyBean in this example).
Notice that the message 'Warning: No DNS servers found' will no longer appear during the start of the AVD. You should also see the AVD look like the one below (after loading and unlocking) - notice that both the Hardware Buttons and DPAD has been enabled.
 Fixed AVD home screen
You can now play around with the AVD - close the AVD when done and then close the AVD Manager. Just remember that this is a virtual machine emulating an ARM CPU based device on an x86 PC. If you expect the virtual device to be fast, then you need to lower your expectation - try it out and see what I mean. It does, however, serves as a test bed for the applications that will be developed later.
Now that you have downloaded, installed and configured all the components for developing software on the Android platform, you can start off programming with the obligatory 'Hello World' program.
- Start Eclipse (if not started) and then click on the New button found in the toolbar. In the New project window that appears next (see figure below), expand the 'Android' item by clicking on the arrow to the left of the name and selecting 'Android Application Project'. Then click Next.
 Start new project
 New Android app project
 - Fill in the form that appears (see below) with the data shown. Note that after entering the Application Name 'My First App', the Project Name and Package Name are automatically filled in - do not change these. The 'Minimum Required SDK', 'Compile With' and 'Theme' has also been filled in with the correct data - in my case, I have only to change the Target SDK to 'API 17: Android 4.2'). Then click Next.
 New Android app data
Click Next when the 'Configure Project' screen (see below) appears, i.e., leave everything here at their defaults. Configure project
Click Next when the 'Configure Launcher Icon' screen (see below) appears. Configure launcher icon
Click Next when the 'Create Activity' screen (see below) appears. Create activity
Click Finish when the 'New Blank Activity' screen (see below) appears. New blank activity
The main Eclipse workbench will reappear after a while (see figure below) - your first Android project has now been set up with some default files. First project workbench
Note that the project that was just created includes a default "Hello World" source file that allows you to immediately run the application without having to enter any lines into your project.
- Now we will test out the application on the AVD you have previously created. First, make sure that you do not have any Android device plugged into your PC (we will test it on an actual Android device later). Then click on the Run button (the green one with the white right-pointing arrow - not the one with the red toolbox) in the toolbar.
A Run As window will appear (see below) - select Android Application and click OK. Run As window
The program will run and the AVD login window will appear (see below) - slide to unlock and, after a while, the output of your first Android application will appear in the AVD (see below). If this the first time you are running Eclipse, you may also get an Auto Monitor Logcat window popping up as shown below. Click OK if it does.AVD login window AVD logcat window
 MyFirstApp output
If you press the AVD's 'Home' key and then the 'Applications' icon, you can see that your My First App will also be listed in the available applications (see below).
 MyFirstApp listed
Congratulations! You have just successfully tested MyFirstApp on the AVD. Close the AVD once you have finished admiring your work. DO NOT CLOSE ECLIPSE YET! We will now test out the same app on a real Android device - which I assume you already have one.
Before you do any else, I suggest that you visit Google's Android Developer web site (http://developer.android.com/sdk/index.html), and then click on 'Tools' and 'Workflow' and finally 'Using Hardware Devices'. Acquaint yourself with the contents that appear - it gives clear instructions on how to setup and connect a device for testing during software development. The required steps for Linux Mint 13 are replicated here for your convenience.
- Open a terminal and execute:
sudo nano /etc/udev/rules.d/51-android.rules
This will open a blank file in which you need to enter the following (all in one line):
SUBSYSTEM=="usb", ATTR{idVendor}=="4-digit-number", MODE="0666", GROUP="plugdev"
Replace the idVendor with a 4-digit hex number for your device - the web-page mentioned above has a list of the vendor's IDs listed there. Find the id for the vendor of your Android device on the and enter it into the file. Save and close the file. Then execute the command:
sudo chmod a+r /etc/udev/rules.d/51-android.rules
As an example, for my Samsung Galaxy Tab 7.7 Tablet, I looked up the idVendor and found it to be 04e8 hex. So the line I entered looks like:
SUBSYSTEM=="usb", ATTR{idVendor}=="04e8", MODE="0666", GROUP="plugdev"
- Make sure that USB debugging is enabled on your device (your real Android device - not the AVD) - the settings can normally be found at Settings >> Developer options but may vary from device to device, but it is always located in Settings.
- Power on your Android device, unlock it, and the connect the device to the PC via a USB cable. You may get one or more windows pop-up asking you what to do - select 'Do nothing' in all cases and then press OK. You may also get an error message saying that Linux Mint is unable to mount the Android device - click OK to dismiss the message, i.e., we will ignore it.
Now execute the following commands on the open terminal:
cd adt-bundle-linux-x86/sdk/platform-tools
./adb devices
If your Android device has been connected correctly, you should see something like this:
List of devices attached
464119060136df1f device
Then close the terminal.
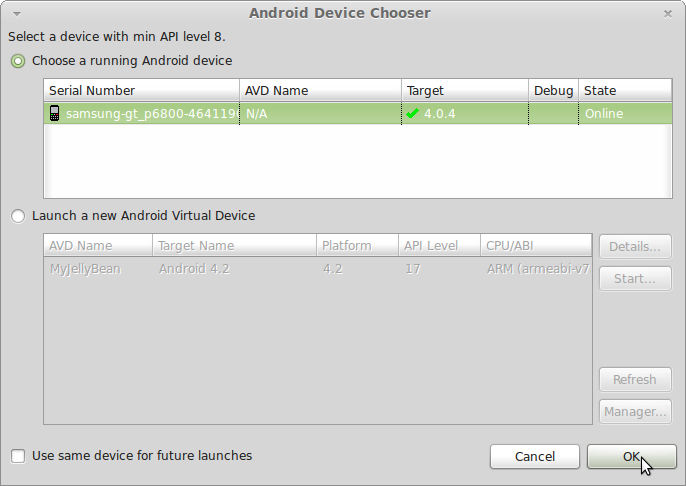
- Click on the Run button on Eclipse and a Device Chooser window (shown below) will pop up. Select the device and click OK.
 Device chooser
After a brief period, the application will run and the same output as before will appear on the device. MyFirstApp will also appear in the Applications list of the device.
NOTE 1: If nothing happens when you press the Run button, and error messages are displayed in Eclipse, starting with "The connection to adb is down, and a severe error has occured." then you need to perform the following steps to restart the adb.- Close the Eclipse if it is running.
- Start a terminal and execute the following commands:
cd adt-bundle-linux-x86/sdk/platform-tools
./adb kill-server
./adb start-server
If you see the message 'daemon started successfully' on the terminal then the adb has been restarted successfully, else try again. Close the terminal after the adb has been restarted successfully. - Start Eclipse again.
- Run the application again. It should run now.
Double Congratulations! You have just successfully tested MyFirstApp on the AVD as well on an actual Android device.