What is the 'update-alternatives' command? The best way to answer this question the Linux way is, of course, by reading the 'man' documents. So go ahead and open a terminal and type the 'man update-alternatives' command. To quote the document - "update-alternatives creates, removes, maintains and displays information about the symbolic links comprising the Debian alternatives system" which about sums up the command. For more details, read the man document in full, making a note that the list of links is found in the /etc/alternatives file.
On a newly installed Linux Mint 17.1 system, only the OpenJDK 7 JRE is present by default. You can see what Java-related packages are installed by launching the Synaptic Packet Manager, then searching for 'openjdk'. The following files are installed (you may have to scroll down the list shown by Synaptic to see all the files):
openjdk-7-jre-lib
openjdk-7-jre
openjdk-7-jre-headless
icedtea-7-jre-jamvm
icedtea-7-plugin
default-jre
Another method to verify that only the JRE is installed, execute the following command in a terminal:
update-alternatives --list java
You should see an output similar to the one shown below:
/usr/lib/jvm/java-7-openjdk-amd64/jre/bin/java
As another verification, execute the following command:
ls -la /etc/alternatives/java
You should see the following output:
lrwxrwxrwx 1 root root 46 Jan 24 08:18 /etc/alternatives/java -> /usr/lib/jvm/java-7-openjdk-amd64/jre/bin/java
This should verify what is being said in the 'man' document. If you have the 'mc' (Midnight Commander) file manager installed on your system, launch it and take a look in the /etc/alternatives directory. In this directory, you will find all the alternative links already set up in the system. By browsing all the links in this directory, it can be determined that the following items are directly related to the currently installed OpenJDK 7 Java - i.e., those referring to files in the /usr/lib/jvm/java-7-openjdk-amd64 directory as the target.
itweb-settings
itweb-settings.1.gz
java
java.1.gz
javaws
javaws.1.gz
jexec
jexec.binfmt
keytool
keytool.1.gz
mozilla-plugin.so
orbd
orbd.1.gz
pack200
pack200.1.gz
policytool
policytool.1.gz
rmid
rmid.1.gz
rmiregistry
rmiregistry.1.gz
servertool
servertool.1.gz
tnameserv
tnameserv.1.gz
unpack200
unpack200.1.gz
Note the files with the '.1.gz' in their names - these are 'man' (manual) files for the items - they are 'slave' links. You can test out these by executing 'man itemname', where itemname is the name of the command that you wish to view the 'man' pages for. The only two exceptions are for the 'jexec' command and the 'mozilla-plugin.so' plugin.
If you plan to install Oracle's Java on the system in order to carry out Android software development using Google's Android Studio, then you have to first download the latest version of the Java SE (aka JDK) package and install it. To do this, first point your web browser to the Oracle SE download page here and download the latest version of the 32-bit or 64-bit JDK (not Server JRE or the JRE) - currently at version 8u31 (or 1.8.0_31). It is also recommended that you download the API docs and demos (+samples) for the JDK - although this is not required for Android development on Android Studio. Once the packages have been downloaded, execute the following commands:
cd Downloads
tar xzvf jdk-8u31-linux-x64.tar.gz
tar xzvf jdk-8u31-linux-x64-demos.tar.gz
unzip jdk-8u31-docs-all.zip -d jdk1.8.0_31
sudo mv jdk1.8.0_31/ /usr/lib/jvm/
sudo chown -R root:root /usr/lib/jvm/jdk1.8.0_31
cd ~
Note that the 'man' files are also supplied by Oracle and they are found in the /usr/lib/jvm/jdk1.8.0_31/man/man1 directory but, unfortunately, they are not compressed files. If you wish to compress them to save disk space, go ahead and do it, but note this is not required by the /etc/alternatives links.
Then you have to decide what to do with the OpenJDK 7 JRE. Do you, if at all possible, remove OpenJDK 7 JRE, or keep it and use the 'update-alternatives' command to set the proper links so that the system will use Oracle's Java as the default Java?
It is not advisable, however, to remove OpenJDK 7 JRE totally from Linux Mint 17.1 as the author found out by trying it using the Synaptic Packet Manager. Trying to remove OpenJDK 7 JRE will only result in the system installing the OpenJDK 6 JRE instead. This was probably due to the fact that the default web browser Firefox uses the IcedTeaPlugin for running Java applets.
That leaves only one method left and that is to fix all the links using the 'update-alternatives' command - including the slave links to the 'man' pages. This means that we have to install all the necessary links to Oracle's Java, using all the items in the list above, except for 'itweb-settings', 'itweb-settings.1.gz' and 'mozilla-plugin.so' (these are for the Firefox web browser only, so it will be safe to keep those links untouched). Then execute the following commands in a terminal:
sudo update-alternatives --install "/usr/bin/java" "java" "/usr/lib/jvm/jdk1.8.0_31/bin/java" 1500 --slave "/usr/share/man/man1/java.1" "java.1" "/usr/lib/jvm/jdk1.8.0_31/man/man1/java.1"
sudo update-alternatives --install "/usr/bin/javaws" "javaws" "/usr/lib/jvm/jdk1.8.0_31/bin/javaws" 1500 --slave "/usr/share/man/man1/javaws.1" "javaws.1" "/usr/lib/jvm/jdk1.8.0_31/man/man1/javaws.1"
sudo update-alternatives --install "/usr/bin/keytool" "keytool" "/usr/lib/jvm/jdk1.8.0_31/bin/keytool" 1500 --slave "/usr/share/man/man1/keytool.1" "keytool.1" "/usr/lib/jvm/jdk1.8.0_31/man/man1/keytool.1"
sudo update-alternatives --install "/usr/bin/orbd" "orbd" "/usr/lib/jvm/jdk1.8.0_31/bin/orbd" 1500 --slave "/usr/share/man/man1/orbd.1" "orbd.1" "/usr/lib/jvm/jdk1.8.0_31/man/man1/orbd.1"
sudo update-alternatives --install "/usr/bin/pack200" "pack200" "/usr/lib/jvm/jdk1.8.0_31/bin/pack200" 1500 --slave "/usr/share/man/man1/pack200.1" "pack200.1" "/usr/lib/jvm/jdk1.8.0_31/man/man1/pack200.1"
sudo update-alternatives --install "/usr/bin/policytool" "policytool" "/usr/lib/jvm/jdk1.8.0_31/bin/policytool" 1500 --slave "/usr/share/man/man1/policytool.1" "policytool.1" "/usr/lib/jvm/jdk1.8.0_31/man/man1/policytool.1"
sudo update-alternatives --install "/usr/bin/rmid" "rmid" "/usr/lib/jvm/jdk1.8.0_31/bin/rmid" 1500 --slave "/usr/share/man/man1/rmid.1" "rmid.1" "/usr/lib/jvm/jdk1.8.0_31/man/man1/rmid.1"
sudo update-alternatives --install "/usr/bin/rmiregistry" "rmiregistry" "/usr/lib/jvm/jdk1.8.0_31/bin/rmiregistry" 1500 --slave "/usr/share/man/man1/rmiregistry.1" "rmiregistry.1" "/usr/lib/jvm/jdk1.8.0_31/man/man1/rmiregistry.1"
sudo update-alternatives --install "/usr/bin/servertool" "servertool" "/usr/lib/jvm/jdk1.8.0_31/bin/servertool" 1500 --slave "/usr/share/man/man1/servertool.1" "servertool.1" "/usr/lib/jvm/jdk1.8.0_31/man/man1/servertool.1"
sudo update-alternatives --install "/usr/bin/tnameserv" "tnameserv" "/usr/lib/jvm/jdk1.8.0_31/bin/tnameserv" 1500 --slave "/usr/share/man/man1/tnameserv.1" "tnameserv.1" "/usr/lib/jvm/jdk1.8.0_31/man/man1/tnameserv.1"
sudo update-alternatives --install "/usr/bin/unpack200" "unpack200" "/usr/lib/jvm/jdk1.8.0_31/bin/unpack200" 1500 --slave "/usr/share/man/man1/unpack200.1" "unpack200.1" "/usr/lib/jvm/jdk1.8.0_31/man/man1/unpack200.1"
The commands listed above install the links for the items and points to the files in the 'jdk1.8.0_31' directory as well as a slave link for the 'man' files. Note that the 'priority' option is set to 1500, a much higher number of the default value of 1071 for the OpenJDK 7 JRE. This was done to ensure that Oracle's Java has a higher priority than the OpenJDK Java. Note that the 'jexec' item was not installed. It most likely that this command is not needed for Android development as 'jexec' is mainly used by the system to allow execution of JAR files. Also note that 'jexec' is a wrapper and is invoked remotely through SSH. More information can be found here.
In order to avoid typing mistake while entering the above commands, it is suggested that you cut and paste the commands above. Of course, this is assuming that you have installed Oracle's Java in the /usr/lib/jvm directory - you may have to modify the commands above if you installed Java into a different directory.
Now that we have installed the links, we still have to tell the system which Java to use. Since we have used a priority of 1500 to install the links - which is higher than OpenJDK's 1071, we have already selected to use Oracle's Java in 'auto' mode. To verify this, execute the following command:
sudo update-alternatives --config java
If you see an output similar to the one shown below, then you are set to use Oracle's Java. Note the asterisk (*) to the left of the first item - this denote the current selection.
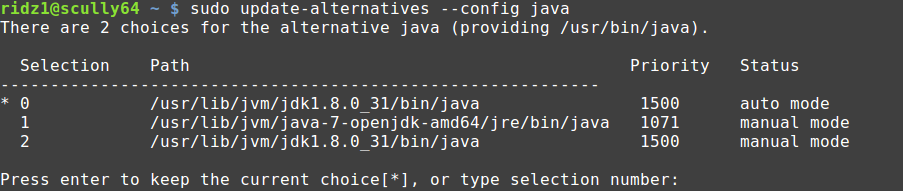
Press the Enter key to keep the selection. If, later, you change your mind and wants to use OpenJDK instead of Oracle's Java, you can easily reverse the changes. This can be done using the 'update-alternatives' command with the '--set' or '--config' options - the only difference is that the '--set' option is non-interactive while the the '--config' option is interactive. It is up to you to use either option.
Notice that we have not set any links for the Java compiler 'javac'. If you do (or plan to do) a lot of Java programming at the command line, then it is suggested that you set up these links and tell the system which Java compiler to use as the default. To do this execute the following commands:
sudo update-alternatives --install "/usr/bin/javac" "javac" "/usr/lib/jvm/jdk1.8.0_31/bin/javac" 1500 --slave "/usr/share/man/man1/javac.1" "javac.1" "/usr/lib/jvm/jdk1.8.0_31/man/man1/javac.1"
Since this is the only 'javac' item installed, it will be automatically set as the default 'javac'. You can, however, add another version of 'javac' - just make sure that the priority number is less than 1500, else you have to set the default 'javac' manually.
To test whether you have set up the links properly for both the 'java' and 'javac' commands, execute the following commands:
java -version
javac -version
If the output from the two commands above contains the string '1.8.0_31', then the links have been set up properly. The rest of the commands can only be tested if you use them directly - however, executing 'man' on these commands should display the proper 'man' pages.
Note that Oracle's SE (aka JDK) 8 have a lot more commands that were not installed using 'update-alternatives'. A peek into the /usr/lib/jvm/jdk1.8.0_25/bin directory should provide you with some idea of these commands. You can use the 'update-alternatives' command to install these if you so wish - just follow the same procedure listed above.
That's it - you now have a (somewhat) full systems that uses Oracle Java instead of the OpenJDK Java.
