This is Part 2 of the series - for those who have not read Part 1, click here. In this part, we will continue with connecting more hardware to Rebecca (aka Linux Mint 17.1).
d) Connecting Android Smart Phones and Tablets Using USB
This section describes how to connect Android smart phones and tablets to a Linux Mint 17.1 PC via a USB port. Most modern Android-based smart phones have the built-in capability of being USB connected to a PC. Some also even have software written specifically for communicating with a PC, but the ability to read and write to the storage media is a basic ability of these devices. Connection between PC and most modern Android smart phones uses the 'Media Transfer Protocol' (MTP) - for more information on MTP, click here. Note that MTP is only for file transfers and do NOT have the ability to 'play' a media file (audio or video) located on the device - trying to use a media player on Rebecca to play media files on the phone or tablet will cause errors - some of which can only be cured by a restart of the PC.
The author has two Android smart phones and one Android tablet in his possession. The tablet is an old (by tablet standard) Acer Iconia A500 using Android 4.0.3 (Ice Cream Sandwich) - old but still useful. One of the two smart phones is a China made knockoff of the Samsung Galaxy Note 2 and is using Android 4.1.1 (Jellybean). This phone is still serviceable but because of the limited RAM (512MB!), it drove the author to purchase a real Samsung Galaxy Note 2 - which is now running Android 4.4.2 (KitKat). So having these 3 devices gave me an opportunity to test whether the various Android (4.0.3 to 4.4.2) versions support MTP when connected to Rebecca.
TIP: For the following tests, a KNOWN good USB port on Rebecca was used. The author had some problems with a intermittently working USB port on Rebecca - symptoms were the PC froze solid whenever a device was connected using this USB port. Swapping USB cables did not help. When the problem was determined to lie with the USB port on Rebecca, that port was blocked off and another USB port was used but occasional problems was detected - this time due to 'el-chepo' USB cables. So make sure that you only use known working USB ports and known good USB cables when performing connections from devices to Rebecca.
Starting with the oldest device first, it was connected to a known good USB port on Rebecca using the cable supplied with the tablet. The message 'Connect as a media device' appeared on the tablet and a window popped up on Rebecca (see figure below), plus an icon appeared on the desktop.
Note that the PC correctly identified the device as the 'Acer Iconia Tab A500' and using the file manager, it was possible to browse through both the storage units - internal and SD card - on the tablet. It was also possible to transfer files back and forth between the PC and the tablet using the file manger 'drag and drop' feature. The only hiccup was that the Nemo file manager has a title of 'Unidentified Device' whenever the Acer tablet was connected. To disconnect the tablet, the 'eject' button on the file manager device was clicked upon with the mouse. All in all, it was a successful test.
Next the China made smart phone was connected to Rebecca using the good USB port and the USB cable supplied with the phone. To my surprise, the following screen appeared on the phone.
So I guess that the fake Note 2 phone does not support MTP after all - it still relies on the old-fashioned UMS despite it using Android 4.1.1 (Jellybean). I guess the manufacturer of this phone did not implement MTP for this device. However, and as shown below, it was still possible to browse all the files on the phone's main storage and SD card (an old NOKIA microSD card salvaged from an old Nokia phone) and transfer files back and forth - albeit at a very much slower pace.
Next the genuine Samsung Galaxy Note 2 was connected to Rebecca using the good USB port and the USB cable supplied with the phone. The first thing that happened was a beep from the phone and a notification message that read 'Connected as a media device' briefly appeared on the phone. It does not seem to matter whether phone was asleep or otherwise when connected. On the PC, the file manager popped up and an icon labelled 'GT N7100' appeared on the desktop (see below).
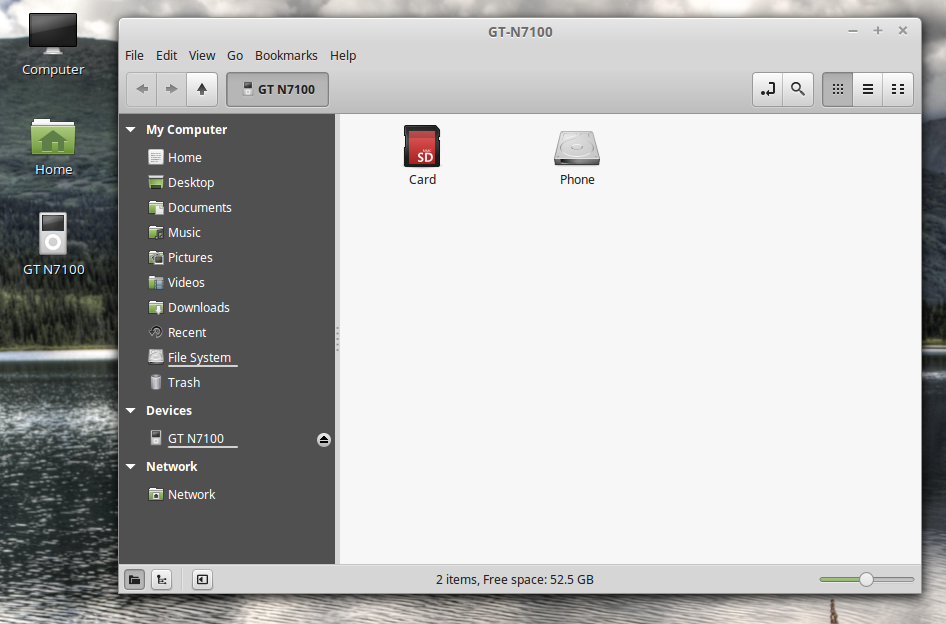
Note that the phone was correctly identified (the correct model number for the Samsung Galaxy Note 2 is GT-N7100) on both the desktop icon and the Nemo file manager. Even the title in the file manager was correct (unlike the Acer A500). It was gratifying to find out that the files on both the storage media on the phone can be browsed by the file manager. It was also possible to transfer files back and forth between the PC and the phone using the file manger 'drag and drop' feature. The MTP file transfer portion worked with the phone with no problem at all. Disconnecting the phone was easy - just right-click on the desktop icon for the phone and select 'Eject'. Alternatively, click on the 'eject' button for the device in the file manager window.
To summarize, Linux Mint 17.1 will handle any Android tablet or smartphone connected to it over USB without any problem or without having to install any other software. Just note that if you stick to file transfer operations only, then you should not encounter any problems.
e) Connecting Apple Devices Using USB
Apple’s devices poses a problem for Linux Mint 17.1 — it doesn’t include MTP support at all. Apple’s iPod, iPhone, and iPad use their own proprietary syncing protocol along with iTunes, so it is understandable that they do not support MTP - a competing protocol. However, the author has the original iPad in his possession and was curious to find out what would happen if he connected this device to Rebecca over USB.
Well, the first thing that happened was 2 windows popped up, one on top of the other (see below). The first asked me what to do with the 'digital photos media', while the second asked me what to do with 'digital media player'.
The second thing that happened was the the Nemo file manager opened up with the iPad listed under 'Devices' as two items as shown below.
Since the file manager was already open, I dismissed the other two windows using the 'Cancel' button. Clicking on the device that identified as my iPad resulted in display shown below.
It was interesting to note that the file manager did detect that there were music and photo files on the iPad and even offer to sync and import these files - using Banshee or gPhoto. Unfortunately these do not work and the end result was not a single file was transferred either way.
Clicking on the Documents on my iPad resulted in the display shown above. Double-clicking on the Readmill icon resulted in a 'Documents' folder being displayed. Note that this folder on the iPad was created by the free Readmill book reader software, which was installed because it was not dependant on Apple's Appstore. I could move ebook files back and forth between the PC and this folder without any problems. Files moved into this folder appeared in the book list and was treated just like another book.
The other two apps shown, 'Chrome' and 'iBooks' each had a Document folder, however, although I could move files from the PC to the iPad, they will not appear in any list. This was probably because the file moved was 'verboten' - it was not 'purchased' through the app store - so it was ignored.
There was another very strange thing that was observed while the iPad connected to the PC - it refuses to recognize any other USB device - for example a USB thumb drive, that was plugged into the PC. The only way to overcome this was to disconnect the iPad and perform a system reboot before connecting any other USB device - only then will the device work properly.
All in all, it was very disappointing that Apple's iPad refuses to work with a Linux Mint 17.1 PC. The moral of this story is "Do not use any Apple device with a Linux Mint 17.1 PC" - I guess this is solely a job for my Apple Mac PC.
f) Connecting Android Smart Phones and Tablets Using Bluetooth
Any Bluetooth devices can be 'paired' with an Linux Mint PC which have Bluetooth devices and services enabled. However, be aware that not all Bluetooth PC 'dongle' will work with Linux Mint. The author had several 'dongle' in his possession, ranging from old ones (which looks like a USB thumb drive) to the latest and very tiny 'dongle'. After testing all the 'dongles', the author found out that only a few worked - and those were the newer models. So, if your 'dongle' does not work with Linux Mint, try another one.
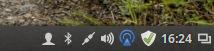
Before attempting to pair a Bluetooth device with a Linux Mint PC, plug in the 'dongle'. Then check the 'notification' area on the bottom right corner of the screen - you should see the Bluetooth icon there if your 'dongle' works with Linux Mint (see figure below).
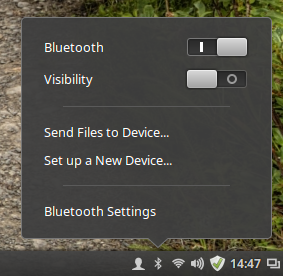
If the Bluetooth icon is clicked, you should see that Bluetooth services is enabled by default (see figure below).
You can now proceed to pair a Bluetooth device with Linux Mint. As an example, the Acer Iconia A500 tablet will be 'paired' first. Of course, the tablet will need to have it's Bluetooth sevices enabled first, then we need to 'pair' the tablet with the PC. Perform the following steps:
- Touch "Settings" on the tablet home screen.
- Then enable Bluetooth by touching the 'switch' to 'On'.
- Then touch the 'Bluetooth' item and in the right pane of the screen, make sure that the A500 device is visible by by touching the item. While the tablet is visible (a timeout timer will start on the tablet), the following steps need to be performed on the Linux Mint PC.
- Click on the Bluetooth icon in the panel of the Linux Mint PC.
- Click on the "Set up a New Device...".
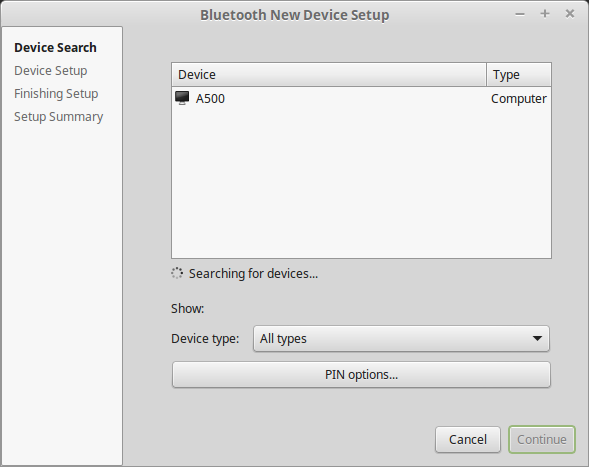
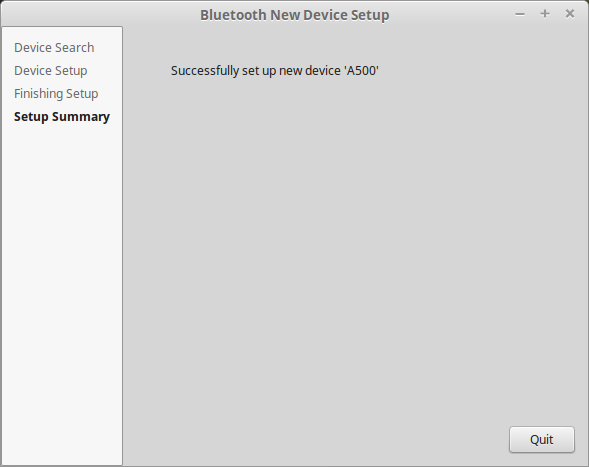
- The 'Bluetooth New Device Setup' screen (shown below) will appear with the words 'Searching for devices...' on it. After a while (and if the visibilty of the tablet has not timed out), the item "A500" will be listed as shown. Select the device by clicking on it and then the "Continue" button.
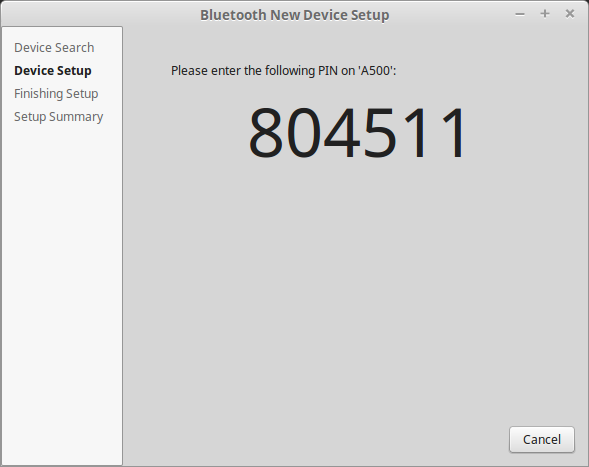
- The next screen that will appear on the PC (shown below), will prompt you to enter the indicated PIN number on the tablet. At this time you will also be prompted on the tablet to enter the PIN number indicated on the PC screen.
- Enter the PIN number on the tablet, touch "OK" and the screen on Linux Mint will change to the one shown below - indicating success with the pairing. The PC name will also appear on the tablet as one of the paired devices.
Note that you can also rename the Linux Mint PC in the Bluetooth pane of the A500 tablet. To do do, just touch the 'settings' icon (found to the right of the current PC name) and a 'Rename' item will be displayed (see below). Touch the 'Rename' item, then enter the new name.
In my case, I have renamed the PC from 'mint-0' to a more descriptive 'scully64-mint-17,1' (scully64 is the actual name of the PC). The final Bluetooth settings will look something like the figure below.
After the tablet has been 'paired' with the PC, you can now easily exchange files between these two devices. To receive a file from the tablet, follow these steps:
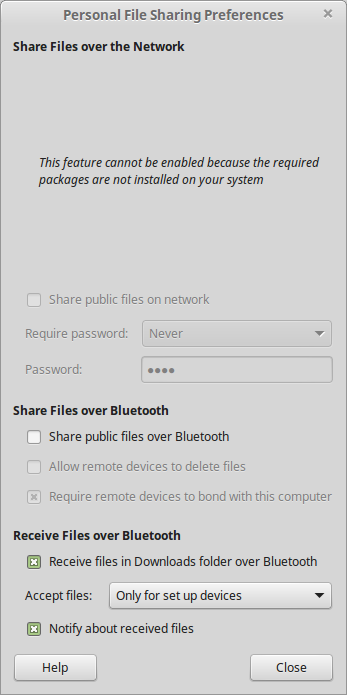
- First we need to enable the ability to receive files over Bluetooth on the Linux Mint PC. This setting can be found in the Menu -> Preference -> Personal File Sharing (see below). In the 'Receive Files over Bluetooth' section, enable 'Receive files in Downloads folder over Bluetooth' and 'Notify about received files'. Note that this setting only has to be done once. Click on the 'Close' button when done.
- Next, use a file manager (for example, the ES File Manager) on the tablet to select the file to send to the PC. Then select the file, use the 'Share' option, specify 'Bluetooth' and the A500 as the recipient for the file.
- The file transfer will start. While the transfer is in progress, a blue icon will appear on the PC's notification area (see figure below). To monitor the progress on the tablet, touch the 'upload' icon and the resulting display will tell you the percentage of the transfer that has been completed. Once the transfer has been completed, a notification will briefly appear on the screen of the PC.
Note that received files are found in the 'Downloads' directory on the Linux Mint PC. Any type of files can be transferred using Bluetooth. Just note that the transfer speed is very much slower than a direct connection between the devices - for example, a USB connection. However, if you have no other way of transferring files, then Bluetooth can save the day - provided, of course, that both the devices support Bluetooth.
To send a file over Bluetooth from the Linux Mint PC to the tablet, just follow these steps:
- First click on the Bluetooth icon the the PC's panel. The resulting display is as shown below.
- Then click on the 'Send Files to Device...' item. The display will change as shown below.
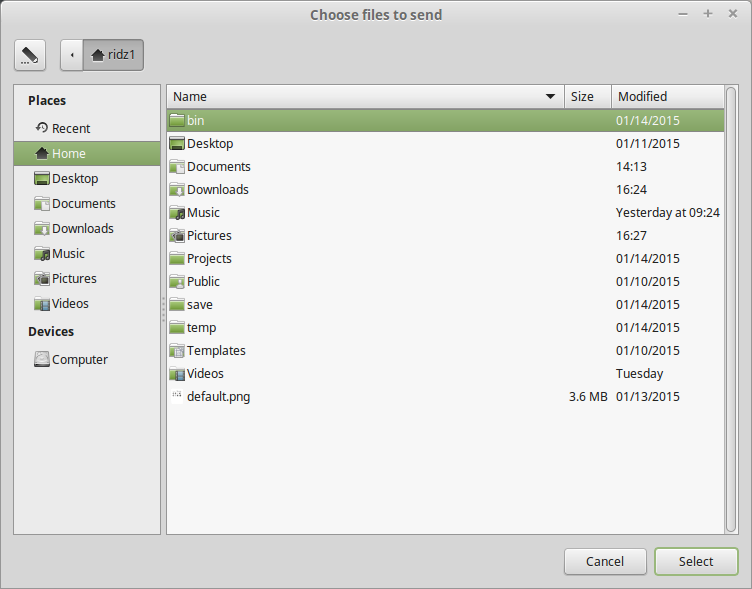
- Browse to the file to send and click on the 'Select' button. The display will change as shown below.
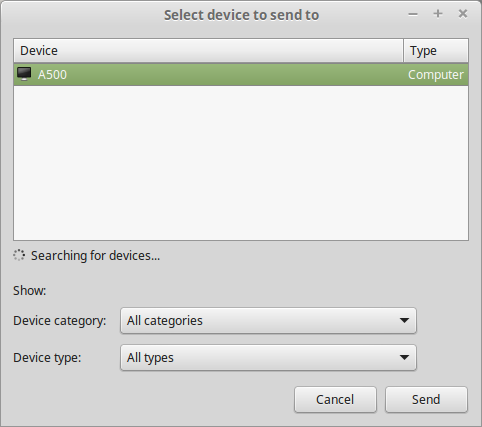
- Select the tablet A500 as the recipient of the file and click on the 'Send' button. The display will change as shown below.
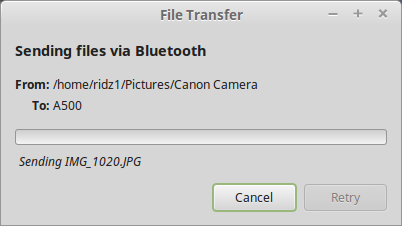
- You will be asked by the A500 tablet whether to accept the file from the PC - say 'Yes' in this case.
- The display on the PC will change as shown below.
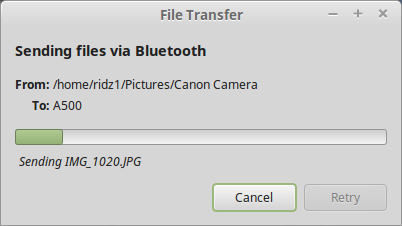
Once the file has been transferred, you will find the file in the 'bluetooth' folder in the main storage (usually 'sdcard') on the A500 tablet. Again, any type of files can be transferred using Bluetooth this way - albeit at very much slower speed than a physical connection.
There may be occasions that you may want to 'unpair' a device from the PC - for example, you have sold off the Android device. To remove (or unpair) a Bluetooth device (the tablet in this case) follow the steps below:
- On the tablet, touch "Settings" and enable Bluetooth (if it is off), then touch the "Bluetooth" item.
- On the screen that appears next, touch the option icon to the right of the PC name, then touch "Unpair". Then exit from here.
- On the PC, click on the Bluetooth icon in panel and select "Bluetooth Settings..."
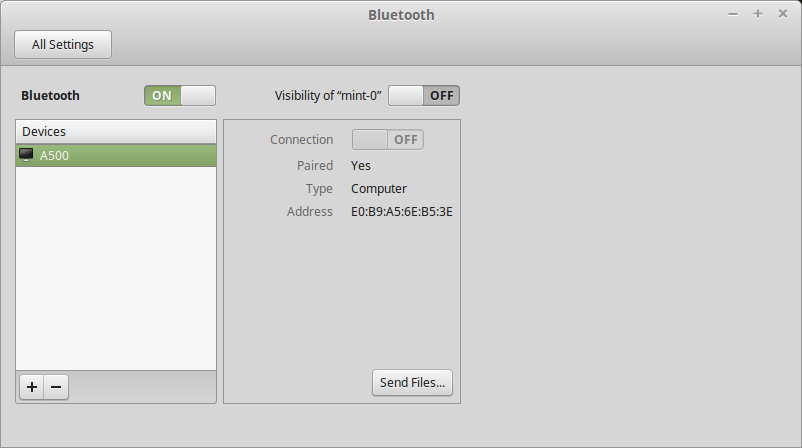
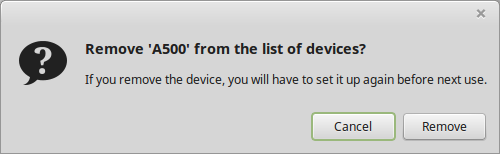
- On the screen that appears next, select the device by clicking on it (see figure below) followed by a click on the "-" (minus) button below. You will be prompted to confirm the removal (see figure below) - click "Remove" to remove the device.
- The tablet will be removed (unpaired) - then close the settings window.
Be aware that Bluetooth operation can only take place for 'paired' devices. Also, be aware that leaving the Bluetooth services enabled on the devices will drain the battery faster - so remember to switch off Bluetooth after using it.
The process of 'pairing' a smartphone with a Linux Mint PC is very similar to that of a tablet. The only difference is the screen display on the smartphone and where the menu items are located on the smartphone. The process can be summarized as follows:
- On the smartphone, enable Bluetooth services and make it 'visible'.
- On the PC invoke 'set up a new device', let the PC 'discover' the smartphone, enter the PIN on the smartphone, and it will be 'paired'.
The process to transfer files, rename PC and/or devices, and 'unpair' devices remains the same for any devices.
At this point, all the hardware that the author wish to connect to Rebecca has been taken care of. Of course, there are other hardware than can be connected to Rebecca but this article only describes the hardware in the author's possession that are connected to Rebecca.
This is the end of Part 2. In the third part, we will continue with tuning Rebecca. Stay tuned.
Rebecca is here! No not that beautiful blonde - but the beautiful Linux Mint 17.1 with the beautiful Cinnamon desktop. This article is all about tuning Rebecca so she is perfect to use - at least to me!
So you have installed Rebecca (aka Linux Mint 17.1 Cinnamon) and you are now staring at the desktop (see figure below) and wondering 'what next?'. Well, wonder no more as I take you on a journey on making Rebecca more beautiful!
As you can see from the desktop shown above, you are greeted by the 'Welcome Screen' right smack in the middle. As the name suggest, it welcomes and thanks you for choosing Linux Mint and also displays a number of icons (13 in all, if you counted!) of items that you are free to click upon in order to explore. For your information, all but 4 items (User Guide, Restore Data, Software Manager and Chat Room) will open the web browser (Firefox by default) and displays the contents for that item. The other 4 items are:
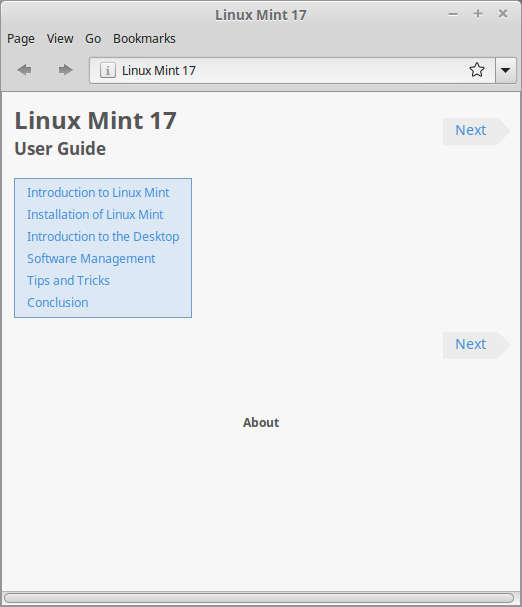
- User Guide - a window similar to the one shown below will open displaying the contents of a user's guide to Linux Mint.
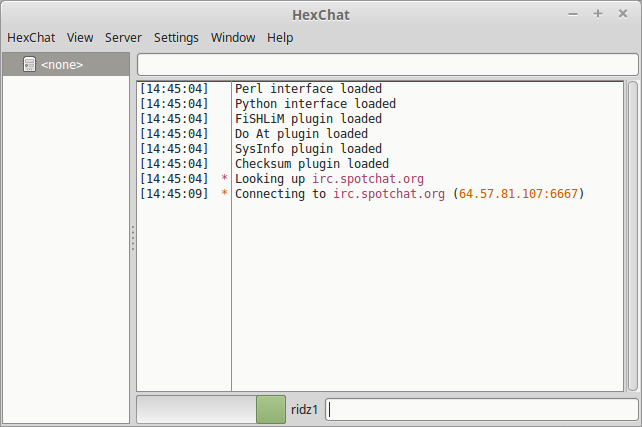
- Chat Room - a window similar to the one shown below will open - in fact, this will launch HexChat, an IRC application pre-configured to log into the Linux Mint chat room on IRC. Note that it is extremely difficult to log into the channel - just click on the close button (the 'x' on the top right hand corner of the application window) if you are not successful in connecting to the channel.
- Restore Data - you will be prompted to enter your password (this item requires admin's privileges) and then a window similar to the one shown below will open. This is the Backup Tool from which you can perform backup and restore of data.
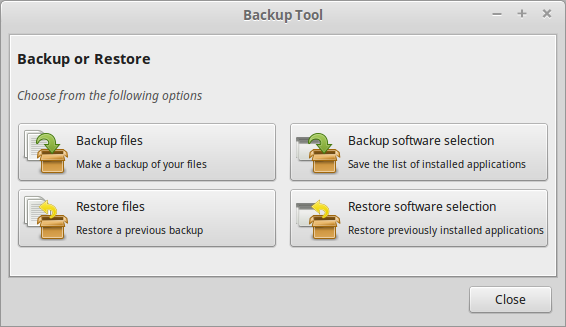
- Software Manager - you will also be prompted to enter your
password (this item requires admin's privileges) and then a window
similar to the one shown below will open. This is the Software Manager window from which you can select software for installing on your PC.

Remember to close the web browser (if open) and any other open application windows before proceeding any further. You can also close the Welcome Screen now. If you do not wish this screen to display upon system start up, remove the check mark on the 'Show this dialog at startup' text at the bottom of the welcome screen. Remember you can always display this screen later by clicking on Menu - Preference - Welcome Screen.
Updating Linux Mint
We start off by checking for updates to Linux Mint - this is normally indicated by the Update icon in the panel (lower right hand side of the screen). If there are any updates (which is normal for a newly installed Linux Mint) the the indicator will have an lower case 'i' in it as shown in the figure below. If you hover the mouse pointer over this icon the text 'A new version of the update manager is available' will be shown.
Click on the icon, and the Update Manager will start with all the upgradable items shown (see figure below).
Since there is only one item (mintupdate), you can start the update process by clicking on the Install Updates button. Another window will pop up (see figure below), asking for confirmation to install additional package(s). Click on OK to confirm.
Since updating the system requires admin's privileges, you will be asked to authenticate by entering your password (see figure below). Do so and then press the Authenticate button.
The update will start to download as shown on the figure below.
Once the update is downloaded, it is installed and the Update Manager will display more updates as shown in the figure below.
Before the update process is started, I normally set a preference to select and trust all security updates - this is an optional choice. Usually you will only see updates from level 1-3 (which are considered to
be safe), but you can make an exception for
level 4 and 5 security updates as I have done here. This can be done (as I have) by clicking on Edit and selecting Preferences. A window similar to the one shown below will appear. Then I place a check mark on on the 'Always select and trust security updates' and click on the Apply button.
As usual, you need to enter your password to authenticate.
Enter your password and then press the Authenticate button. The downloading of all the package files will begin.
Once all the files have been downloaded, the installation process will begin.
When all the updates have been installed, Update Manager will then appear again, this time with a blank window (if you have set the preferences just like me), indicating that all updates have been successfully installed.
You can close Update Manager now. Notice that the lower case 'i' in the update icon on the panel has changed to a green check mark - indicating that the system is up-to-date.
Note how useful is the update notification in the panel area - they tell you whether there are any updates that are available for the system at any time. However, you may want to check for updates manually on occasion. This can be easily done by clicking Menu - Preference - Update Manager (see figure below).
That's it - you now have a fully updated Linux Mint system - Rebecca would be pleased!
Changing the Desktop Background
The next thing that I normally do is to change the desktop background from the awful looking (sorry, Clem) default Linux Mint desktop. This can be easily accomplished by right-clicking on a blank area of the desktop. A window similar to the one shown below will pop up.
Select 'Change Desktop Background' from the window and another window will pop up (see figure below). This window is part of the System Settings and from this window, it is possible to select a more suitable (and beautiful) desktop background - and also, make the background images change automatically and other cool stuff. Feel free to explore all the options. Don't forget to close the Backgrounds window when done.
My personal preference for a desktop background is 'The Trail' from, what else, Rebecca's choice of images. My final desktop looks like this:
Rebecca is looking more and more beautiful!
Setting up WiFi
Normally, my Internet connection is via an Ethernet network connection. Occasionally, I use a WiFi 'dongle' with my PC to connect to another Internet network connection. I will show you how to set up this connection using the 'Network' icon on the panel. If you hover the mouse pointer over the network icon, the text 'Connected to the wired network' is shown (see figure below).
Click on this icon, and a menu will pop up as shown in the figure below.
If your WiFi 'dongle' works (and is recognized by the PC), you will see both the 'Wired' and 'Wireless' items as shown in the figure. Then click on the wireless item you want to connect to, and a window will pop up (see figure below) asking you for the authentication password. Enter it and press the 'Connect' button (which will be enabled if you enter the correct password - else it will remain 'greyed out').
If you have successfully connected to the wifi network, a notification will appear briefly on your desktop. If you click on the network icon, the active wifi connection will have a 'dot' to the left of its name (see figure below).
I normally switch off the wired connection at this point by clicking on the 'switch' to the right of the 'Wired' item. If successful, another notification will appear briefly on the desktop and the menu will look something like the figure below.
Notice also that the network icon has changed as shown in the figure. This is an indication that your Internet connection is now via WiFi.
Adjust Audio Volume
I usually adjust the audio volume to a higher level using the sound icon found in the panel. Because of my loudspeakers input level, I adjust the level to about 85% as shown in the figure below.
The level is set by dragging the 'knob' using the mouse to the required level. To test out the level, click on the 'Sound Setting' item - a window similar to the one shown below will open.
Click on the Test Sound button and another window will open (see figure below) - click on the Test buttons for the left or right channels in order to test the sound levels.
Click on the Close button when done. You will beck at the Sound setting window - click on the Input tab. Here you can set the input microphone device and levels. Since I have a Logitech Webcam model C250 with a built-in microphone, I set that as my input device and the input level for this is as shown in the figure.
The Sound settings window was then closed.
Setting Up A Terminal
Simply put, a terminal (or console) is a place from where you execute a Linux command line. It is useful as it allows you to execute esoteric commands otherwise not available as GUI applications. As a programmer, I particularly find it useful - your mileage may vary here.
If you spend a lot of time in the terminal, then setting it up properly is a must - the process is fairly simple and is as follows. Click on the Terminal icon in the panel (see figure below) and it will launch.
Then right-click on a blank area of the terminal and the menu will appear as shown. Select Profile and Profile Preference as shown in the figure below.
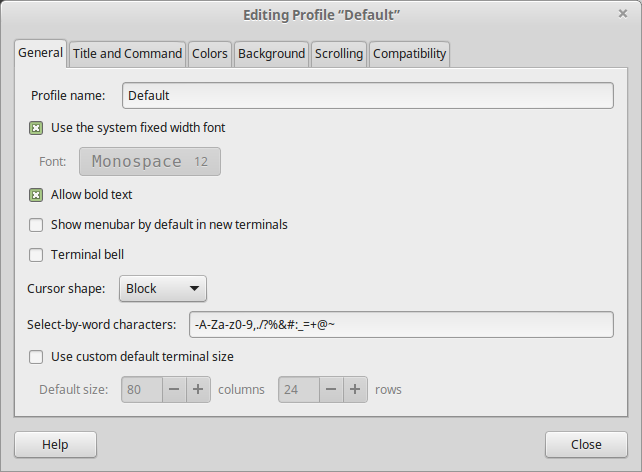
A window labelled Editing Profile "Default" will appear as shown below.
I prefer a terminal using a larger font size (12 points) and the physical size of the terminal to display 110 characters in 34 rows. So I set the profile as shown in the figure below.
To set the profile and close the window, the Close button was clicked. The terminal was then closed (via a Ctrl-D key sequence) and re-opened using the terminal launcher. The final terminal looks like the one showed below.
Installing Software From A Terminal
Rebecca (aka Linux Mint) gives you 3 main methods of installing sofware; namely, the new Software Manager, the old and trusty Synaptic Packet Manager and lastly, for the geek (or nerd - take your pick) in you, the Terminal's command line. This section shows you how to install software from a command line in a terminal.
Launch a terminal, and type the following command and press the Enter key:
sudo apt-get install mc
This command will execute the apt-get - the APT package handling utility for command line, and will install mc - a terminal-based file manager. First it will prompt you for your password - the sudo command allows you to execute commands at the admin's level. Enter your password and press the Enter key. It will then check the system and if the package exists, it will prompt you to continue or cancel. Press the Enter key to say 'Yes'. It will then start to download the package and, when finished, will start to install it. If successful, you will the see the prompt again without any error messages. The screen display below illustrate the whole process.
While the terminal is open, you can now start the mc software. Enter mc (followed by the Enter key) and the screen shown below will appear.
In case you are wondering why I use this file manager instead of the GUI file manger (Nemo), there are some things that this file manager can do that Nemo cannot. In any case, I am an 'old-school' Linux user and mc happens to be one of my favourite command line file manager.
While mc is open, you can explore it to your heart's content - when you have finished playing around with it, close it by pressing the F10 (or click on the Quit 'button' at the right-hand bottom) and the pressing the Enter key to confirm you really want to quit mc.
To close a terminal, you can either type the exit command or press the Ctrl-D key sequence.
Installing Hardware
I have a fair bit of hardware, like printers, scanners, etc., that I want to use with Rebecca. This section is all about installing them - your choices of hardware may differ from mine so view this section as a guide for hardware installation in general.
a) Installing Printers
Most modern printers (lasers and inkjets) uses USB connections, so it's just a matter of connecting them to Rebecca, switching them on, and then using System Settings to add the printer(s). The System Settings can be started from clicking on Menu and selecting the icon as shown in the figure below.
The System Settings window will open (see figure below). The Appearance and Preference items will be displayed. If you scroll down, the Hardware and Administration items will be shown (see figure below).
We need to use the Printers (under Hardware) item for adding printer(s) - so click on that and a new window will pop up (see figure below).
Click on Add - the New Printer window will appear (see below). Note that 'Enter URL' is selected by default - however, since we are NOT using a networked printer, and that the printer we have connected to Rebecca has been detected (an HP Laserjet Professional P1102, in my case here) has already been detected.
So we click on the correct printer (HP Laserjet Professional P1102) as shown in the figure below.
Click on the Forward button. The drivers for the printer will be searched for, and if found, it will be installed and the screen will change to one similar to the one shown below.
You can make any changes here (I shortened the short printer name to HPLJ-Pro-P1102) and then click the Apply button. Another window will pop up (see below) asking you whether you want to print a test page. I suggest you do so and click on the Print Test Page button.
A confirmation that the test page has been sent to the printer will appear (see below). Click on the OK button to close the window.
You should check the printer to see if the test page has been printed correctly - in my case, it had. The Printer Properties window (see below) will appear. You can set anything here - notice the amount of information on the printer! In addition, you can also perform other tasks by using the 3 buttons located at the bottom of this window. Click OK to dismiss this window.
The Printers window will appear again (see below) - this time with the newly added printer appearing in the window. Notice the check mark on the icon for this printer. Since it is the only printer (so far) in the system, it is marked as the default printer - hence the check mark.
You can go ahead to add more printers at this stage by clicking on the Add button or you can close this window if you have completed adding printers.
b) Installing Scanners
By comparison, installing a scanner (I
have two) to Rebecca is not as simple and straightforward as installing printers. There is no Scanners item under Hardware in System
Settings -
and therein lies the problem. If Linux Mint (or any Linux, for that
matter) makes this as easy (are you listening, Clem?) as installing
printers, then I can safely say that Linux have come a long, long way to
matching ease-of-use to Windows and Mac OS X.
The
first scanner I have is an Epson Perfection V330 Photo scanner - do not
be fooled by the term "Photo" in the name - it is a general purpose
scanner. As it is a USB device, I plugged it using the USB cable
supplied and powered it on. I then launched the Simple Scan program
(Menu - Graphics - Simple Scan) and the result is as shown in the figure
below.
As
you can see, the Epson scanner was not detected and there was no way I
could proceed any further until I have the correct drivers from the
manufacturer (Epson, in this case) and installed them on Rebecca.
I was fortunate in finding drivers and software for this scanner from the Epson Download Center (URL is here).
After filling in 'V330' and 'Linux' in the search boxes (see figure
below), and clicking on search, I was presented with a list of of
available software as shown.
By clicking on the Download button for
the first item in the list, I arrived at the page shown below. By
scrolling down, I managed to spot the Accept button - on which I
clicked.
I was then presented by the list shown
below. Knowing that my Rebecca uses the '.deb' file format and is a
64-bit PC, and guided by the FAQ (link shown on web page), I downloaded
the 'iscan_2.30.0-1~usb0.1.ltdl7_amd64.deb' and
'iscan-data_1.33.0-1_all.deb' files, which, by default, to the Downloads
folder.
The
procedure was repeated for the second item in the first list (close the
current window and you will be back at this list) and the file was
downloaded. You should now have 3 Epson driver files in the Downloads
folder. They are as listed below:
iscan-data_1.33.0-1_all.deb
iscan_2.30.0-1~usb0.1.ltdl7_amd64.deb
esci-interpreter-perfection-v330_0.2.0-1_amd64.deb
I could have used the GDebi program (Menu - Administration - GDebi
Package Installer) to install the downloaded files but instead I
selected to use a Terminal and show you how to install the files from a
command line. First, of course, is to launch a Terminal. Click on the
item in the panel or, alternatively, click on Menu, then click on the
Terminal icon found there - either way, a Terminal is launched. Then
enter the following command to switch to the Downloads folder.
cd Downloads
The switch to the admin (root) mode by executing:
su
Enter your password when prompted. Then execute the following command.
apt-get install xsltproc
This
command is to install the 'xsltproc' package to meet one of the
requirement (or dependencies) of the iscan program. Then execute the following command.
dpkg -i ./iscan-data_1.33.0-1_all.deb
This command will execute the dpkg
package installer (the grand-daddy of the DEB package manager) and
install the 'iscan-data_1.33.0-1_all.deb' package found in the Downloads folder. In a similar manner, execute the following command.
dpkg -i ./iscan_2.30.0-1~usb0.1.ltdl7_amd64.deb
and:
dpkg -i ./esci-interpreter-perfection-v330_0.2.0-1_amd64.deb
If
you don't see any error messages resulting from the execution of any of
the commands above, then you have successfully installed the iscan
program for the Epson V330 scanner. Exit from the admin (root) mode by
pressing the Ctrl-D key sequence.
Now
plug in the Epson scanner and switch it on. Then launch the iscan
program by either executing 'iscan' from the Terminal or clicking on
Menu - Graphics - Image Scan! for Linux. Either way, you should see the
following display.
NOTE: If you see a screen similar to the one below, then you have run into problems with the scanner. First check whether the scanner is connected to a USB port and powered on. Usually, fixing these will solve the problem but if you still see the screen below, then check whether you have installed all the files mentioned above IN THE ORDER indicated. Failing to do this will cause the problem. Un-install the files and try again. Should all fail, go the Linux Mint forum and search for a solution.
A test scan was then performed using the test page of the HP LaserJet P1102 that was installed in the previous section. The Preview button was pressed and the scanner started scanning the document - with the result shown in the figure below.
The image was then scanned using the Scan button, and upon completion, another window popped up (see below) for saving the image file to a destination with the suggested file name.
The OK button was pressed and the image
file was saved to the Documents folder with the name 'default.png'. A
quick check revealed the file was there and then viewed using the Image
Viewer.
As a last test, the Simple Scan program
(Menu - Graphics - Simple Scan)was again launched. This time there was no error message and a scan of the same test page was performed with the end result as shown in the figure below.
The Epson Perfection V330 Photo scanner has now been successfully installed.
As mentioned previously, I have another scanner - a HP ScanJet Professional 1000 Mobile Scanner - mostly used with my laptop as a mobile scanner since all the power it need to operate is from the USB port (hence the 'mobile' name). Plugging this scanner in a USB port on Rebecca and starting the Simple Scan program produces the same error message - 'No scanners detected'.
This time I was not so lucky in finding drivers as in the case of the Epson scanner. To cut a long story short, the HP scanner WILL NOT work on Rebecca and, to the best of my understanding, HP do not plan to support this scanner with Linux at all. End of story. This brings home the point that, with Linux (any Linux), do not depend on the manufacturer of the hardware to supply Linux drivers or software for that product.
c) Connecting a Digital Camera
Most of us will have (at one time or another) a digital camera, whether a simple point-and-shoot unit or a more sophisticated DSLR unit. One of common things, however, of these units, are attaching it to a PC for image transfer to do further processing on the images taken by the camera. Most digital camera manufacturers will supply software to transfer and process these images; but those software mainly works on Windows and Mac. They very rarely supply software for Linux.
Fortunately, Linux is able to read the memory storage (whether CF, or SD cards, or other types of memory cards) and also the ability to transfer files from these cards to the PC over USB. Note that most digital cameras will have a USB connection, as well as store the camera images on the memory cards under a standard folder - the DCIM folder. Provided the digital camera's manufacturer follows these 'standard', it will be extremely easy for image transfer to a Linux Mint PC - just follow these steps.
First connect the digital camera to the PC via a USB cable. Most manufacturers supply these cables - use these instead of a standard USB cable - you just don't know what the manufacturers have done with the cable and it is advisable to use these.
Then switch on the power to the digital camera. If you are lucky and the manufacturer of the digital camera follows standards, a window will pop up (see figure below) asking you what to do. I have a Canon PowerShot A550 digital camera - so it was gratifying to see that it was detected, as evident by the title in the window and the icon labelled 'Canon Digital Camera' that appeared on my desktop (see figure below).
Since the purpose of this exercise is the transfer of images from the camera to the PC, the images from the camera was imported using gThumb, a software installed by default on Linux Mint 17.1 for just this purpose. This action was selected by clicking on the 'down arrow' in the window and the text 'Ask what to do' was replaced with 'Import with gThumb' (see figure below). Note that you could make this the default action by placing a check mark on the 'Always perform this action' item. Next, the OK button was clicked.
Another window will pop up (see below) - the images to import were selected by using a Ctrl-Click sequence, followed by clicking on the Import button.
Note that the images will be imported to the Pictures folder by default - you can change this if you wish - for example a sub-folder off the Pictures folder called Canon Camera. There are other items that you can set if you wish - click on the Import button when finished. The main gThumb window wll the open as shown below.
There are a fair bit of things that you can do with gThumb, but mainly this software is useful for light editing of the images, sharing the images and printing the images. If you want to do some heavy editing then you need to use a heavyweight software like Gimp - which is installed by default on Rebecca (Menu - Graphics - Gimp Image Editor) and is shown in the figure below.
To disconnect the camera from the PC, simply switch off the camera and then disconnect the USB cable.
This is the end of Part 1. In the second part, we will continue with connecting other hardware like smart phones and tablets using USB, Bluetooth and other methods. Stay tuned.