There has been a lot of news lately about Google and the future of Android (search the Web for this term to read all the news). First 'fragmentation' then 'updates' and 'Google vs Oracle court case' and so on. Should you be worried? I suggest that you concentrate on program development for Android and let the chips fall where ever they may. Google is too big to fail – that said, it may take a very long while for it to so. So, for the time being, Android program development is the way to go. Enough of the political bit, and let us concentrate on Android et al.
Please note that OpenJDK is now officially supplied with Android Studio and there is no need to install Oracle's Java JDK on the Windows PC. If you are new to Java, then I suggest you download and install the OpenJDK JDK and a Java IDE (e.g. IntelliJ, Eclipse, etc).
Before we start off on our journey, I will assume that you have installed the latest version of Windows 10 and apply all the latest updates for the PC. Also, note that I will assume that you have installed the proper propriety video drivers for your PC. This is the only way for OpenGL ES (or GLES) to be installed for the PC. OpenGL ES is required by Android to make 2D/3D graphics processing faster through Hardware Acceleration.
Note that this 'how-to' is based on a Nvidia video card equipped PC, with the propriety video driver installed. Please note that it does not matter which video card is used; the end result is the same. This means that anyone can use Android Studio with a video card from Nvidia, AMD or Intel.
This 'how-to' was tested on the following hardware and found to be working:
- Gigabyte GA-Z79-HD3 Motherboard
- Intel Core i5-4590 CPU (3.3 GHz)
- Kingston 16Gb DDR3 HyperX RAM
- Nvidia GTX 750Ti PCI-E Graphics Card
STEP 1: Install Android Studio
To download and install Google's Android Studio point your web browser to here and move the cursor to the button labeled 'DOWNLOAD ANDROID STUDIO' – the button will turn green. Click on that button.

When the next screen appears, place a check mark on the 'I have read and agree with the terms and conditions' and then click on the blue button that reads 'DOWNLOAD ANDROID STUDIO FOR WINDOWS' to start the download.

NOTE: The downloaded file is named 'android-studio-ide-173.4819257-windows.exe' and is the currently the latest version of Android Studio (as of July 2018). The version number shown may be higher than this as Google or JetBrains is constantly updating it.
While downloading, you can read the 'Install Guide' by clicking on the appropriate button on the link. You find the instructions for installing Android Studio on Windows there.

NOTE: On the same web page, you will find a link labeled 'Build your first app'. You can click on this link and bookmark that web page for the continuation of this 'how-to'. Links will also be given for Udacity learning courses and meeting Android Studio. When done, you can go ahead to close the web browser.
Now that you have downloaded Android Studio, it is time to get it installed. To install it, open Windows Explorer and go to the 'Downloads' folder. Double-click on the downloaded .exe file to install it – if the User Account Control (UAC) window appears asking for permission to install the program, click on 'Yes' to allow Android Studio to be installed on your PC. The downloaded file will then start installing and the Android Studio Setup window (see figure below) will appear. Click on the 'Next' button to proceed.

The next window (Choose Components) is where you select the components to install. Note that they have been preselected to install all components – unless you have a need, do not select any components and click 'Next'.

The next window (Configuration Settings as shown below) is the location directory for installing Android Studio. You can enter the directory's name directly into the field, or use the 'Browse..' button to browse to the directory for the installation, then press the 'OK' button. I suggest that you accept the default for this 'how-to' since it would be easier to locate the installation directory. Then press the 'Next' button to proceed.

The next window – the Choose Start Menu Folder (see below) is where you specify whether you want to create a start menu item. Leave it at the default and click on the 'Install' button.

The actual installation of Android Studio will begin as shown below. This may take some time to complete so be patient. Wait for the installation to finish and then click on the 'Next' button.

The next window (shown below) will be displayed with the 'Start Android Studio' checked – keep it as it is. Click the 'Finish' button to close the setup window and start Android Studio.

The next window (shown below) asks whether you want to import any settings. If this is the first time you installed and started Android Studio, chances are that you don't have any – so just click on the 'OK' button. Of course, if you had installed Android Studio on Eclipse previously and wish to preserve the settings on Eclipse, feel free to import the previous settings by following the on-screen instructions.

Android Studio will begin loading as shown in the figure below.

The 'Setup Wizard' for Android Studio will start and the first window (the welcome screen) will look like the one shown in the figure below. Take time to read the text and then click on the 'Next' button to proceed.

The 'Install Type' window will appear next as shown below. The 'Standard' type of setup is already preselected – unless you have a need to customize the setup (click on the 'Custom' item), click on the 'Next' button.

The 'Select UI Theme' window will appear next as shown below. Select the theme you want to use (the IntelliJ theme was selected for this 'how-to') and click on the 'Next' button.

The 'Verify Settings' window will appear next as shown below. If you need to change anything, click on the 'Previous' button and select 'Custom' item – else click on the 'Finish' button.

The 'Downloading Components' window will appear next as shown below. If components need to be downloaded and installed, Android Studio will do so. This may take time so be patient.

When completed, the screen will display a window with the message 'Android SDK is up to date' (where SDK stands for Software Development Kit) as shown in the figure below. Click on the 'Finish' button to close the Setup Wizard.

Android Studio will start and the welcome screen will appear as shown below.

NOTE: Note that the last line on the IDE window may contain an additional item – the 'Events' item with a green balloon to the left. If you wish to apply the updates now, click on the 'Events' item, then on the 'update' item and follow the on-screen instructions.
Take some time to inspect the welcome screen of Android Studio. If you are new to Android Studio and Android programming, you should concentrate on the first item in the menu – the 'Start a new Android Studio project'. If you had created a project, you may use the 'Open an existing Android Studio project' menu item. The rest of the menu items are for advanced users – i.e., Version Control, importing projects and Android code samples.
Note the two items on the bottom of the Android Studio window – the 'Configure' and 'Get Help' items. The 'Get Help' item is self-explanatory – it allows you to seek help from Google (the User Manual!) or IntelliJ. It also allows you to check/set the 'Tip of the Day' settings.
The 'Configure' item allows you to carry out various configuration to Android Studio – specifically to the SDK Manager, the default Android Studio Settings, the default Android Studio Plugins, and Import/Export Settings. It also allows you to check/set the Settings Repository, Check for Update and finally, check/set Projects Defaults. If any of these terms seems to be gibberish to you, then do a Google search for them.
NOTE: The latest version of Android Studio has a new look which differs from the previous versions. One of the major differences is the way Android Studio handle updates – if there are any, the last line on the IDE window will contain an additional item – the 'Events' item with a green balloon to the left. Click on the 'Events' item, then on the 'update' item and follow the on-screen instructions if you wish to apply the updates. Note that the update message may also appear in the projects window.
In order to make things easier to launch Android Studio, it is suggested that you place the icon for Android Studio in the Windows taskbar. To do this, right-click on the icon for currently running Android Studio in the Windows taskbar and select 'Pin to taskbar' from the resulting pop-up window. You can reverse this by selecting 'Unpin from taskbar' at any time.
You can also place an icon on your desktop by clicking on 'Start' then locate the 'Android Studio' item. Click on the down arrow for this item, and then on 'Android Studio' item. Right-click that item, and select 'More' from the drop-down list, then 'Open file location' item. A Windows Explorer window will open showing the file 'Android Studio'. Create a shortcut for this item on your desktop and then close the window.
To test whether this taskbar icon works, close Android Studio first by clicking on the close button (the one that looks like an 'X'), followed by a click on the taskbar icon. Android Studio should launch – if not, follow the instructions given in the last paragraph.
STEP 2: Configuring SDK Manager
Launch Android Studio again if you have not already done so. Notice the 'Configure' on the last line of the screen – click on it and then click on the 'SDK Manager' item (see below). For your information, SDK stands for Software Development Kit.

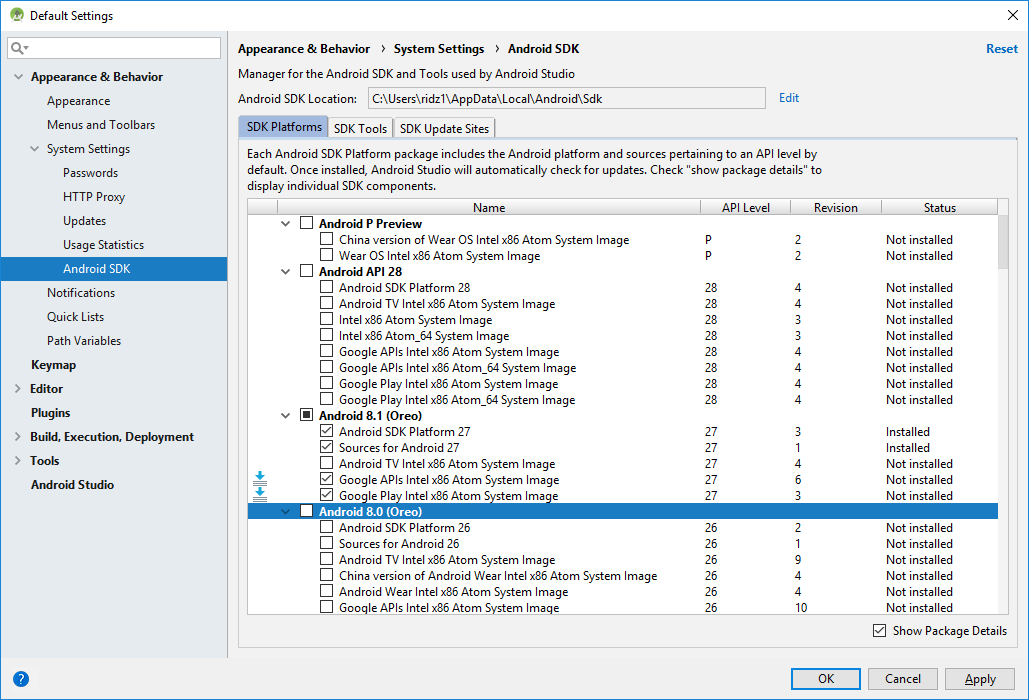
The 'Default Settings' window will appear as shown below.

Note that the 'Android SDK' item is automatically selected on the left pane of this window. Other items are listed in the left pane and are available for you to use, but for the time being, keep the selection on the 'Android SDK' only in the left pane.
The column to note is the 'Status' column – it is where the window indicates whether the package has been installed or any updates are available for any package. For the purpose of this 'how-to', a 'package' can include other packages – but this window will only show the 'main' package.
The location of the 'Android SDK' is clearly stated on this window, and you can change its location if you wish – but for the purpose of this 'how-to', keep it as it is.
Note also that the tabs below the SDK location are pre-selected for the 'SDK Platform'. To change tab, all you need to do is to click that tab – for example, click on the 'SDK Tools' tab, and you will see the contents of that tab (see below). Note the item 'Intel x86 Emulator Accelerator (HAXM Installer)' which is marked as 'Installed'. Make sure that this item exists and is installed on a Windows 10 PC – else you may experience problems with the emulator later.

NOTE: There are lots and lots of SDK tools listed here. Only those tools that are essential to initially build a project have been installed. You are free to install any other extra tools as you so wish.
If you see any items with the text 'Update Available: xx.x' (where x can be any number) under the 'Status' column, then it is advisable to apply the update immediately.
If you click on the 'SDK Update Sites' tab, you will see URL's for the sites (see below) – do not change anything on this window at this time. Now click the 'SDK Platform' tab again – keep it at that tab for the moment.

Note the 'Show Package Details' box at the bottom of the window – at the moment it is not selected (i.e., no check mark has been placed there). Click on the box to select it – the display will change as shown below.

This display window will show more details on the packages installed so far – including their API level, its revision number and as mentioned previously its status. Note that it even includes the latest packages for Android API 28 and Android P Preview.
Based on your requirements, you may decide to install more packages – for example, the author has a Google/LG Nexus 5X smartphone running on Android 8.1.0 (Oreo) – so it was decided to install the additional packages as shown by selecting the box next to its names. Note the 'Download' icons that appear as soon as you select the boxes for the items (see below).
NOTE: If you decide to use the latest Android P Preview or Android API 28, do so as the latest Android versions is backward compatible (see below).

You are free to select any packages to download and install, depending on the actual Android devices that you possess, though you may do otherwise. Just select them (you have to scroll down the display for more packages), then click on the 'Apply' button and the 'OK' button on the 'Confirm Change' window that appears next.

NOTE: If you deal with Android TV and/or Android Wear, make sure that you download these items.
The ARM system image more closely matches most Android devices using these processors, but requires the processor to be emulated and is thus very slow. The Intel x86 Atom system image is potentially quite a bit faster, using the Intel HAXM virtual machine support mechanisms to execute the code in a partially native way. You can try the x86 for speed, and fall-back to the ARM if you have compatibility problems.
Support for Google specific Android APIs like the Android Google maps API, are not provided with the standard Android system images. They need to be installed separately using the SDK manager. To use these APIs with an x86 system image you need to also install the Google APIs (x86 System Image) for the same API level.
The difference between a 32-bit and a 64-bit processor is self-evident and can be found easily on the Internet. Examples can be found here or here.
The next screen will appear – the 'Component Installer' window (see below).

Wait for the download to finish (it may take some time to complete), then press the 'Finish' button (see below).

You will be back at the 'Default Settings' window of the Android SDK (see below). Inspect the packages that were downloaded and installed to make sure that they are correct. If any errors are found – such as downloading errors – then try again. Once this is successful then click the 'OK' button.

You will be back at the welcome screen of Android Studio.
STEP 3: Create a New Project Using Android Studio
Now that you have successfully installed Google's Android Studio, it's time to use it to develop software for the Android platform. We start off by using Android Studio to write a short and simple 'Hello World' program, which you can run either on your Android Virtual Device (AVD), or your actual Android device.
Use either the icon in your taskbar or on your desktop to launch Android Studio if it is closed. Start a new project by clicking on the 'Start a new Android Studio project' (as indicated by the red arrow) item from the welcome screen (see below).

The 'New Project' screen as shown below will appear – fill in the details for the 'Application name' to 'Hello World', and 'Company Domain' to 'any.company.com' as shown.
NOTE: You can change the package name by clicking on the 'Edit' button on this screen – but I suggest that you keep this package name – at least for this 'how-to'. Likewise, you can also enable C++ and Kotlin (search the Internet if you are not familiar with this) support by enabling the appropriate boxes – but for this 'how-to', leave them off.
The directory in which this project reside can be anywhere on your PC. In the example shown, I have placed the project in my home folder's 'Projects' directory but you are free to use any directory you wish. Then click on the 'Next' button.

The 'Target Android Devices' screen will appear next (see below). Make sure that the 'Phone and Tablet' item is selected. The 'Minimum SDK' is preselected to be 'API 15: Android 4.0.3 (IceCreamSandwich)' and the reason why is as stated in the note below this field. If you are unsure on which minimum SDK to select, you can click on the 'Help me choose' link. For this tutorial, leave it at the preselected minimum SDK.
Note that a check box labeled 'Include Android Instant App support' – consult the Internet if you are not familiar with this term – for the time being, do not place a check mark in the box.
NOTE: If you are developing any projects for Android Wear and/or TV, then select the appropriate buttons. The Android Auto item enables you to add support for it to your existing application. It will enable your app to work on both car and phone screens. Android Auto handles most of the work to adjust each application's user interface to the screen on which it is displayed. In a similar manner, Android Things lets you build smart, connected devices for a wide variety of consumer, retail, and industrial applications.
Note that to enable your app for Wear/TV, your app must target Android 5.0 (API level 21) or higher. Likewise, for Android Auto/Things your app must target Android 7.0 (API level 24) or higher.

Then click on the 'Next' button. The 'Add an activity to Mobile' screen will appear next (see below). Select the 'Empty Activity' item if it is not preselected.
NOTE: There are lots of activities to choose from – you can scroll through the available ones and pick one to suit your app. According to Google, activities are one of the fundamental building blocks of applications on the Android Studio platform. They also serve as the entry point for your interaction with an application and are also central to how a user navigates within an application or between applications. For further reading, go here.

Then click on the 'Next' button. The 'Configure Activity' screen will appear next (see below). Change the 'Activity Name' to MyActivity and the rest of the items below will change as shown.
NOTE: There are two other radio boxes that you can use – one is labeled 'Generate Layout File' and the other is labeled 'Backwards Compatibility (AppCompat)'. The 'Generate Layout File' allows you to generate an XML file for the activity, while 'Backwards Compatibility (AppCompat)' is letting you know that if you un-check it, then you'll be including and using the library Activity instead of AppCompatActivity. At the moment, both of these are enabled (i.e., they both have check marks). Leave them enabled for the time being. Use Google to search for more information on these items.

Then click on the 'Next' button. The 'Component Installer' screen (see below) may appear next and this is where Android Studio checks for any components that may be required to be downloaded and installed. Once that is done, click on the 'Finish' button.

Android Studio (the 'Gradle' part anyway) will then start building the project as shown below. This may take some time to complete so be patient. Note that your project is a basic 'Hello world' app that contains some default lines so you do not have to enter those lines into the project. Later you can view the Java source code for this 'Hello world' project in the Android Studio IDE.

During the building of the project, you may see a 'Window Security Alert' (as shown below) pop-up – click on the 'Allow access' button to allow OpenJDK to access the system through the firewall. The window will disappear.

After the system has finished building the project, a screen similar to the one shown below will appear.

If a 'Tip of the Day' screen appears, you can safely close it by clicking on the 'Close' button. You can, if you wish to, also clear the box labeled 'Show Tips on Startup' to disable this feature.
If this is the first time you are using Android Studio, you may get a window pop-up at the left bottom corner of the IDE labeled 'Help improve Android Studio by sending usage...'. Click 'I agree' or 'I don't agree' and this window will disappear and will not bother you anymore.
NOTE: For those users who are new to Android Studio (and the IntelliJ) user interface, the various buttons, menu items, tabs, etc, poses a very big challenge – for example, what are the purpose of the various buttons? Do not despair as the Android Studio User Manual is available online here. They will help you to familiarize yourself with the various parts of the IDE. For those who are interested, a guided tour around the IntelliJ IDE user interface (on which the Android Studio is based) is also available here. Take some time to familiarize yourself with the functions of the various components of the IDE. For those of you who are familiar with a programming IDE, you can safely disregard this note and proceed with the 'how-to'.
Note that this screen shows the source for the package 'MyActivity' Java class. Click on the 'activity_my.xml' tab and the screen as shown below will appear. Note that it does contain a graphic of a Nexus 4 device on it. This, however, is NOT the output of the project.

If any error occurs during the project build, Android Studio will display the error message and will offer a 'Tip' to try out ways of solving it.
Notice that the graphics shown is a Nexus 4 device. If this is acceptable to you, then don't change anything. However, since the author has a Nexus 5X device, it was decided to change the graphics to show such a device. This can be achieved by simply clicking on the downward pointing arrow beside 'Nexus 4', and then selecting 'Nexus 5X' from the drop-down list (see below). Of course, you are free to choose any other Android device from the list depending on the actual device in your possession. Note that there will be no change in the graphics shown since the 'Nexus 4' device is similar to that of 'Nexus 5X'.

To close the 'Hello World' project on your Windows PC, click on 'File' and the 'Close Project' menu items on Android Studio. You will be back to the welcome screen. Note the project 'HelloWorld' listed on the right panel of this screen. All you have to restart this project is to click on this.

Now that we have created a new 'Hello World' project, we will test it out to see whether it will run as advertised. Before we do this, we need to create either an emulated Android device or use an actual Android device. We will now create an emulated Android device for testing the project. Later, this 'how-to' will describe the procedure for running the project on an actual Android device.
STEP 4: Create Emulated Target Android Device
If you have closed Android Studio, launch it again, click on the Hello World project to make sure that the 'Hello World' project is on the screen. You may see the screen as shown below. Close the status window (located at bottom of the window) below by clicking on the icon as indicated by the red arrow.

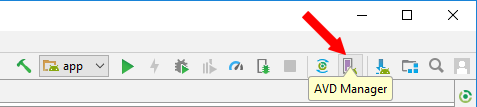
Notice in Android Studio's toolbar an icon with some words in it. Hover the cursor over the icon and you will see 'AVD Manager' – that is the icon I am referring to – then click on it (see below). Alternatively, click on 'Tools' in the menu, followed by a click on 'AVD Manager'.
No matter which path you took to activate the AVD manager, the window will change to 'Your Virtual Devices' as shown below. If you are running Android Studio for the first time, no virtual devices have been set up. The '+ Create Virtual Devices...' button will be shown (see figure below).
NOTE: Note the notice below where the Android Dashboards is mentioned – click on this link and a web browser window will appear showing the contents of the Android Dashboards. Close this web browser when done.

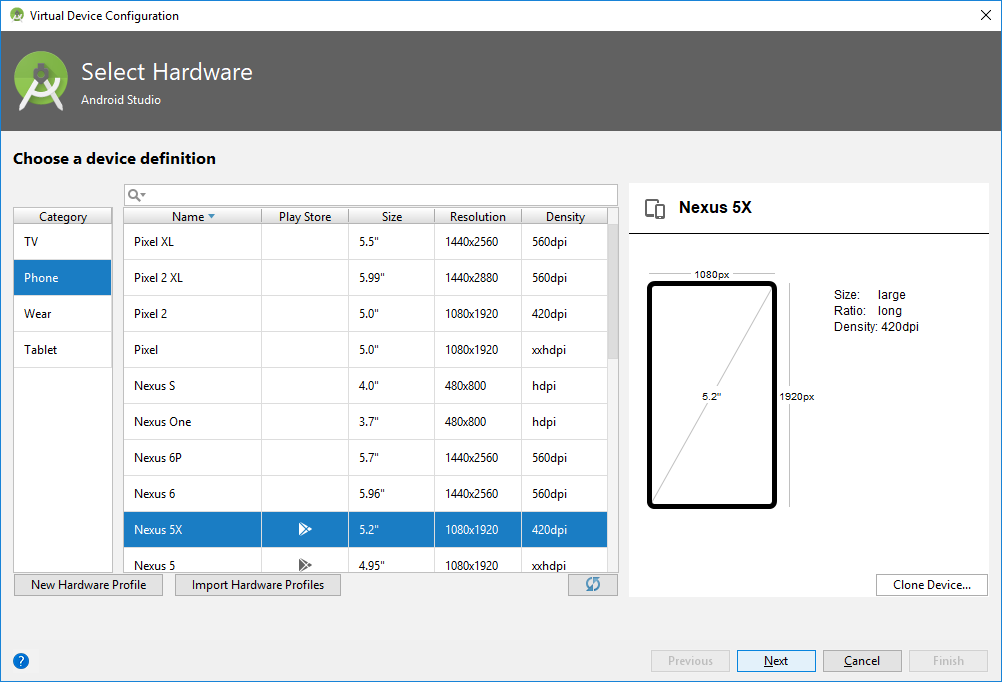
Click on the '+ Create Virtual Devices...' button. The 'Select Hardware' window will appear next (see below). It already preselects a 'Phone' device under the Category column and the Nexus 5X device with the specifications shown.
Note the 3 buttons at the bottom of the window. The 'Hardware Profile' button allows you to create an Android device other than that in the list. The 'Import Hardware Profiles' allows you to import a profile stored on your PC into Android Studio. The 'Clone Device...' button allows you the clone the currently selected device (the Nexus 5X in this case), and use this as a base for a new device similar to the Nexus 5X. For the time being, do not press any of the 3 buttons.
In addition to these 3 button mentioned, there are 2 more buttons which you can use. One is the 'Refresh' button found under the window – this is used to refresh the screen anytime.
The other is the 'Help' button (which contains a question mark). Clicking on this will result on a web browser window appearing – giving the user advice on creating and using an AVD. Close this web browser window when done.
Press the 'Next' button to proceed. The next 'System Image' window is where you specify the 'System Image' to use for the AVD. The 'Recommended' tab is already selected and the cursor is already resting on the recommended item (see below), which is 'API 28 – 28 – x86 – Android API 28 (Google Play)' – which you can use. However, according to which Android device I possess – a Nexus 5X – I would require an Oreo-based x86 emulator with API 27. It must be compatible with Android 8.1.0 (and above) and must use Google Play.

In order to set this, all that is required, is to move the cursor down to the item labeled as 'Oreo' (see below).

If you are unsure which system image to use, click on the link that says 'API level distribution chart'. A distribution chart will be displayed to guide you in selecting the right image to use (see below). When finished with the chart, click on 'Close' to dismiss the chart screen.

Note that there 2 other tabs for the screen – the 'x86 Images' and the 'Other Images' tabs. These allow you to select other images to use (you have to download and install some of these before they can be used). Click on the 'x86 Images' tab and the screen will change as shown below.

If you click on the 'Other Images' tab, you will see a screen similar to the one shown below. Note the warning message at the bottom of this screen. It says that 'A system image must be selected to continue' – since you have not made a selection yet, you can safely ignore this warning. There is also another warning message (in red color) in the right panel of this screen – it reads 'Consider using an x86 system image on an x86 host for better emulation performance' – since you have made your selection, you can safely ignore this warning also.

Now click on the 'Recommended' tab and make sure that your cursor is on the 'Oreo' item, then click on the 'Next' button.
The 'Android Virtual Device (AVD)' window will appear next (see below). Note that you can change (if you wish) some things on the window. For example, if you wish to change the name of the AVD all you have to do is to click anywhere on the field and make the changes. The Startup Orientation is also changeable – portrait or landscape mode. Likewise the Emulated Performance and Device Frame.

You can also click on the 'Show Advanced Settings' button for more settings to set and configure. This button will reveal (you may have to scroll up this window) the Camera (Front and Back), the Network (Speed and Latency), the Emulated Performance, the Memory and Storage, the Device Frame, and the Keyboard settings. You can change any of these settings if you so wish.

Verify all the settings (see below) – then click on the 'Finish' button. You will be back at the 'Your Virtual Device' window (see below) with the newly-created AVD listed.

From here, you can either launch the AVD, edit any AVD settings and perform any other actions by clicking on any icons in the 'Actions' column. You can also define a new AVD by clicking on the '+ Create Virtual Device...' button. For now, close this window via the 'x' on the top right-hand corner and you be back at the project window.
STEP 5: Running The Project On The Emulated Target Android Device
If you have closed Android Studio, launch it again, click on the Hello World project to make sure that the 'Hello World' project is on the screen.
On the Android Studio project screen's tool-bar, there will be a green-colored icon that looks like a right-pointing arrow (see below). If you hover your cursor over the icon, the words 'Run 'app' (Shift+F10)' button will appear.

Click on the icon (or press the Shift+F10 keys) and the 'Select Deployment Target' screen will appear (see below). If this is the first time you started it, you may see a message 'Initializing ADB' appear on the screen briefly. ADB stands for Android Debug Bridge and is a command-line tool that lets you communicate with a device – specifically the Nexus 5X in this case.
Note the warning message stating that 'No USB devices or running emulators detected'. You can safely ignore this message – you have not connected an actual Android device and the emulator has not started yet.
Also note the 'Troubleshoot' link on the display – if you click on this, a web browser will open to allow you to troubleshoot the problem. Close the web browser when finished.
Note that the Nexus 5X emulator has been preselected by default. Also, note you can create a new virtual device by clicking on the appropriate button. If you want to use the same device in future, place a check mark in the 'Use same selection for future launches' item in the bottom of the screen.
Make sure your cursor is resting on the AVD that you have just created and then click on the 'OK' button.

NOTE: If you don't see your device, click on the message that says 'Don't see your device?' and the web browser will be launched showing a page from the User Guide on this subject – pursue this page to solve the problem. Close the web browser when done.
The Nexus 5X AVD will start, and after a while, the AVD will appear displaying a flashing animation followed by a 'Google' sign. Then the AVD will display the home screen for a short while, after which the 'Hello World!' words will appear on the AVD's screen (see below). This means that the Nexus 5X AVD is set up correctly and is working perfectly.

Note the small vertical window to the right of the AVD (see below). This contains all the controls for the AVD – which includes the power button, the speaker volume controls, the screen rotation controls, the camera button, the search button and the navigation buttons. At the extreme top are the minimize and exit buttons.
At the extreme bottom is a row of three horizontal dots – clicking on this will bring up another screen (shown below) where more extended controls are located. You can play with the controls if you wish.

NOTE: The extended controls allow you to set several parameters such as Location (GPS), Cellular network, Battery level, Camera controls, Phone/SMS calls, Directional pad (useful on a tablet), a Microphone device, Fingerprint device, Virtual sensors (accelerometers, etc), Bug reports, Snapshots, Screen Record, Google Play, Settings, and lastly, Help. Since the highlight is on the 'Location' item, you should see the GPS data in the right side of the screen.
To close the extended controls of the AVD, click on the exit (looks like an 'X') button located on top of the control screen. Close the AVD by clicking click on the exit button, and you will be back at the project screen. If this is the first time you do this, it may take time to finish – so be patient and wait.
NOTE: You may see a red colored error message balloon (labeled 'Event Log') at the bottom of Android Studio's IDE – this will indicate any errors that may occur during the building of the application. If such errors occur, click on the 'Event Log' and the errors will be listed at the bottom of the IDE as shown below.

Note that you cannot do anything about some of the errors and they will remain listed until Google address the issues. However the last line of the screen will state whether your AVD has been successful – if it does, it should state '
You can close the 'Hello World' project any time by clicking on 'File' menu and selecting 'Close Project'. You will find yourself back at the welcome screen of Android Studio.
Alternatively, if you want to keep the 'Hello World' project (or any project) in the project screen on the next restart of Android Studio, all you need to do is to click on 'Android Studio' in the menu, and select 'Quit Android Studio' item. You need to confirm this exit by clicking on the 'Exit' button.
You can also click on the 'X' on the top right-hand of the project screen and confirm that you want to exit. You will find yourself back at the welcome screen of Android Studio. Then you can close Android Studio if you wish.
STEP 6: Running The Project On An Actual Target Android Device
We have successfully tested the 'Hello World' project on the AVD emulator. However, our ultimate goal is that the project should run on an actual Android device (a smartphone, for example). In order to do this, you need to connect that device to your development PC (the Windows PC on which Android Studio is currently running) using a proper USB cable and the proper USB ports.
First, you need to enable USB debugging on your Android device. Usually, this setting can found under 'Settings' and 'Developer options' but it can vary from device to device. The newer Android devices with Oreo (Android 8.1.0) has 'Developer options' under 'Settings' > 'System' but is initially hidden. To reveal this 'Developer options' you need to follow the steps outlined below.
- Tap 'Settings' followed by 'System' and at the bottom, you will find an 'About phone' item.
- Tap on it and scroll to the bottom, where you will find an item labeled 'Build number'.
- Tap on this item 7 times and you will see the message 'You are now a developer'.
- Now go back to the previous screen where you will find the 'Developer options'.
The screen shot (you may have to scroll the display up) shown below is the already revealed 'Developer options' for the Nexus 5X and show that the USB debugging switch has been set to 'On'.

The screen shot below it shows the message that pops up in the smart phone asking you to verify USB debugging by tapping on 'OK'.

If you find an item labeled 'Revoke USB debugging authorizations' on your Android device, tap on that.

A message will pop up and ask you for confirmation. Then clear all previous authorization by tapping on 'OK'.

Now click the Android device 'Back' button to exit the 'Developer options', 'System', and 'Settings'.
Now check if you had previously run/installed the same 'Hello World' application on the Android smartphone. This can be done by pressing the 'App' button on the 'Home' screen of the smartphone (the middle lower button that looks like a round button with two rows of 3 dots on it), and then searching for it on the 'App' screen – delete it if found. Then close the 'App' screen – you should be back at the 'Home' screen.
Next, we have to make sure that the proper USB cable is used. The manufacturers of your Android device usually provide you with one – use that cable and none other. Unfortunately, the author's Nexus 5X smartphone comes only with type C USB connectors at both ends so it would be impossible to make connections to a Windows PC with type A USB connectors. Should this be the case with your Android smartphone and your Windows PC, it would mean getting another USB cable for the connection between your Android smartphone and your Windows PC. Purchase one with a type A USB connector on one end and a type C USB connector at the other end.
You also have to make sure that the USB port to be used on your Windows PC is working. Test this port out first by plugging in a thumb drive (or any other USB device) and if the Windows PC recognizes this device, you can safely say that the USB port is working.
Now make sure that Android Studio is running the 'Hello World' project. Then connect your Android smartphone to your Windows PC using the USB cable. You will note the connection is valid by the figure (as pointed out by the red arrow below) on your Android smartphone Home screen. By the way, the screenshot below shows the author's phone – yours may look different but the valid figure should remain the same.

Make sure that you have configured the USB connection as for transferring files (or photos), and not for charging the battery. This is easily done by swiping down the round figure on your Home screen (see figure above) on your Android smartphone Home screen. Tap on the 'USB charging this device' item and the figure as shown below should appear on the smartphone. Select 'Transfer files' or 'Transfer photos (PTP)' and the screen should disappear.

Then click on the 'Run' button in Android Studio's PC tool-bar. As usual, the 'Select Deployment Target' screen will pop up as shown below.
NOTE: If this is the first time you are using Android Studio, you may see the connected Android smartphone as a string of garbage letters and numbers before you authorize the RSA key (see below) – this is normal for Android Studio, so don't be alarmed. Only after you have OK'ed the RSA key, you will find the 'LGE Nexus 5X' as shown in the figure below, replacing the letters and numbers.

You will also need to authorize the USB debugging connection to the smart phone with the Windows PC's RSA key by selecting 'OK' on your smart phone (see below).

Then, make sure that the 'LGE Nexus 5X (Android 8.1.0, API 27)' item is selected on the 'Select Deployment Target' screen on the Windows PC. Then click the 'OK' button to run the project on your Android phone device.
If everything is set up correctly, you should see the 'Hello world!' message displayed on your Android device's screen (see below).

NOTE: You may get a message on your Windows on the existence of a previous 'Hello World' (created by another Android Studio) file installed on your smartphone If this is the case, all you have to do is to press the 'OK' button and it will delete the file for you and you hopefully will see the 'Hello World' message on your smartphone.
If not, see if there are any messages on your Android Studio event log screen of your Windows PC. If the message mentions authorization (for example), then, most probably you have forgotten to set USB connection authorization on your device. Do it now and retry running the project again.
The important thing to remember here (if unsuccessful) is that Android Studio will display some message and this usually gives you a clue on what is wrong. If you still run into problems, then I suggest searching the Internet for your problem.
You can now close the window on your Android device (usually using the 'Back' key). If you examine the apps on your device, you will find an app labeled 'Hello World' (see below). This is, of course, the 'Hello World' app file (usually with a .apk extension) which Android Studio has downloaded for you. You can delete this file if you so wish. By the way, before you put your Android device aside after testing more new apps developed using Android Studio, remember to disconnect the smartphone first and then switch off USB debugging from the phone.

You should see the projects screen on your Windows PC. You can close the project at any time – and you will be back to the welcome screen.
Updating Android Studio
If you start Android Studio and see an extra item on the last line, listed as 'Events' on a green background, then it is time to apply updates. Note that the update notifications may appear on the welcome screen or the projects window.
Note that there are two types of updates – one is to the Android Studio itself (and indirectly, IntelliJ) and the other is to the SDK. One would require a restart to Android Studio and the other do not.
To apply the updates, just follow the steps below:
- First click on the 'Events' item followed by a click on the 'update' item.
- Then click on the 'Update and Restart' or the 'Update Now' button and the update process will start. Next, a patch file will be downloaded and installed.
- If required, the 'License Agreement' and the 'Component Installer' will appear next, where the update files are downloaded and installed.
- If you apply the first type of update, Android Studio will be restarted while the second type of update will display the welcome screen again. Note that in either case, there will be the absence of the 'Event' balloon denoting that all updates were applied.
Summary Of Steps
- Download and install Google's Android Studio.
- Configure SDK for Google's Android Studio.
- Create a new project on Google's Android Studio.
- Run the new project on the AVD to test it.
- Run the same project on an actual Android device.
Final Words
That's it. You now have a Windows 10 PC which can be used to develop Android software. What was outlined in this 'how-to' is only the 'tip-of-the-iceberg' – there are more, lots more that you need to discover and learn!
If you are an experienced IntelliJ, Android Studio, Java, and Android programmer, enjoy! For those people who are new to Android Studio or Java programming, here are some links which I recommend you visit in order to learn about Android programming.
To learn how to use Android Studio for developing Android software, visit here for a tutorial on this. To read the User Guide for Android Studio, visit here for this. No matter how experienced you are, I urge you to read this manual.
To learn about the IntelliJ IDE (on which the Android Studio is based), visit here for a tutorial on this.
If you are new to Java, then I would recommend searching the web for tutorials and the books 'Java For Dummies, 7th Edition' and 'Head First Java, 2nd Edition' as a guide.
If you are new to Java Programming for Android, then I would recommend searching the web for tutorials and the book 'Java Programming For Android For Dummies' as a guide. There is also another book by the same author but is more 'advanced' and is targeted towards Android developers. The title of this book is 'Java Programming For Android Developers For Dummies'.
Happy computing!
No comments:
Post a Comment