STEP 1: Check for Virtualization Technology
First you need to check whether you have Virtualization Technology (Intel or AMD based) on your PC. Why is this important? In a word, the answer is ‘speed’. If you have used Google’s Android Development Tools (ADT) previously on the Eclipse IDE previously, then you know what I mean. Basically speaking, Virtualization Technology allows you to create an Android Virtual Device (AVD) which loads and run faster than previously – thus cutting software development time. The Virtualization Technology employed by Google’s Android Studio depends on both hardware and software – the hardware side is dependant on whether you are using a hardware-virtualization capable CPU on your PC, while the software side is dependant on whether your OS has drivers for the hardware-virtualization capable CPU on your PC. Working together, these technologies will provide you (the user of the PC) with time-saving features while developing Android software.
To test whether the CPU in your PC is hardware virtualization capable, run the following command in a root terminal (or preface each command by sudo in a non-root terminal):
egrep --color=auto 'vmx|svm' /proc/cpuinfo
If your PC support Virtualization Technology, then you should see ‘vmx’ or ‘svm’ highlighted in color in the output (repeated according to the number of cores in your CPU) of the command. On the other hand, if nothing highlighted is displayed, then your processor does not support hardware virtualization, and you will not be able to use Virtualization Technology. This means that you cannot use the Intel Atom x86 AVD and emulation is purely on a software level (very, very slow!) with Android Studio.
To check whether the CPU on your PC is manufactured by Intel or AMD, execute the following command in a root terminal:
lscpu
You should various information on your CPU being listed out – the two most important pieces of information are:
Vendor ID: GenuineIntel OR AuthenticAMD
Virtualization: VT-x OR AMD-V
These will tell you whether you are using an Intel or AMD CPU and whether the CPU support hardware virtualization – in the case of my PC, it’s an Intel CPU with virtualization capability.
If you have a Intel CPU based PC which is hardware virtualization capable, then do a restart of your PC and enter the BIOS (classic or UEFI) – the settings for Virtualization Technology are usually found under the Advanced CPU (or Processor) setting named ‘Intel Virtualization Technology’, ‘Intel VT-x’, ‘Virtualization Extensions’, ‘Vanderpool’, or something similar. Check whether the option is enabled – enable it if was not and then select ‘Save and Exit’ or the equivalent feature to save your settings changes and reboot your computer.
If you have an AMD CPU based PC which is hardware virtualization capable, then do a restart of your PC and enter the BIOS (classic or UEFI) – the settings for Virtualization Technology are usually found under the Advanced CPU (or Processor) setting named ‘Secure Virtual Machine Mode’, or something similar. Check whether the option is enabled – enable it if was not and then select ‘Save and Exit’ or the equivalent feature to save your settings changes and reboot your computer.
Next you need to make sure that the Linux Kernel-based Virtual Machine (KVM) module is loaded on your PC. Usually the absence of these item are made known when trying to run an AVD (Android Virtual Device) using the Intel Atom x86 emulator – the error message when trying to launch such an AVD will clearly indicate this.
To check whether the KVM module is loaded, open a root terminal and execute the following commands:
lsmod | grep kvm
If these command does not return anything (and they SHOULD not for a newly installed PC), then the modules are not loaded. To load these, execute the following (the example is shown for the Intel CPU):
modprobe kvm
modprobe kvm_intel
These command should not return anything. To verify that the modules has been successfully loaded, execute the following command again:
lsmod | grep kvm
If you should see something similar to the one shown below, then the modules have been successfully loaded. Of course, the CPU type and numbers may be different on your PC.
kvm_intel 138253 0
kvm 259570 1 kvm_intel
irqbypass 2488 1 kvm
You can now proceed to the next step. However, if you are unable to load the KVM modules, then it is quite possible that KVM is not part of your Linux kernel. You may have to resort to re-building your kernel – this ‘how-to’ will not cover that topic. Consult the Internet for instructions on how to do this.
Also note that the KVM modules are only loaded for this session. If the PC is shut down and then re-started again later, the process of manually loading the KVM modules has to be done once again. To load these KVM modules automatically upon every start-up of the PC, you need to execute the following command in a root terminal:
nano /etc/rc.d/rc.local
This will open the ‘/etc/rc.d/rc.local’ file for editing. Now add the following lines to the file (the example is shown for the Intel CPU):
/sbin/modprobe kvm
/sbin/modprobe kvm_intel
Just remember to save the file and restart your PC to test it. If successful, the modules should show up as being loaded upon start-up.
STEP 2: Install Oracle’s Java SE (or JDK) 8
On a newly-installed and updated PCLinuxOS64, only Oracle’s Java Runtime Environment 8 is installed by default. This can be easily verified by executing the following command from a terminal:
ls -la /usr/lib/jvm
The output will display a screen similar to the one shown below.

Note that only Oracle’s JRE version 1.8.0.112 (the latest version as of October 2016) is installed. Also note that other Java directories exists – from version 1.6.0.38 onward but they are mostly empty. From my experience and as far as I know, PCLinuxOS64 is the only Linux distribution that currently install Oracle’s Java – although they still label it as Sun’s Java. Google’s Android Studio, however, requires the full Java SE, and the recommended version is Oracle’s Java (JDK or SE 7 and above). So, you need to install it first before you proceed.
Why install Oracle’s Java? Why not OpenJDK? Good questions and the answer is that Oracle’s Java is recommended by Google. Should you plan to use Java for Android programming, then Google says it is better to use Oracle’s version – their Android Studio says that there are stability issues with OpenJDK. Whether this is true is a moot point here – if you do plan to do Android programming later, then install Oracle’s Java – else, any Java will do, even the default Oracle JRE 8 or OpenJDK.
To install Oracle’s Java SE 8, first open the Synaptic Packet Manager (enter your password if prompted as shown below) and then click on the ‘Search’ button. Another window will pop up, and by entering ‘java-1.8.0’ in the text field and pressing the ‘Search’ button, Synaptic will display all entries for ‘java-1.8.0’. The display is similar to the one shown below:


Notice the entry for Java SE 8 which is labelled ‘java-1.8.0-sun-devel’. Mark this for installation by clicking on the check box to the left of the item and selecting the ‘Mark For Installation’. Then click on the ‘Apply’ button. Click on ‘Apply’ again to confirm and the package will be downloaded and installed (see below). Close Synaptic when done.


Then take a look at the ‘/usr/lib/jvm’ directory again – it should look like the screen shown below:

Note the differences – in addition to the previous JRE links there are now new ‘java’ and ‘java-sun’ links. If you dive into the ‘java-1.8.0-sun-1.8.0.51’ directory you will now find a ‘bin’ directory in addition to the old ‘jre’ directory. If you execute the following command:
update-alternatives --display java
you should get an output similar to the one shown below:

As a last check to verify that Oracle’s Java SE 8 has been installed correctly, execute the following command:
java -version
If you see an output similar to the one below, then Oracle’s Java SE 8 is correctly installed and you can proceed with the next step.
java version "1.8.0_112"
Java(TM) SE Runtime Environment (build 1.8.0_112-b15)
Java HotSpot(TM) 64-Bit Server VM (build 25.112-b15, mixed mode)
Note that you can use the ‘javac’ command without having to set or change any system environment variables on your PCLinuxOS64 PC. To test this, execute the following command:
javac -version
You see an output similar to the one below.
javac 1.8.0_112
This will also enable the ‘javac’ (the Java compiler) command to be executed from any directory. Note that the ‘javac’ command is not essential to Android software development, but it could prove useful if you are running Java programs from a terminal. It also would be useful if you are new to Java and wish to test software from the command line during the learning process.
However, the STUDIO_JDK, JDK_HOME and JAVA_HOME environment variables for the whole system is NOT set. The STUDIO_JDK, JDK_HOME and JAVA_HOME environment variable points to the JDK root. Note that these environment variables will be used for Android Studio, and other programs which uses Java. To set these variables, execute the following command in a root terminal:
nano /etc/profile.d/custom.sh
This will execute the nano text editor and create the ‘/etc/profile.d/custom.sh’ file. Now add the following lines.
export STUDIO_JDK=/usr/lib/jvm/java-1.8.0-sun-1.8.0.112
export JDK_HOME=/usr/lib/jvm/java-1.8.0-sun-1.8.0.112
export JAVA_HOME=/usr/lib/jvm/java-1.8.0-sun-1.8.0.112
Save the file and close the editor. Now make the the file you have just created executable by executing the command in a terminal:
chmod a+x /etc/profile.d/custom.sh
Now close the terminal, log out and then log in again to the system in order to make sure that all the environment variables are set. Check that you have correctly set these by executing the commands in a terminal:
echo $STUDIO_JDK
echo $JDK_HOME
echo $JAVA_HOME
If you see the string ‘java-1.8.0-sun-1.8.0.112’ in the output to the above commands, then you have successfully set up these environment variables.
Now if Oracle issues an update to their Java JDK (or SE), it has to applied using the Synaptic Packet Manager. Note that there is an update notification system for PCLinuxOS64, so you will know when any update is available. Also note that any update has to be manually installed using the Synaptic Packet Manager. Assuming that there is an update for Oracle’s Java, you need to install it first. Refer to the documents on updating a PCLinuxOS64 system if you are unsure. Just make sure that the ‘/etc/profile.d/custom.sh’ file is updated too.
STEP 3: Install Google’s Android Studio
To download and install Google’s Android Studio, point your browser to here and click on the big green button, agree to the terms, and then click the download button. Wait for the download to finish.
NOTE: As of October 2016, the version of Android Studio stands at version 2.2. This version differs from any of the previous versions; so the user must take this into consideration – especially those users that are used to using the standalone SDK and AVD Managers. It must be pointed out to new users that the Android Studio is based upon the Jetbrains’s Intellij IDE – which is vastly different from the Eclipse IDE on which the previous Android Studio is based. So new users are encouraged to read about the Intellij IDE before using it.
To install Android Studio, first start a non-root terminal and then execute the following command:
unzip Downloads/android-studio-ide-145.3360264-linux.zip
Note that the version number in the file name may differ from the one shown above because Google issues new updates constantly. Always use the latest version although the screen shots in this article applies to the version shown above.
The command shown above will decompress the contents of the zip file downloaded into a new sub-directory called ‘android-studio’ in your home directory. To start Android Studio setup, execute the following commands, one by one (ignore any warnings that you may see on the terminal):
cd android-studio/bin
./studio.sh
A window similar to the one shown below will appear asking whether you would like to import any settings. If this is the first time you are using Android Studio, it will be likely that you don’t have anything to import. However, if you are moving from an older version of Android Studio, you may want to keep any settings made previously – in this case specify the location of the settings and let the setup wizard do the job.

Click on the ‘OK’ button to proceed. Android Studio will begin loading as shown in the figure below.

After a while, the ‘Setup Wizard’ window similar to the one shown below, will appear. Click on the ‘Next’ button to continue.

The next window (‘Install Type’) similar to the one shown below will appear. The Standard type of setup is already selected – this is recommended unless you want to customize the setup. Click on the ‘Next’ button and the the next window will appear.

The next window (see below) is the ‘Verify Settings’ window where you will find settings like the setup type, the destination folder, and the SDK components to be downloaded next, plus the total size of the downloads. Click on the ‘Next’ button and the the next window will appear.

If you have Intel’s Virtualization Technology enabled in your PC BIOS and Linux kernel, then it will be detected as shown on the ‘Emulator Settings’ window. You can read up more on this technology at the URL shown on the window. Then click on the ‘Finish’ button.

The SDK components mentioned in the ‘Verify Settings’ window will begin downloading as shown below. Wait for the download and installation of the SDK components to finish.

Once downloading and installation is completed, a log window will appear as shown. Note that this log window is where any error messages, if any, will be displayed. Assuming that the log window does not display any error messages, click on the ‘Finish’ button.

The next window shown is the Android Studio IDE's welcome screen itself (shown below). You have now successfully installed Android Studio on your PCLinuxOS64 PC.

NOTE: The latest version of Android Studio has a new look which differs from the previous version. One of the major difference is the way Android Studio handle updates – if there are any, a small window (or two) will pop up on the top right hand corner and informs you of the fact. To apply the updates (if you wish), just click on the ‘update’ item and follow the on-screen instructions.
You can now pause and admire your handiwork, then close Android Studio by clicking on the ‘x’ on the top right hand corner of the window. Ignore any warnings on the terminal and then close the terminal.
Remember that, at the moment, you have to start a terminal, change to the correct ‘bin’ directory and then launch ‘studio.sh’ in order to start Android Studio. Surely there must be an easier way and there is! To place a launcher icon on your desktop, follow the steps outlined below:
- Right-click on an empty portion of your desktop and select ‘Create New’ and then ‘Link to Application...’
- A window similar to the one shown below, will appear. Under the ‘General’ tab, change the ‘Link to Application’ text to ‘Android Studio’.
- Click on the ‘Application’ tab and in the description field enter ‘Android Studio’. In the comment field enter ‘Google’s Programming IDE for Android’. To set the command field, first click on the ‘Browse...’ button, navigate to the ‘android-studio/bin’ sub-directory in your home directory and select the ‘studio.sh’ file. In the work path field set it to your home directory using the folder button to the right of this field. Leave the other fields blank and click on the ‘OK’ button.


You can test the launcher by clicking on it. If everything works properly, Android Studio will launch and the welcome screen will appear on your desktop.
STEP 4: Configure SDK Manager
Launch Android Studio again if you have not already done so. Notice the ‘Configure’ on the last line of the window – click on it and then click on the ‘SDK Manager’ item (see below). The ‘Default Settings’ window similar to the one shown below will appear.


Note that the ‘Android SDK’ item in the left-side pane is already selected by default. Also note the ‘Launch Standalone SDK Manager’ item – users of the old version of Android Studio will be familiar with this item, as this will launch the old standalone SDK Manager. Click on this item and the window shown below will appear – with the lower right button showing that there are updates available. If there are no updates (i.e., the ‘Install packages’ button will be greyed out), it will be safe to close the standalone SDK Manager.

If there are updates and you wish to apply them, click on ‘Install x packages...‘ (where x can be any number) button. On the next window that appears, accept the license (see below), then click on the ‘Install’ button. The packages will then be downloaded and installed – after which the display will look like the one shown below. Then close the standalone SDK Manager (using the ‘x’ at the top right corner of the window) and you will be back to the ‘Default Settings‘ window.


NOTE: From now on, I suggest that you check if there are any updates by using the standalone SDK manager. This should be done every time you start Android Studio.
Now enable the item labeled ‘Show Package Details’ – the display will change as shown below.

Now it's time to check what has been installed so far. On the right side pane of the window, all installed packages are marked ‘Installed’ under the ‘Status’ column. Note that Android SDK Platform 25 package has already been installed for Android 7.1.1 (Nougat) – the latest Android version from Google. Other packages may have already been installed – just check the ‘Status’ column.
Depending on what Android devices that you wish to develop software for, you may wish to install additional packages for that device. For example, the author has an Android Nexus 5X smartphone running Android version 7.0 (Nougat), so the packages marked as shown below, was selected to be installed. Take note that all versions of Android is backward-compatible (at least in theory) so it is safe to include the latest version as shown. Note that you are free to choose the packages to install. The window shown includes all packages for Android 7.0 and 7.1.1 (Nougat). Then click on the ‘Apply’ button. A ‘Confirm Change’ window will pop-up next as shown below. Click on the ‘OK’ button. Then click on the accept the license agreement as shown below. Then click on the ‘Next’ button.


The next window will appear as shown below. This will display the progress of the downloads as well as the installation of the packages. Wait until the downloads and installation has been completed – then click on the ‘Finish’ button (see below).


You will be back at the ‘Default Settings’ window where all the installed packages will be shown under the ‘Status’ column (see below).

You can now explore the ‘Default Settings’ window – click on the ‘OK’ button when you are done.
STEP 5: Create a New Project Using Android Studio
Now that you have successfully installed Oracle’s Java SE 8u112 and Google’s Android Studio 2.2, it’s time to use Android Studio to develop software for the Android platform. We start off by using Android Studio to write a short and simple ‘Hello, world’ program, which you can run either on your AVD (Android Virtual Devices), or your actual Android device.
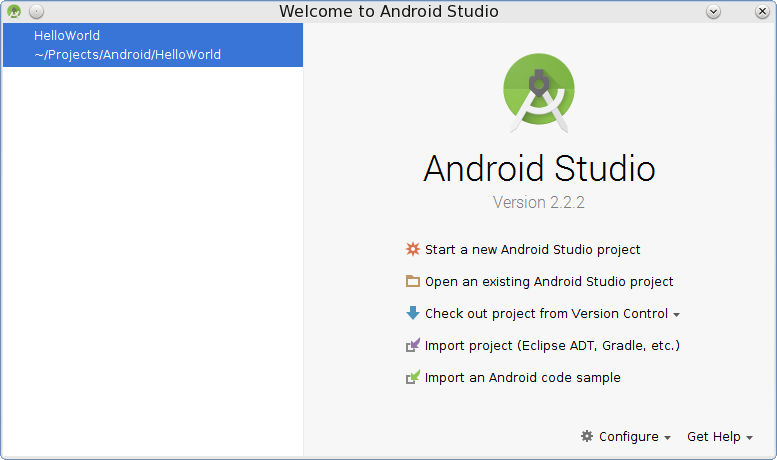
Launch Android Studio if it is closed, then start a new project by clicking on the ‘Start a new Android Studio project’ item from the welcome screen (see below).

The ‘New Project’ window as shown below will appear – fill in the details for the ‘Application name’ to ‘Hello World’, and ‘Company Domain’ to ‘any.company.com’ as shown. The directory in which this project reside can be anywhere on your PC. In the example shown, I have placed the project in my home folder’s ‘Projects’ directory but you are free to use any directory you wish. Then click on the ‘Next’ button.

The ‘Target Android Devices’ window will appear next (see below). Make sure that the ‘Phone and Tablet’ item is selected. The ‘Minimum SDK’ is pre-selected to be ‘API 15: Android 4.0.3 (IceCreamSandwich)’ and the reason why is as stated in the note below this field. If you are unsure on which minimum SDK to select, you can click on the ‘Help me choose’ item. For this tutorial, leave it at the pre-selected minimum SDK. Then click on the ‘Next’ button.

The ‘Add an activity to Mobile’ window will appear next (see below). Select the ‘Empty Activity’ item if it is not pre-selected. Then click on the ‘Next’ button.

The ‘Customize the Activity’ window will appear next (see below). Change the ‘Activity Name’ to MyActivity and the rest of the items below will change as shown. Then click on the ‘Finish’ button.

Android Studio (the ‘Gradle’ part anyway) will then start building the project as shown below. Note that your project is a basic ‘Hello world’ app that contains some default lines so you do not have to enter those lines into the project. Later you can view the the Java source code for this ‘Hello world’ project in the Android Studio IDE.

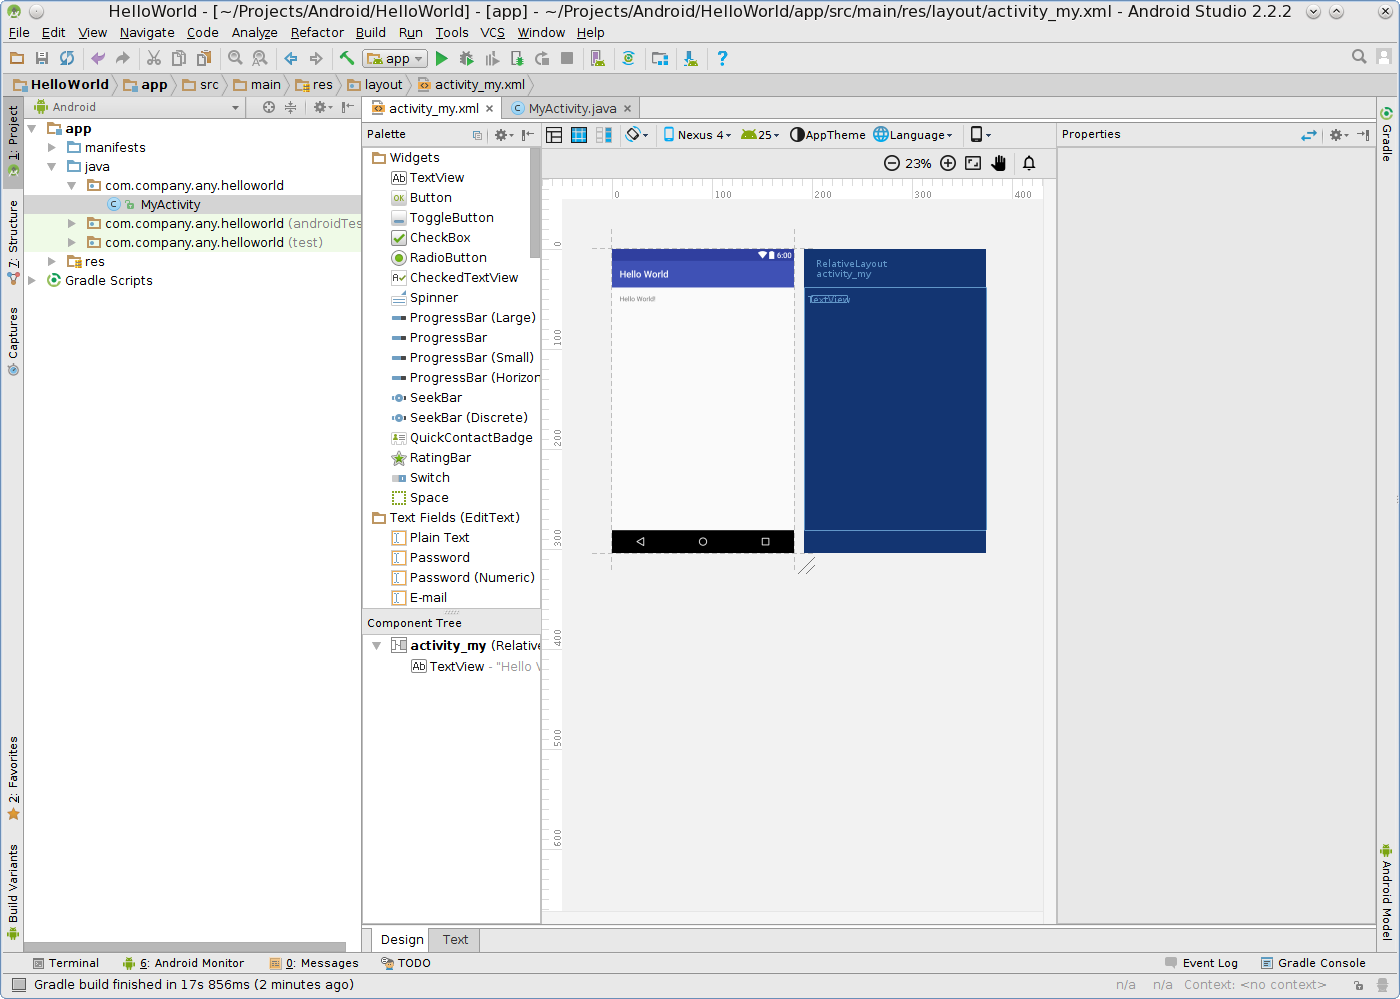
When completed, Android Studio will display it’s main IDE window (see below). If a ‘Tip of the Day’ window appears (also shown below), you can safely close it by clicking on the ‘Close’ button. Note that if you do not wish to see the ‘Tip of the Day’ window anymore, clear the check mark from the ‘Show Tips on Startup’, and you will not see this window anymore. Also note that, if this is the first time you are using Android Studio, the next screen will take some time to appear while the system will carry out indexing of the IDE – the word ‘Indexing...’ will appear in the bottom of the IDE window (see below).


After the system has finished indexing, a window similar to the one shown below will appear. Note that it shows the source for the package ‘MyActivity’ Java class. Click on the ‘activity_my.xml’ tab and the screen as shown below will appear. Note that it does contain a graphic of a Nexus 4 device with the ‘Hello World!’ text on it. This, however, is NOT the output of the project.

STEP 6: Create a New Emulated Android Device
Before we run this project in order to test it, we will require an Android device to run the project on. We can either run the project on a emulated Android device or an actual Android device. Running the same project on an actual Android device will be described later. We will now create an emulated Android device based on a Nexus 5X device.
NOTE: There are two ways of creating an emulated Android device. One is via the old standalone SDK manager and the other is using the ‘Tools’ menu on the Android Studio (while a project is open) itself. This article will use the new way instead of the old standalone SDK manager. For those users who prefer using the old standalone SDK manager, I suggest reading my past article here.
Click on the ‘Tools’ menu, followed by ‘Android’ and finally ‘AVD Manager’. The ‘Your Virtual Devices’ window will appear (shown below). Click on the ‘Create Virtual Device...’ button. The ‘Select Hardware’ window will appear (see below). Note that a Phone device labeled Nexus 5 is already pre-selected. Since this is NOT what we want, select the one labeled Nexus 5X (see below). Then click on the ‘Next’ button.


The ‘System Image’ window will appear (shown below). Note that a phone device with Android 7.1.1 (Nougat) API 25 is already pre-selected. You can leave this as it is, or you can select a phone device with Android 7.0 (Nougat) API 24 like the screen shown below. The choice is entirely up to you – since I have a Nexus 5X with Android 7.0, I decided to select an AVD to match. Then click on the ‘Next’ button. A window similar to the one shown below will appear – just press the ‘Finish’ button.


The AVD will be saved and the ‘Your Virtual Devices’ window listing your virtual devices will be displayed as shown. You can edit this AVD anytime by first selecting it and clicking on the edit icon (looks like a pencil) at the column marked ‘Actions’. Note that, besides editing this AVD, you can also run it (by clicking on the Run icon) and perform various functions by clicking on the down arrow icon.

To edit this AVD, click on the edit icon and the ‘Verify Configuration’ window as shown below will appear. You can make necessary changes here. You can make more advanced changes by clicking on the ‘Show Advanced Settings’ button – the window will change as shown below. You can scroll up to see (and change if necessary) more advanced details. Click on the ‘Finish’ button to save your edits and to close this window. Then close the ‘Your Virtual Devices’ window by clicking on the ‘x’ on the top left hand corner. You will be back at the main IDE screen.


Before running the project, first click on the downward pointing arrow next to the ‘Nexus 4’ icon then select the ‘Nexus 5X’ item from the drop-down list (remember that we already have created a Nexus 5X AVD). The final screen will look like the one shown below, with the change indicated by the red arrow. Now we are ready to run the project on our emulated Android device.

STEP 7: Running The Project Using An Emulated Android Device
To run this project on the Nexus 5X AVD emulator that you have created, click on the ‘Run’ button – the one in Android Studio’s toolbar that looks like a green-colored right pointing arrow (as indicated by the red arrow below). Another window will pop-up and, after a while, the screen will look like the one shown below.


Note the warning message (on a yellow background) stating that ‘No USB devices or running emulators detected’. You can safely ignore this message – you have not connected an actual Android device and the emulator has not started yet. Also note that the Nexus 5X emulator has been pre-selected by default. Click on the ‘OK’ button.
NOTE: You may see the following error window pop-up (see below). Although the error seems to be in RGB GLX area, the emulator will load up fine. Just click on ‘OK’ button to dismiss this window – I will investigate this error soon.

The Nexus 5X AVD will start and the screen will change to the one shown below. After a while, the AVD will appear displaying the flashing ‘Android’ sign (see below). Then the AVD will display the home screen for a short while, after which the ‘Hello World!’ message will appear on the Nexus 5X AVD's screen (see below). This means that the Nexus 5X AVD is set up correctly and is working perfectly.


Note the small vertical window to the right of the AVD (see below). This contains all the controls for the AVD – which includes the power button, the speaker volume controls, the screen rotation controls, the camera button, the search button and the navigation buttons. At the extreme top are the minimize and exit buttons. At the extreme bottom is a row to three horizontal dots – clicking on this will bring up another window (shown below) where more extended controls are located. You can play with the controls if you wish. Then click on the dot located at the top right of this window to close it. To close the AVD, click on the ‘x’ located on top of the control window. You will be back at the project screen (shown below).


STEP 8: Running The Project Using An Actual Android Device
We have successfully tested the ‘Hello World’ project on the AVD emulator. However, our ultimate goal is that the project should run on an actual Android device (a smart phone, for example). In order to do this, you need to connect that device to our development PC (the PC on which Android Studio is currently running) using a proper USB cable and the proper USB ports.
First you need to enable USB debugging on your device. Usually this can found under ‘Settings’ and ‘Developer options’ but it can vary from device to device. On some Android devices, ‘Developer options’ may need to revealed as they are hidden by default. If unsure, consult your ‘User’s Manual’ or the manufacturer’s web page for the information on how to enable USB debugging. The screenshot shown below is the already revealed ‘Developer options’ for the Nexus 5X.

If you find an item labelled ‘Revoke USB debugging authorizations’ on your Android device, select that and clear all previous authorization by selecting ‘OK’. Note that if this item is not present on your Android device, you can safely assume that your PC is automatically authorized. The screenshot shown below is the ‘Revoke USB debugging authorizations’ for the Nexus 5X.

Next we have to make sure that the proper USB cable is used. The manufacturer of your Android device usually provide you with one – use that cable and none other. Unfortunately, the Nexus 5X smartphone comes only with type C USB connectors at both ends, so it would be impossible to make connections to a PC with type A USB connectors. Should this be the case with your Android smartphone and your PC, it would mean getting another USB cable for the connection between your Android smartphone and your PC.
You also have to make sure that the USB port to be used on your PC is working. Test this port out first by plugging in a thumb drive (or any other USB device) and if the PC recognize this device, you can safely say that the USB port is working.
Now make sure that Android Studio is running the ‘Hello World’ project. Then connect your Android smartphone to your PC using the USB cable. Dismiss any file manager window on your PC if any pops up.
Then click on the ‘Run’ button in Android Studio’s toolbar. As usual, the ‘Select Deployment Target’ window will pop up as shown below. Note that the ‘LGE Nexus 5X Android 7.0, API 24’ item is selected by default. You may need to authorize the USB connection to the smart phone for debugging with the PC’s RSA key by selecting ‘OK’ on your smart phone (see below). Click the ‘OK’ button to run the project on your Android device.


If everything is set up correctly, you should see the ‘Hello World!’ message displayed on your Android device’s screen (see below). If not, see if there are any messages on your Android Studio status screen of your PC. If the message mentions authorization (for example), then, most probably you have forgotten to set USB connection authorization on your device. Do it now and retry running the project again. The important thing to note here (if unsuccessful) is that Android Studio will display some message and this usually gives you a clue on what is wrong. If you still run into problems, then I suggest searching the Internet with your problem.

You can now close the window on your Android device (usually using the ‘Back’ key). If you examine the apps on your device, you will find an app labelled ‘Hello World’ (see below). This is, of course, the ‘Hello World’ app file (usually with a .apk extension) which Android Studio has downloaded for you. You can delete this file if you so wish. By the way, before you put your Android device aside after testing more new apps developed using Android Studio, remember to disconnect the smartphone first and then switch off USB debugging.

To close the ‘Hello World’ project on your PC, click on ‘File’ and the ‘Close Project’ menu items on Android Studio. You will be back to the welcome screen and the ‘Hello World’ project will be listed on the left hand side pane (see below). To restart (or reload) the same project, make sure that the project is selected and then double-click the item – that project will then be started.
Summary Of Steps:
STEP 1: Check for Virtualization Technology
Check if your PC support Virtualization Technology and enable firmware (classic or UEFI) settings if so. Then check if your PC has an Intel or AMD processor. Also, check if the KVM module for your processor is loaded, and if not, load them. Make sure that the KVM loading is done automatically every time you start the PC.
STEP 2: Install Oracle’s Java SE (or JDK) 8
Install Oracle’s Java (‘java-1.8.0-sun-devel’) using the Synaptic Packet Manager, then verify the installation. Set the correct environment variables.
STEP 3: Install Google’s Android Studio
Download and install the latest version of Android Studio for Linux. Then install a desktop launcher to make starting Android Studio simpler. Refer to the main article for illustrations.
STEP 4: Configure SDK Manager
Launch Android Studio and start the SDK Manager. Then launch the Standalone SDK Manager and apply any updates, if any. Close the Standalone SDK Manager and enable ‘Show Package Details’ and select the required packages. After this is done, close the SDK Manager.
STEP 5: Create a New Project Using Android Studio
Create a new ‘Hello, world’ project. Refer to the main article for illustrations.
STEP 6: Create a New Emulated Android Device
In order to run the ‘Hello, world’ project on the PC, you need a emulated Android device. Follow the steps in the main article to create this AVD.
STEP 7: Running The Project Using An Emulated Android Device
To run the project using the newly created AVD, follow the steps in the main article.
STEP 8: Running The Project Using An Actual Android Device
To run the project using an actual Android device, follow the steps in the main article.
Final Words:
That’s it. You now have a 64-Bit PCLinuxOS64 KDE PC which can be used to develop Android software. If you are an experienced Intellij, Android Studio, Java and Android programmer, enjoy! For those people who is new to Android Studio or Java programming, here are some links which I recommend you visit in order to learn about Android programming.
To learn about the Intellij IDE (on which the Android Studio is based), visit https://www.jetbrains.com/idea/documentation/ for a tutorial on this.
To learn how to use Android Studio for developing Android software, visit https://developer.android.com/training/index.html for a tutorial on this.
If you are new to Java, then I would recommend searching the web for tutorials and the books ‘Java For Dummies, 7th Edition’ and ‘Head First Java, 3rd Edition’ as a guide.
If you are new to Java Programming for Android, then I would recommend searching the web for tutorials and the book ‘Java Programming For Android For Dummies’ as a guide. There is also another book by the same author but is more ‘advanced’ and is targeted towards Android developers. The title of this book is ‘Java Programming For Android Developers For Dummies’.
Happy computing!
No comments:
Post a Comment