NOTE
This article updates the previous blog on Java and Android Studio on Ubuntu 16.04 (Xenial Xerus). Oracle's Java is now at version 111 and Google's Android Studio is now at version 2.2.1. Due to these changes, I have decided to update this article.
This article is a ‘how-to’ for installing Oracle’s Java JDK 8 (or SE 8) and Google’s Android Studio on Ubuntu Linux 16.04 (Xenial Xerus). If you wish to develop software on the Android platform on your Ubuntu 16.04 PC, then this ‘how-to’ is for you. Note that most necessary steps are performed at the command line in a terminal – if you are not familiar with this, I suggest reading about it first before trying out this ‘how-to’.
STEP 1: Install Oracle’s Java SE (or JDK) 8
First you should be aware that there is no Java installed on a freshly installed Ubuntu 16.04. This can be verified by executing the following in a terminal:
java -version
The output is as follows:
The program 'java' can be found in the following packages:
* default-jre
* gcj-4.8-jre-headless
* openjdk-7-jre-headless
* gcj-4.6-jre-headless
* openjdk-6-jre-headless
Try: sudo apt-get install <selected package>
Notice from the output that there is no mention of Oracle’s Java at all. So why install Oracle’s Java? Why not OpenJDK? Good questions and the answer is that Oracle’s Java is recommended by Google. Should you plan to use Java for Android programming, then Google says it is better to use Oracle’s version – their Android Studio says that there are stability issues with OpenJDK. Whether this is true is a moot point here – if you do plan to do Android programming later, then install Oracle’s Java – else, any Java will do, even OpenJDK.
This article assumes that there is no Java installed on your Ubuntu 16.04 PC. If you had installed other Java previously, then you need to make a decision – keep that Java and install Oracle’s Java or remove that Java and install Oracle’s Java in its place. That decision is entirely up to you but you need to remember that Google’s Android Studio recommends Oracle’s Java.
Point your web browser to the Oracle SE download page here and download the latest version of the 64-bit JDK (not Server JRE or the JRE) – currently at version 8u111 (or 1.8.0_111). It is also recommended that you download the API documents, demos and samples for the JDK – although this is not required for Android development on Android Studio. Once the packages have been downloaded, execute the following commands:
cd Downloads
tar xzvf jdk-8u111-linux-x64.tar.gz
tar xzvf jdk-8u111-linux-x64-demos.tar.gz
unzip jdk-8u111-docs-all.zip -d jdk1.8.0_111
The last two commands in the above is only applicable if you have downloaded the demos and the documentation. The second command above will create a ‘jdk1.8.0_111’ directory in the Downloads folder while the last two commands above (if applicable) will create the ‘sample’, ‘demo’ and ‘docs’ directories under the ‘jdk1.8.0_111’ directory in the Downloads folder.
Now execute the following commands:
sudo mkdir /usr/lib/jvm/
sudo mv jdk1.8.0_111/ /usr/lib/jvm/
cd ~
The first command will create the ‘/usr/lib/jvm’ directory. The second command will move the whole ‘jdk1.8.0_111’ directory to ‘/usr/lib/jvm’ – where the root of all Java related files resides. The last command will place you back into your home directory.
Note that you are free to decide where to place the ‘jdk1.8.0_111’ directory – even your home directory! However the ‘jdk1.8.0_111’ directory in ‘/usr/lib/jvm’ is highly recommended as this will be in line with other Linux distro’s placement of the Java files. This whole article reflects that recommendation.
Notice that the owner and group of the ‘jdk1.8.0_111’ directory is still in your name and group. You can keep it as it is if you are the only user of the PC or you can set this to root by executing:
sudo chown -R root:root /usr/lib/jvm/jdk1.8.0_111
The contents of the ‘/usr/lib/jvm’ directory after STEP 1 is completed should be like this:
drwxr-xr-x 5 root root 4096 Jun 24 14:55 .
drwxr-xr-x 183 root root 20480 Jun 24 14:06 ..
drwxr-xr-x 11 root root 4096 Jun 24 14:55 jdk1.8.0_111
Notice that there is only one directory there – the ‘jdk1.8.0_111’ directory.
STEP 2: Set Up Default Java To Oracle’s Java JDK 8
The next thing to do is to tell Ubuntu 16.04 where Oracle Java JDK resides and set up a default Java. For this we use the ‘update-alternatives’ command. Execute the following command from the terminal (note that the command is on a single line):
sudo update-alternatives --install "/usr/bin/java" "java" "/usr/lib/jvm/jdk1.8.0_111/bin/java" 1500 --slave "/usr/share/man/man1/java.1" "java.1" "/usr/lib/jvm/jdk1.8.0_111/man/man1/java.1"
These will install all the necessary links to Oracle’s Java, including a slave link for the ‘man’ pages for Java. After the command has been executed, the default Java was automatically set to Oracle’s Java.
To verify that all have been set correctly, you can use the following commands:
update-alternatives --display java
If the output to the query above looks like this
java - auto mode
link best version is /usr/lib/jvm/jdk1.8.0_111/bin/java
link currently points to /usr/lib/jvm/jdk1.8.0_111/bin/java
link java is /usr/bin/java
slave java.1 is /usr/share/man/man1/java.1
/usr/lib/jvm/jdk1.8.0_111/bin/java - priority 1500
slave java.1: /usr/lib/jvm/jdk1.8.0_111/man/man1/java.1
then everything have been set correctly. A quick check on the current version of the Oracle’s Java can be performed by executing the following command in a terminal:
java -version
If the output for the command is:
java version "1.8.0_111"
Java(TM) SE Runtime Environment (build 1.8.0_111-b14)
Java HotSpot(TM) 64-Bit Server VM (build 25.111-b14, mixed mode)
then Oracle’s JDK 8 has been set up properly.
STEP 3: Set the System's Environment Variables and Paths
Now we have to set the environment variables and paths correctly for the whole Ubuntu 16.04 system. Execute the following command:
sudo nano /etc/profile
This will execute the nano text editor and open the ‘/etc/profile’ file for editing. Now add (or edit) the following lines at the end of the file.
export STUDIO_JDK=/usr/lib/jvm/jdk1.8.0_111
export JDK_HOME=/usr/lib/jvm/jdk1.8.0_111
export JAVA_HOME=/usr/lib/jvm/jdk1.8.0_111
export PATH=$PATH:$JAVA_HOME/bin
Save the file and close it. Note that, upon system startup, these will set the STUDIO_JDK, JDK_HOME and JAVA_HOME and PATH environment variables for the whole system. The STUDIO_JDK, JDK_HOME and JAVA_HOME environment variable points to the JDK root while the PATH environment variable will add the ‘/bin’ directory of the JDK to whatever path that has already been specified. Note that these environment variables will be used for Android Studio, and other programs which uses Java. This also will enable the ‘javac’ (the Java compiler) command to be executed from any directory. Note that the ‘javac’ command is not essential to Android software development, but it could prove useful if you are running Java programs from a terminal. It also would be useful if you are new to Java and wish to test software from the command line during the learning process.
Now log out and then log in again to the system in order to make sure that both the environment variables are set. Check that you have correctly installed Oracle Java by executing the commands (one by one) in a terminal:
echo $JAVA_HOME
echo $PATH
java -version
javac -version
If you see the string ‘jdk1.8.0_111’ in the output to the above commands, then you have successfully installed Oracle’s SE 8.
Now whenever Oracle issue an updated Java version, all you have to do in order to use the new version of Java SE is to follow STEP 1, STEP 2 above and this step (STEP 3). Just make sure that you change the version number to the new version in the commands shown above. However, you do not have to re-create the ‘/usr/lib/jvm’ directory as it already exist. Also make sure that you remove the links to the old version of Java by using the ‘sudo update-alternatives --remove-all java’ command before implementing the links to the new version of Java in STEP 2.
STEP 4: Install 32-Bit Libraries
Since you are using the 64-bit version of Ubuntu 16.04, it is important to note that Android Studio requires the 32-bit libraries to run properly. The standard installation of a 64-bit Ubuntu 16.04 DOES NOT have the capability of running 32-bit applications, instead you must manually install the necessary packages by executing the following:
sudo dpkg --add-architecture i386
sudo apt-get update
sudo apt-get install libc6:i386 libncurses5:i386 libstdc++6:i386 lib32z1
Note that, if you fail to install these packages, you will not be able to use Android Studio without running into errors.
STEP 5: Install Google's Android Studio
Point your browser to here and click on the big green button and then agree to the terms. Click on the download button and wait for the download to finish (note that the version number may be different from those shown below). Then start a terminal and execute the following command:
unzip Downloads/android-studio-ide-145.3330264-linux.zip
This will decompress the contents of the zip file downloaded into a new directory called ‘android-studio’ which can be found in your home directory. To start Android Studio setup, execute the following commands, one by one:
cd android-studio/bin
./studio.sh
A window similar to the one shown below will appear asking whether you would like to import any settings. If this is the first time you are using Android Studio, it will be likely that you don’t have anything to import. However, if you are moving from an older version of Android Studio, you may want to keep any settings made previously – in this case specify the location of the settings and let the setup wizard do the job of importing all the old settings.

Click on the ‘OK’ button to proceed. Android Studio will begin loading as shown in the figure below.

After a while, the Setup Wizard screen similar to the one shown below, will appear. The ‘Next’ button was clicked in order to continue.

The next screen similar to the one shown below will appear. The Standard type of setup is already selected – this is recommended unless you want to customize the setup. Click on the ‘Next’ button and the the next screen will appear.

The next screen (see below) is the ‘Verify Settings’ window where you will find settings like the setup type, the destination folder, and the SDK components to be downloaded next, plus the total size of the downloads. Click on the ‘Next’ button and the the next screen will appear.

If you have Intel’s Virtualization Technology enabled in your PC BIOS and Linux kernel, then it will be detected as shown on the wizard’s screen. You can read up more on this technology at the URL shown on the screen. Then click on the ‘Finish’ button.

The SDK components mentioned in the ‘Verify Settings’ window will begin downloading as shown below. Wait for the download and installation of the SDK components to finish.

Once downloading and installation is completed, a log window will appear as shown. Note that this log window is where any error messages, if any, will be displayed. Assuming that the log window does not display any error messages, click on the ‘Finish’ button.

The next screen shown is the Android Studio Welcome Screen itself (shown below). You have now successfully installed Android Studio on your Ubuntu 16.04 LTS PC.

Remember that, at the moment, you have to start a terminal, change to the correct bin directory and then launch ‘studio.sh’ in order to start Android Studio. Surely there must be an easier way and there is! But, in order to implement the easier way, there are two things that must be done initially.
The first is to create a launcher item in the Unity launcher. This is easily accomplished by right-clicking on the Android Studio icon in the launcher and click on the ‘Lock to Launcher’ item. The Android Studio launcher (as shown by the green arrow in the screenshot below) will then remain permanently in the launcher until you remove it. You can now close Android Studio by clicking on the ‘x’ on the top left hand corner of the window. Ignore any warnings on the terminal and close it too.

The second is to edit the ‘Desktop Entry’ text file for the Android Studio launcher. Launch a new terminal and execute the following:
nano .local/share/applications/jetbrains-studio.desktop
Remember that this command is all on one line and don’t forget the dot (or period) before ‘local’ – this is NOT a typo as ‘.local’ is a hidden file. The contents of that file need to be edited as follows:
- Remove the ‘Welcome to Setup Wizard’ from the ‘Name’ item if it is there and replace it with just ‘Android Studio’. If the name is already set, you can skip this step.
- Edit the ‘Exec’ item to ‘/home/(login name)/android-studio/bin/studio.sh’ (replace (login name) with your login name – in case you forgot, this is the same login name as the ‘Path’ item on the previous line). Note that the unedited line is for the setup command and is rather long – make sure that you remove it completely before entering the new command.
- Insert a line after the ‘Exec’ line, and type ‘Terminal=false’.
- Leave the rest of the items unchanged. The final file will look something like this:


If you want to launch Android Studio from anywhere using ‘studio.sh’, it is recommended that the system wide path include the ‘android-studio/bin’. To do this, execute this command in a terminal:
sudo nano /etc/profile
In the ‘profile’ file make sure to include the ‘android-studio/bin’ in the PATH – for example:
export PATH=$PATH:$HOME/android-studio/bin
If you have already implemented the path to JAVA_HOME (as in STEP 3), then the new line should look like this:
export PATH=$PATH:$JAVA_HOME/bin:$HOME/android-studio/bin
Save the file and close nano. To make sure that this new path takes effect, log out and then log in again. Now you can launch ‘studio.sh’ in a terminal from any directory.
STEP 6: Configure SDK Manager
Launch Android Studio again if you have not already done so. Notice the ‘Configure’ on the last line of the window – click on it and then click on the ‘SDK Manager’ item (see below). The Default Settings window similar to the one shown below will appear.

Note that the ‘Android SDK’ item in the left-side pane is already selected by default. Also note the ’Launch Standalone SDK Manager’ item – users of the old version of Android Studio will be familiar with this item, as this will launch the old standalone SDK Manager. Click on this item and the window shown below will appear – with the lower right button showing that there are 11 updates available. If there are no updates (i.e., the ‘Install packages’ button will be grayed out), it will be safe to close the standalone SDK Manager and you will be back to the Default Settings window.

If there are updates and you wish to apply them, click on ‘Install 11 packages...’ button. On the next window that appears, accept the license (see below), then click on the ‘Install’ button. The packages will then be downloaded and installed – after which the display will look like the one shown below. Then close the standalone SDK Manager and you will be back to the Default Settings window.


NOTE: From now on, I suggest that you check if there are any updates by using the standalone SDK manager. This should be done every time you start Android Studio.
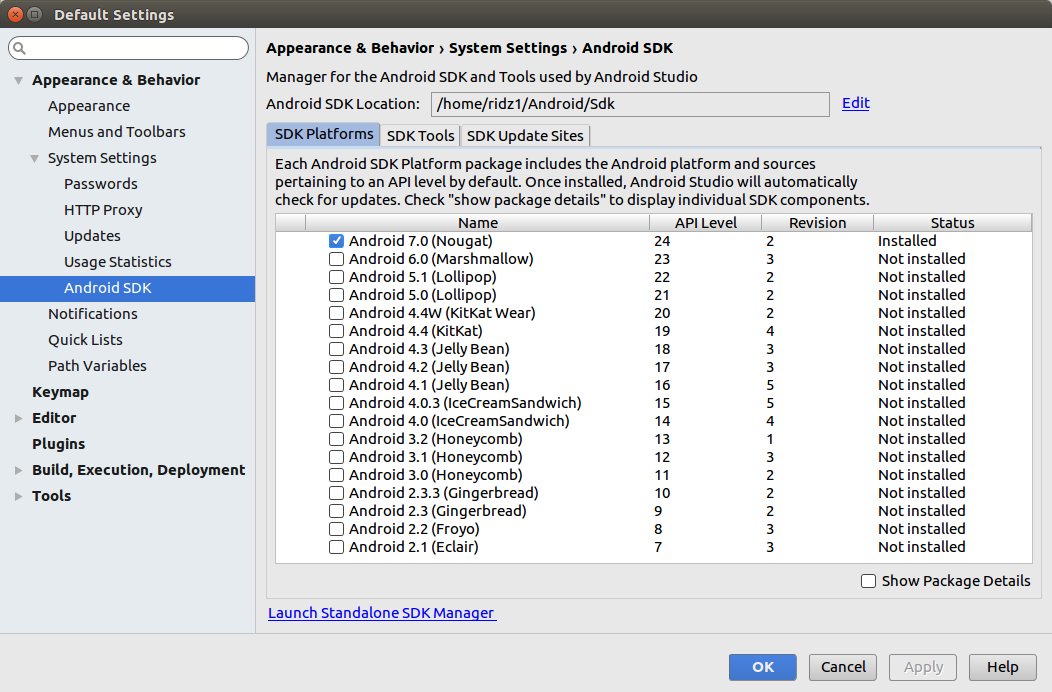
Now enable the item labelled ’Show Package Details’ – the display will change as shown below.

Now it's time to check what has been installed so far. On the right side pane of the window, all installed packages are marked ‘Installed’ under the ‘Status’ column. Note that Android SDK Platform 24 package has already been installed for Android 7.0 (Nougat) – the latest Android version from Google. Other packages may have already been installed – just check the ‘Status’ column.
Depending on what Android devices that you wish to develop software for, you may wish to install additional packages for that device. For example, the author has an Android Nexus 5X smartphone running Android version 7.0 (Nougat), so the packages marked as shown below, was selected to be installed. Take note that all versions of Android is backward-compatible (at least in theory) so it is safe to include the latest version as shown. Note that you are free to choose the packages to install – the screen shown includes all packages for Android 7.0 (Nougat). Then click on the ‘Apply’ button. A ‘Confirm Change’ screen will pop-up next as shown below. Click on the ‘OK’ button. Then click on the accept the license agreement as shown below. Then click on the ‘Next’ button.


The next window will appear as shown below. This will display the progress of the downloads as well as the installation of the packages. Wait until the downloads and installation has been completed – then click on the ‘Finish’ button (see below).

You will be back at the ‘Android SDK’ window where all the installed packages will be shown under the ‘Status’ column (see below).

You can now explore the ‘Android SDK’ window – click on the ‘OK’ button when you are done, and you will be back at the Android Studio main window.
STEP 7: Create a New Project Using Android Studio
Now that you have successfully installed Oracle’s Java SE 8u111 and Google’s Android Studio 2.2, it’s time to use Android Studio to develop software for the Android platform. We start off by using Android Studio to write a short and simple ‘Hello, world’ program, which you can run either on your AVD (Android Virtual Devices), or your actual Android device.
Launch Android Studio if it is closed, then start a new project by clicking on the ‘Start a new Android Studio project’ item from the welcome screen (see below).

The ‘New Project’ screen as shown below will appear – fill in the details for the ‘Application name’ to ‘Hello World’, and ‘Company Domain’ to ‘anycompany.com’ as shown. Do not place a check mark in the ‘Include C++ Support’ box. The directory in which this project reside can be anywhere on your PC. In the example shown, I have placed the project in my home folder’s ‘Projects’ directory but you are free to use any directory you wish. Then click on the ‘Next’ button.

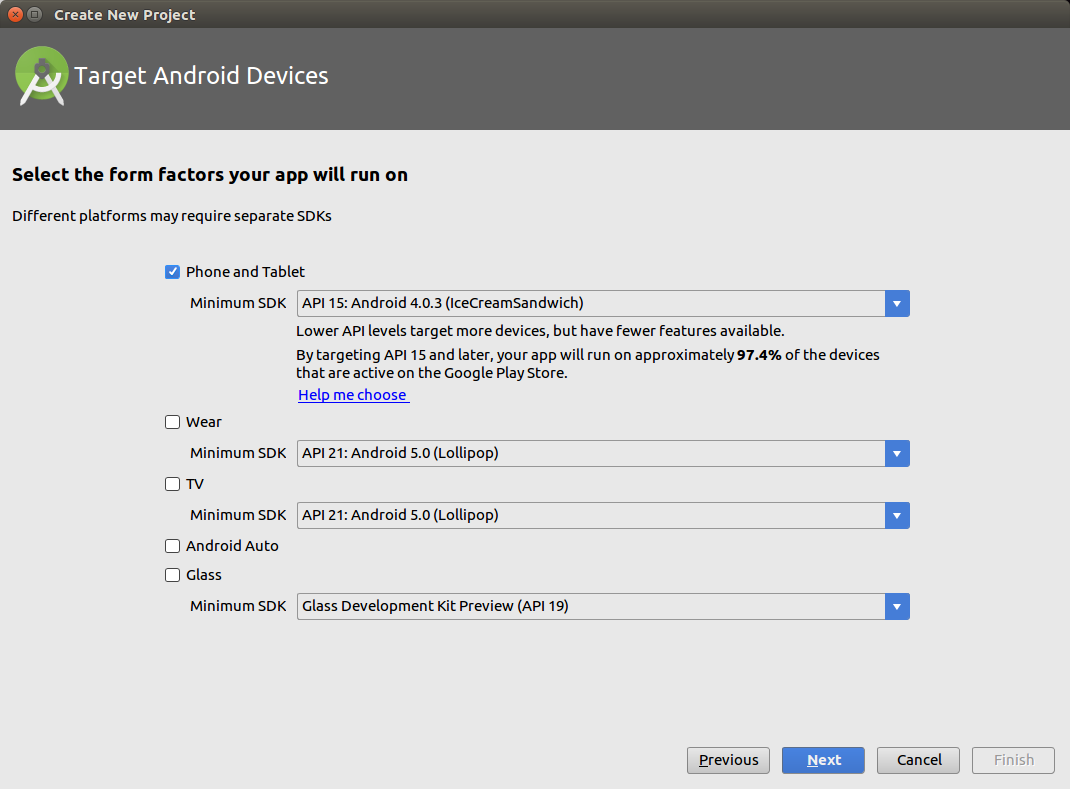
The ‘Target Android Devices’ screen will appear next (see below). Make sure that the ‘Phone and Tablet’ item is selected. The ‘Minimum SDK’ is pre-selected to be ‘API 15: Android 4.0.3 (IceCreamSandwich)’ and the reason why is as stated in the note below this field. If you are unsure on which minimum SDK to select, you can click on the ‘Help me choose’ item. For this tutorial, leave it at the pre-selected minimum SDK. Then click on the ‘Next’ button.
The ‘Add an activity to Mobile’ screen will appear next (see below). Select the ‘Empty Activity’ item if it is not pre-selected. Then click on the ‘Next’ button.

The ‘Customize the Activity’ screen will appear next (see below). Change the ‘Activity Name’ to MyActivity and the rest of the items below will change as shown. Then click on the ‘Finish’ button.

Android Studio (the ‘Gradle’ part anyway) will then start building the project as shown below. Note that your project is a basic ‘Hello world’ app that contains some default lines so you do not have to enter those lines into the project. Later you can view the the Java source code for this ‘Hello world’ project in the Android Studio IDE.

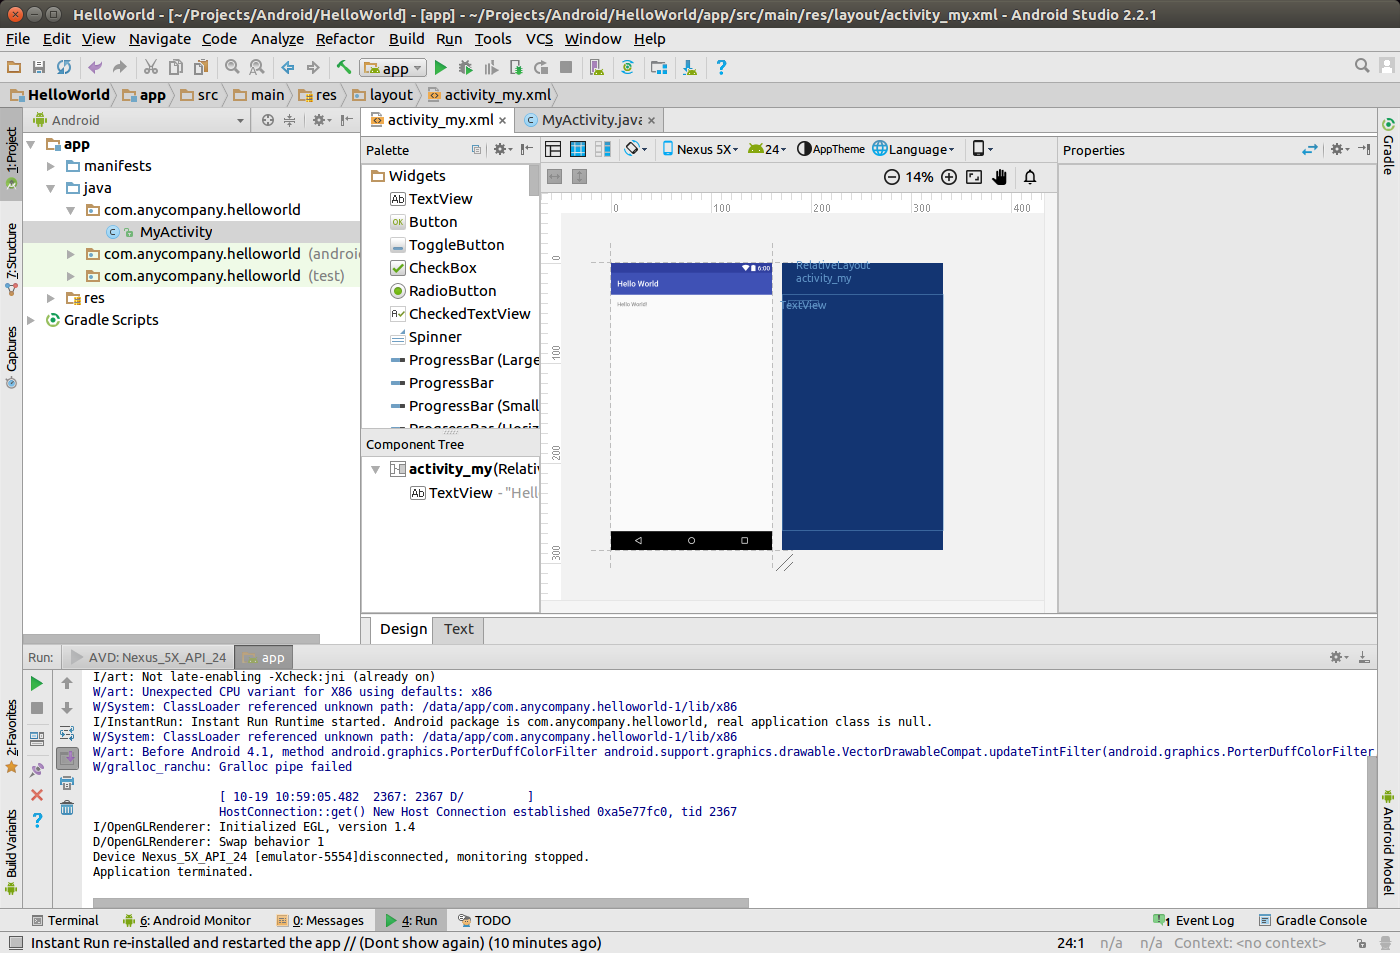
When completed, Android Studio will display it’s main IDE screen. If a ‘Tip of the Day’ window appears (shown below), you can safely close it by clicking on the ‘Close’ button. If this is the first time you are using Android Studio, the next screen will take some time to appear while the system will carry out indexing of the IDE – the word ‘Indexing...’ will appear in the bottom of the IDE window (see below).


After the system has finished indexing, a screen similar to the one shown below will appear. Note that it shows the source for the package ‘MyActivity’ Java class. Click on the ‘activity_my.xml’ tab and the screen as shown below will appear. Note that it does contain a graphic of a device with the ‘Hello world!’ text on it. This, however, is NOT the output of the project.


STEP 8: Create a New Emulated Android Device
Before we run this project in order to test it, we will require an Android device to run the project on. We can either run the project on a emulated Android device or an actual Android device. Running the same project on an actual Android device will be described later. We will now create an emulated Android device based on a Nexus 5X device. Why this Android device? The simple answer is ‘because the author has one’. However, you are free to create any Android device of your choosing – the procedure is the same for all Android device.
NOTE: There are two ways of creating an emulated Android device. One is via the old standalone SDK manager and the other is using the ‘Tools’ menu on the Android Studio (while a project is open) itself. This article will use the new way instead of the old standalone SDK manager. For those users who prefer using the old standalone SDK manager, I suggest reading my past article here.
Click on the ‘Tools’ menu, followed by ‘Android’ and finally ‘AVD Manager’. The ‘Your Virtual Devices’ screen will appear (shown below). Click on the ‘Create Virtual Device...’ button. The ‘Select Hardware’ screen will appear (see below). Note that a Phone device labelled Nexus 5 is already pre-selected. Since this is NOT what we want, select the one labelled Nexus 5X (see below). Then click on the ‘Next’ button.


The ‘System Image’ screen will appear (shown below). The correct one (recommended) is already pre-selected. so just press the ‘Next’ button. A screen similar to the one shown below will appear – just press the ‘Finish’ button.


The AVD will be saved (see below) and the final screen listing your virtual devices will be displayed as shown. You can edit this AVD anytime by first selecting it and clicking on the edit icon (looks like a pencil) at the column marked ‘Actions’. Note that, besides editing this AVD, you can also run it (by clicking on the Run icon) and perform various functions by clicking on the down arrow icon.

To edit this AVD, click on the edit icon and the ‘Verify Configuration’ screen as shown below will appear. You can make necessary changes here. You can make more advanced changes by clicking on the ‘Show Advanced Settings’ button – the screen will change as shown below. You can scroll up to see (and change if necessary) more advanced details. Click on the ‘Finish’ button to save your edits and to close this window. Then close the ‘Your Virtual Devices’ screen by clicking on the 'x' on the top left hand corner. You will be back at the main IDE screen.


Before running the project, first click on the downward pointing arrow next to the ‘Nexus 4’ icon then select the ‘Nexus 5X’ item from the drop-down list (remember that we already have created a Nexus 5X AVD). The final screen will look like the one shown below. Now we are ready to run the project on our emulated Android device.

STEP 9: Running The Project Using An Emulated Android Device
To run this project on the Nexus 5X AVD emulator that you have created, click on the ‘Run’ button – the one in Android Studio’s toolbar that looks like a green-coloured right pointing arrow. Another window will pop-up and, after a while, the screen will look like the one shown below.

Note the warning message (on a yellow background) stating that ‘No USB devices or running emulators detected’. You can safely ignore this message – you have not connected an actual Android device and the emulator has not started yet. Also note that the Nexus 5X emulator has been pre-selected by default. Click on the ‘OK’ button.
The Nexus 5X AVD will start and, after a while, the AVD will appear displaying the flashing ‘Android’ sign (see below). Then the AVD will display the home screen for a short while, after which the ‘Hello World!’ message will appear on the AVD's screen (see below). This means that the Nexus 5X AVD is set up correctly and is working perfectly.


Note the small vertical window to the right of the AVD (see below). This contains all the controls for the AVD – which includes the power button, the speaker volume controls, the screen rotation controls, the camera button, the search button and the navigation buttons. At the extreme top are the minimize and exit buttons. At the extreme bottom is a row to three horizontal dots – clicking on this will bring up another window (shown below) where more extended controls are located. You can play with the controls if you wish. Then click on the ‘x’ located at the top right of this window to close it. To close the AVD, click on the ‘x’ button located on top of the control window. You will be back at the project screen (shown below).You can close the ‘Hello World’ project anytime by clicking on ‘File’ menu and selecting ‘Close Project’. The welcome screen of ‘Android Studio’ will now display the ‘Hello World’ project file as shown below.


STEP 10: Running The Project Using An Actual Android Device
We have successfully tested the ‘Hello World’ project on the AVD emulator. However, our ultimate goal is that the project should run on an actual Android device (a smartphone, for example). In order to do this, you need to connect that device to our development PC (the PC on which Android Studio is currently running) using a proper USB cable and the proper USB ports.
First you need to enable USB debugging on your device. Usually this can found under ‘Settings’ and ‘Developer options’ but it can vary from device to device. On some Android devices, ‘Developer options’ may need to revealed as they are hidden by default. If unsure, consult your ‘User’s Manual’ or the manufacturer’s web page for the information on how to enable USB debugging. The screenshot shown below is the already revealed ‘Developer options’ for the Nexus 5X.

If you find an item labelled ‘Revoke USB debugging authorizations’ on your Android device, select that and clear all previous authorization by selecting ‘OK’. Note that if this item is not present on your Android device, you can safely assume that your PC is automatically authorized. The screenshot shown below is the ‘Revoke USB debugging authorizations’ for the Nexus 5X.

Next we have to make sure that the proper USB cable is used. The manufacturer of your Android device usually provide you with one – use that cable and none other. Unfortunately, the Nexus 5X smartphone comes only with type C USB connectors at both ends, so it would be impossible to make connections to a PC with type A USB connectors. Should this be the case with your Android smartphone and your PC, it would mean getting another USB cable for the connection between your Android smartphone and your PC.
You also have to make sure that the USB port to be used on your PC is working. Test this port out first by plugging in a thumb drive (or any other USB device) and if the PC recognize this device, you can safely say that the USB port is working.
Now make sure that Android Studio is running the ‘Hello World’ project. Then connect your Android smartphone to your PC using the USB cable. Dismiss any file manager window on your PC if any pops up – also ignore any warning messages that may also pop up.
Then click on the ‘Run’ button in Android Studio’s toolbar. As usual, the ‘Select Deployment Target’ window will pop up as shown below. Note that the ‘LGE Nexus 5X (Android 7.0, API 24’ item is selected by default – select it if not. You may need to authorize the USB connection to the smartphone for debugging with the PC’s RSA key by selecting ‘OK’ on your smartphone (see below). Then click the ‘OK’ button to run the project on your Android device.


If everything is set up correctly, you should see the ‘Hello world!’ message displayed on your Android device’s screen (see below). If not, see if there are any messages on your Android Studio status screen of your PC. If the message mentions authorization (for example), then, most probably you have forgotten to set USB connection authorization on your device. Do it now and retry running the project again. The important thing to note here (if unsuccessful) is that Android Studio will display some message and this usually gives you a clue on what is wrong. If you still run into problems, then I suggest searching the Internet with your problem.

You can now close the window on your Android device (usually using the ‘Back’ key). If you examine the apps on your device, you will find an app labeled ‘Hello World’ (see below). This is, of course, the ‘Hello World’ app file (usually with a .apk extension) which Android Studio has downloaded for you. You can delete this file if you so wish. By the way, before you put your Android device aside after testing more new apps developed using Android Studio, remember to disconnect the smartphone first and then switch off USB debugging.

To close the ‘Hello World’ project on your PC, click on ‘File’ and the ‘Close Project’ menu items on Android Studio. You will be back to the welcome screen and the ‘Hello World’ project will be listed on the left hand side pane (see below). To restart (or reload) the same project, make sure that the project is selected and then double-click the item – that project will then be started.

Summary Of Steps:
STEP 1: Install Oracle’s Java SE (or JDK) 8
Download and install the following from Oracle's website (via a terminal):
cd Downloads
tar xzvf jdk-8u111-linux-x64.tar.gz
tar xzvf jdk-8u111-linux-x64-demos.tar.gz
unzip jdk-8u111-docs-all.zip -d jdk1.8.0_111
Now execute the following commands:
sudo mkdir /usr/lib/jvm/
sudo mv jdk1.8.0_111/ /usr/lib/jvm/
cd ~
sudo chown -R root:root /usr/lib/jvm/jdk1.8.0_111
STEP 2: Set Up Default Java To Oracle’s Java JDK 8
Execute the following in a terminal:
sudo update-alternatives --install "/usr/bin/java" "java" "/usr/lib/jvm/jdk1.8.0_111/bin/java" 1500 --slave "/usr/share/man/man1/java.1" "java.1" "/usr/lib/jvm/jdk1.8.0_111/man/man1/java.1"
To verify:
update-alternatives --display java
java -version
STEP 3: Set the System's Environment Variables and Paths
Execute the following in a terminal:
sudo nano /etc/profile
Insert the following lines:
export STUDIO_JDK=/usr/lib/jvm/jdk1.8.0_111
export JDK_HOME=/usr/lib/jvm/jdk1.8.0_111
export JAVA_HOME=/usr/lib/jvm/jdk1.8.0_111
export PATH=$PATH:$JAVA_HOME/bin
Log out and then log back in and execute the following in a terminal:
echo $STUDIO_JDK
echo $JDK_HOME
echo $JAVA_HOME
echo $PATH
java -version
javac -version
If you see the string ‘jdk1.8.0_111’ in the output to the above commands, then you have successfully removed OpenJDK 7 JRE and replaced it with Oracle’s SE 8.
STEP 4: Install 32-Bit Libraries
Execute the following in a terminal:
sudo dpkg --add-architecture i386
sudo apt-get update
sudo apt-get install libc6:i386 libncurses5:i386 libstdc++6:i386 lib32z1
STEP 5: Install Google's Android Studio
Download and install Android Studio by opening a terminal and executing:
unzip Downloads/android-studio-ide-145.3330264-linux.zip
cd android-studio/bin
./studio.sh
Follow the on-screen instructions to install Android Studio (see figures in the main how-to). If you wish to place a launcher on your desktop and your panel, see the how-to.
STEP 6: Configure SDK Manager
Click on ‘Configure’ followed by a click on the ‘SDK Manager’ item. Click on the ’Launch Standalone SDK Manager’. If there are any updates, click on the updates available button, and then follow the on-screen instructions to apply the updates.
Now enable the item labeled ’Show Package Details’. Depending on what Android devices that you wish to develop software for, you may wish to install additional packages for that device. Then click on the ‘Apply’ button, and follow the on-screen instructions.
STEP 7: Create a New Project Using Android Studio
Click on the ‘Start a new Android Studio project’ item from the welcome screen of Android Studio. Follow the on-screen instructions and the main how-to to create a new Hello World project. When completed, Android Studio will display it’s main IDE screen.
STEP 8: Create a New Emulated Android Device
Click on the ‘Tools’ menu of Android Studio main IDE screen, followed by ‘Android’ and finally ‘AVD Manager’. The ‘Your Virtual Devices’ screen will appear. Click on the ‘Create Virtual Device...’ button. The ‘Select Hardware’ screen will appear. Note that a Phone device labeled Nexus 5 is already pre-selected. Select the one you want from the drop down list. Then click on the ‘Next’ button.
The ‘System Image’ screen will appear. The correct one (recommended) is already pre-selected. so just press the ‘Next’ button. The next screen will appear – just press the ‘Finish’ button.
The AVD will be saved (see below) and the final screen listing your virtual devices will be displayed. You can edit this AVD anytime by first selecting it and clicking on the edit icon (looks like a pencil) at the column marked ‘Actions’.
STEP 9: Running The Project Using An Emulated Android Device
To run this project on the emulator that you have created, click on the ‘Run’ button – the one in Android Studio’s toolbar that looks like a green-colored right pointing arrow. Another window will pop-up, with emulator has been pre-selected by default. Click on the ‘OK’ button.
The AVD will start and after a while, the AVD will appear displaying the flashing ‘Android’ sign. Then the AVD will display the home screen for a short while, after which the ‘Hello World!’ message will appear on the AVD's screen. This means that the AVD is set up correctly and is working perfectly.
STEP 10: Running The Project Using An Actual Android Device
First you need to enable USB debugging on your Android device. If you find an item labelled ‘Revoke USB debugging authorizations’ on your Android device, select that and clear all previous authorization by selecting ‘OK’. Next we have to make sure that the proper USB cable is used. You also have to make sure that the USB port to be used on your PC is working.
Now make sure that Android Studio is running the ‘Hello World’ project. Then connect your Android smartphone to your PC using the USB cable. Dismiss any file manager window on your PC if any pops up – also ignore any warning messages that may also pop up.
Then click on the ‘Run’ button in Android Studio’s toolbar. The ‘Select Deployment Target’ window will pop up. Select the correct AVD. You may need to authorize the USB connection to the smartphone for debugging with the PC’s RSA key by selecting ‘OK’ on your smartphone. Then click the ‘OK’ button to run the project on your Android device.
If everything is set up correctly, you should see the ‘Hello world!’ message displayed on your Android device’s screen.
You can now close the window on your Android device (usually using the ‘Back’ key). If you examine the apps on your device, you will find an app labeled ‘Hello World’. Before you put your Android device aside remember to disconnect the smartphone first and then switch off USB debugging.
Final Words:
That's it. You now have a 64-Bit Linux Mint 18 Cinnamon PC which can be used to develop Android software. If you are an experienced Intellij, Android Studio, Java and Android programmer, enjoy! For those people who is new to Android Studio or Java programming, here are some links which I recommend you visit in order to learn about Android programming.
To learn about the Intellij IDE (on which the Android Studio is based), visit https://www.jetbrains.com/idea/documentation/ for a tutorial on this.
To learn how to use Android Studio for developing Android software, visit https://developer.android.com/training/index.html for a tutorial on this.
If you are new to Java, then I would recommend searching the web for tutorials and the books ‘Java For Dummies, 6th Edition’ and ‘Head First Java, 2nd Edition’ as a guide.
If you are new to Java Programming for Android, then I would recommend searching the web for tutorials and the book ‘Java Programming For Android For Dummies’ as a guide. There is also another book by the same author but is more ‘advanced’ and is targeted towards Android developers. The title of this book is ‘Java Programming For Android Developers For Dummies’.
Happy computing!
No comments:
Post a Comment