STEP 1: Install Oracle’s Java SE (or JDK) 8
On a newly-installed Windows 10 PC, there is no Java installed by default. This can be verified by opening a terminal by right-clicking on the ‘Start’ button and selecting the ‘Command Prompt’. Then execute the following command:
java -version
If you see a response similar to the figure below, then you can be sure that there is no Java installed.

You can then proceed to install Oracle’s Java by pointing your web browser to here and clicking on the ‘Download’ button as indicated by the green arrow in the figure below. Note that the current (as of December 2015) version of Java SE is 8u65/8u66. The 8u66 version is highly recommended here; though, of course, the version number may be higher than this. Unless you have a specific need, always choose the highest version of the JDK or SE to download.

On the next page that appears, you will find a item labelled ‘Java SE Development Kit 8u66’. On this item, click on ‘Accept License Agreement’ as indicated by the green arrow, and followed by a click on the Windows x64 Java download file also as indicated by the green arrow (see figure below). Remember to save the files if a prompt appears – they will go into the ‘Downloads’ folder by default.

On the same page (you may have to scroll up a bit), you will find a item labelled ‘Java SE Development Kit 8u66 Demos and Sample Downloads’. On this item, click on ‘Accept License Agreement’ as indicated by the green arrow, and followed by a click on the Windows x64 Java download file also as indicated by the green arrow (see figure below). Remember to save the files if a prompt appears – they will go into the ‘Downloads’ folder by default. Strictly speaking, this item is not necessary for Android program development but is recommended if you are new to Java and wish to play around with demos and samples provided by Oracle.

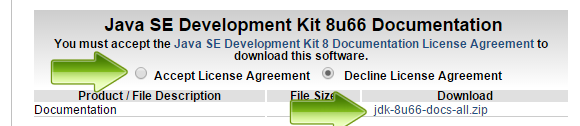
Now click the ‘Back’ button on your web browser and then click on the Java SE 8 Documentation ‘Download’ button as indicated by the green arrow in the figure below (you may have to scroll up a bit to see this item) to download the API documents for Java. Again this item is not necessary for Android program development but is highly recommended if you are a heavy Java programmer.

On the next page that appears, click on ‘Accept License Agreement’ as indicated by the green arrow, followed by a click on the docs download file also as indicated by the green arrow (see figure below). Remember to save the files if a prompt appears – they will go into the ‘Downloads’ folder by default.
If you take a look in the Downloads folder, you should see the following 3 files (if you have downloaded all 3):
jdk-8u66-windows-x64.exe
jdk-8u66-windows-x64-demos.zip
jdk-8u66-docs-all.zip
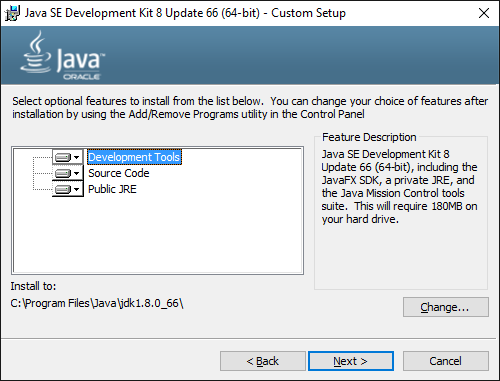
To install the Java JDK 8, double-click on the ‘jdk-8u66-windows-x64.exe’ file. If you are prompted for a password, supply one. The Java Setup screen as shown below will appear.

From here, follow the on-screen instructions in order to install Java – keep clicking on the ‘Next’ button when they appear, until you come to the last screen where you can click on the ‘Close’ button (see figures below). Oracle Java is now installed on you PC.


If you have downloaded the demos (and samples) and docs, now would be a good time to install them. First unzip the demos to a temporary directory – this will create a ‘jdk 1.8.0_66’ sub-directory in which there will be two more sub-directories – ‘demo’ and ‘sample’. Then unzip the ‘docs’ file to the same ‘jdk 1.8.0_66’ sub-directory just created. This will create another sub-directory called ‘docs’. Then move all these 3 sub-directories (‘demo’, ‘docs’ and ‘samples’) to the actual Java directory, i.e., ‘C:\Program Files\Java\jdk1.8.0_66’. You will have to give permission for this action since you are moving files into a ‘system’ type directory.
One more thing before going any further and that is to first set the JAVA_HOME environment variable and to set the PATH environment to include the ‘bin’ directory of where Java was installed on your system. If you have not changed it this would be ‘C:\Program Files\Java\jdk1.8.0_66’. To do this, right-click on the ‘This PC’ icon on your desktop and select ‘Properties’. Alternatively, if you have not personalize your desktop and ‘This PC’ icon is not present on your desktop, launch ‘Windows File Explorer’, then right-click on the ‘This PC’ item in the ‘File Explorer’ and select ‘Properties’. A screen similar to the one shown below will appear.

On that screen, click on the ‘Advanced system settings’ item. On the ‘System Properties’ window that appears (see figure below), click on the ‘Environment Variables’ button.

The ‘Environment Variables’ window will appear (see figure below). Under the ‘System variables’ part, click on the ‘New...’ button.

The ‘New System Variable’ window will appear (see figure below). Enter ‘JAVA_HOME’ as the variable name and ‘C:\Program Files\Java\jdk1.8.0_66’ as the variable value as shown in the figure. Then click the ‘OK’ button.

If you look at the ‘System variables’ portion of the window, you see the ‘Path’ item. Click on it as shown in the figure below.

Click on the ‘Edit...’ button. The ‘Edit System Variable’ window will appear (see figure below).
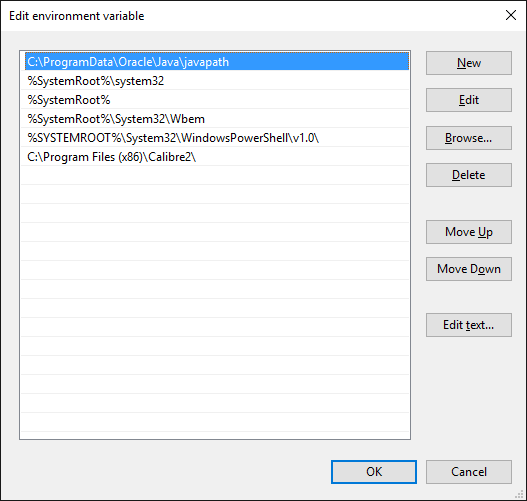
Click ‘New’, then type the following into the field:
C:\Program Files\Java\jdk1.8.0_66\bin\
Then press the ‘Enter’ key. The completed screen will look something like this:

Click ‘OK’, followed by another ‘OK’, and finally another ‘OK’. To make the new environment variables effective, log out from the system, then log in again. Open a non-admin command prompt and type the following commands (followed by the ‘Enter’ key), one by one:
echo %JAVA_HOME%
echo %PATH%
java -version
javac -version
You should see something similar to the screen below.

Strictly speaking, the JAVA_HOME and PATH settings are not necessary for Android program development but is recommended if you are new to Java and wish to learn Java programming, which is a requirement for Android program development. The JAVA_HOME and PATH settings will help the new Java programmer to execute the ‘javac’ (the Java compiler) from anywhere in the system.
STEP 2: Install Android Studio
Now it’s time to download and install Google’s Android Studio. Point your web browser to here and click on the big green button to start the download.

Then check the terms and conditions item and then click the download button. Save the file and wait for the download to finish.

Double-click on the downloaded file to install it – if a prompt appears asking for permission, click on ‘Run’. The UAC may also pop-up next – click on ‘Yes’ to confirm. The setup screen (see figure below) will appear – click on the ‘Next’ button.

The next screen is where you select the components to install. Note that they have been pre-selected to install all components – unless you have a need, do not de-select any components and click on ‘Next’.

The next two screens (shown below) are the license agreement – one for Android Stdio and one for Intel’s Hardware Accelerated Execution Manager (HAXM). If you agree to them, click on the ‘I Agree’ button on each of the next two screens.


The next screen (shown below) is the configuration settings where all the installation paths are shown. Change it if you wish and click the ‘Next’ button to proceed.

The next screen (shown below) is another configuration setting for the emulator mode using HAXM and for size of the emulator memory. The recommended size is already specified, so just click on the ‘Next’ button.

The next screen is for the creation of a start menu folder – leave it at the default and click on the ‘Install’ button.

The actual installation of Android Studio will begin as shown below.

Wait for the installation to finish and the screen shown below will appear. Click on the ‘Next’ button.

The last screen (shown below) will be displayed with the ‘Start Android Studio’ checked, which you need to un-check as we need to set up an icon on the desktop and/or taskbar. Click the ‘Finish’ button to close the setup window.

Click on the ‘Start’ icon and then right-click on the ‘Android Studio’ item (see figure below), then click on ‘More’ item. Then you can pin ‘Android Stdio’ to the taskbar by clicking on the ‘Pin to taskbar’ item. You can also place an icon on your desktop by clicking on the ‘Open file location’ item. A Windows Explorer window will open showing the file ‘Android Studio’. Create a shortcut for this item on your desktop and then close the window.

STEP 3: Setting Up And Updating Android Studio
To launch ‘Android Studio’, you can single-click on the icon in your taskbar, or you can double-click on the icon on your desktop – either way ‘Android Studio’ should launch.
The first screen (shown below) asks whether you want to import any settings. If this is the first time you installed and started Android Studio, chances are that you don’t have any – so just click on the ‘OK’ button.

If a Windows Security Alert as shown below appears, click on the ‘Allow Access’ button. Android Studio will begin loading and upon completion, will begin checking for any additional items to download – if required, it will begin downloading them as shown in the figure.


When it has finished downloading and installing all components, a log window will appear (see figure below). Check this window for errors – if there are none, then click on the ‘Finish’ button. If there are errors, the log window will give details on the errors – you need to fix them before trying to use Android Studio.

The main Android Studio IDE will then appear (see figure below). Notice that at the bottom of the windows is a message ‘Check for updates now’ – click on the ‘Check’ term to start the check.

If there are any updates, a window similar to the one below, will appear. Click on the ‘Update Now’ button to start the update process.

A window similar to the one shown below, will appear. Click on the ‘Exit Studio and launch SDK Manager’ button. The main reason for this is that updates cannot be installed if Android Studio is open – so it need to be closed and the stand-alone SDK Manager will be used to apply the updates.

The Android Studio window will close and, in its place will appear the stand-alone SDK Manager. Notice the ‘Install x packages...’ where ‘x’ is any number of updates to be applied (9 as shown on the figure). Click on this button to proceed.

The next window to appear is the license agreement window. Click on the ‘Accept License’, followed by clicking on the ‘Install’ button.

The packages will begin downloading as shown below – wait for it to finish downloading and installing.

When all the packages have been downloaded and installed, the screen will look something like the one shown below. Now would be a good time to check from this window all the packages that have been installed so far. Based upon your requirements, you may decide to install more packages – for example, the author has a Samsung Galaxy Note 2 smart-phone running on Android 4.4.2 (KitKat) – so it was decided to install Android 4.4.2 as well. Notice also that the samples for the SDK is also included.

To install additional packages, place a tick mark on the packages (select them) as shown below, then click on the ‘Install x Packages’ button (where x = number of packages to be installed). Then on the license window which appear next, click on ‘Accept License’ followed by a click on the ‘Install’ button. Wait for the packages to finish downloading and installed – the final window will look something like the one shown below.


Now close the stand-alone SDK Manager. Once in a while you may have to start the stand-alone SDK Manager (and the AVD Manager) to download and install additional packages (plus create new AVD’s) without starting Android Studio, so it may be worthwhile to create a shortcut to both the SDK and AVD Managers on your desktop.
To do this, you may have to view and access the two hidden executable files found in the ‘C:\Users\(login_name)\AppData\Local\Android\sdk’ directory (replace login_name with your actual login name). Open Window’s File Explorer, click on ‘View’ and ‘Options’ and in the pop-up window that appears, click on the ‘View’ tab, then enable the ‘Show hidden files, folders, or drives’. Then close File Explorer and re-launch it again. Then navigate to the ‘C:\Users\(login_name)\AppData\Local\Android\sdk’ directory where you will find the two executable – then create shortcuts for each executable to your desktop. Remember to disable the File Explorer’s view hidden file setting once this is done. To launch the SDK or AVD Manager, simply double-click on the respective icons on your desktop. Note that using these shortcuts is mainly for your convenience – Android Studio will NOT be launched when you use these shortcuts.
STEP 4: Configuring SDK and AVD Manager
Launch Android Studio once more using the desktop icon or the icon in your taskbar. On the Welcome Screen and under ‘Quick Start’ of Android Studio, click on ‘Configure’ and the ‘SDK Manager’ item (see below).

The Default Settings window will appear as shown below. The click on ‘Launch Standalone SDK Manager’ and the SDK Manager window will appear as shown below. This is the ‘normal’ way of invoking the SDK Manager from Android Studio. Since we already have updated Android Studio and the SDK Manager, we will now proceed to configure the Android Virtual Devices (AVD) Manager.


Click on ‘Tools’ and ‘Manage AVDs...’ from the Android SDK Manager menu and the AVD Manager window similar to the one shown below will appear.

Notice that an AVD called ‘Nexus_5_API_23_x86’ has already been defined by Google. As the name suggest, this is for the Nexus 5 Android smart-phone and you can view it’s settings by selecting the AVD and clicking on the ‘Edit’ button. The window as shown below will appear. Take special note of the warning that appears as the last line in this window.

Make a note of each of the settings as this provide a guide for setting up an AVD of your own later. Click on the ‘Cancel’ button to close the edit window when done and you will be back in the AVD Manager window. Notice that there is another tab labeled ‘Device Definitions’. Clicking on this tab will show a window similar to the one below and they contain a list of generic AVD device definitions. You can use this list as a starting point for creating your own AVD later.

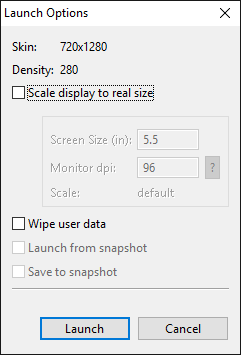
For now, let’s take a look at the pre-defined Nexus 5 AVD. To start an AVD, make sure that you click on the ‘Android Virtual Devices’ tab, select the AVD that you want to start (just the Nexus 5 AVD in this case), and then click on the ‘Start’ button. A window labeled ‘Launch Options’ (shown below) will appear.

Click on the ‘Launch’ button to launch the AVD. A ‘Starting Android Emulator’ window will appear (see below). If, for some reason, the loading caused errors to occur, it is possible that hardware virtualization features are NOT supported in your PC. This will often happen if your PC is NOT using the newer version of an x86 compatible CPU – for example your PC is using an very old AMD CPU. It also can happen if you don’t have Virtualization Technology enabled in BIOS and you are using Intel Atom x86 CPU/ABI in your AVD. Alternatively, HAXM is NOT supported for your PC. Examine the error messages on the window to find out the source of the error – make sure that you solve them before proceeding.

Assuming that there were no errors during launching, the Nexus 5 AVD will be displayed as shown below. If this is the first time you are starting an AVD, it will take time to appear. The Nexus 5 AVD will then display the flashing ‘android’ sign.

Once the AVD has finished loading without any errors, the Nexus 5 AVD will appear in it’s full glory (see below).

Click on the ‘GOT IT’ and the display will change to the one shown below.

In order to test the AVD, first click on the ‘Apps’ button (the center icon at bottom) and the screen will change to one as shown below.

To test out an example app, click on the ‘Browser’ icon – if your PC is connected to to the Internet, you should see a screen similar to the one shown below. Note the query below which ask you whether you want to share your location – if so, click on ‘Share location’, else click on ‘Decline’. If you had clicked on ‘Share location’, the screen will change to look like the one shown below.


Type something into the Google search box, using the on-AVD-screen keyboard – for example ‘microsoft’ (see below).

Then click on the search icon. The page shown below will appear.

Click on the ‘Microsoft’ (first item shown) that appears on the AVD’s screen. If everything works, the Microsoft home page will appear (see below).

You can now play around with the Nexus 5 AVD – notice how fast the response is, thanks to Virtualization Technology plus HAXM features. You can safely close the AVD by clicking on the ‘x’ on the top right hand of the window. You will then be back to the AVD Manager window.
STEP 5: Setting Up Your Own AVD
If the Android device that you possess is not listed under the ‘Device Definitions’ tab of the AVD Manager, you can create one to correspond to your device. First make sure that you have selected the ‘Device Definitions’ tab, then click on the ‘Create Device’ button. You should see a screen similar to the one shown below.

Now make sure that you have all the details for your Android smart phone ready – search for it on the Internet or use your User’s Manual if the details are present in there. As an example, the author has entered the details for his Samsung Galaxy Note 2 in the figure below, then clicked on the ‘Create Device’ button.

You will be back to the AVD Manager window with the ‘Device Definitions’ tab selected. Notice that the device you created will be in the device list (and selected by default). The screen will look like the one shown below.

Note that you have only created a definition for the device but NOT an AVD for that device. To create an AVD, select the newly created device (if it is not already selected), then click on the ‘Create AVD’ button. You will see a screen similar to the one below. Notice that the ‘AVD Name’, the ‘Device’, and the ‘Target’ entries have been pre-entered from the new device definitions.

You can edit the entries mentioned above if you so wish, but for this tutorial, leave the entries alone. Note however, a warning message that no CPU/ABI system image has been selected yet will appear at the bottom of the window – do so now by clicking on the down-arrow to the right of the CPU/ABI item on the window and select the CPU as per your device specification. Since my Android smart phone is using the ARM processor, I decided to use the ‘ARM (armeabi-v7a)’ CPU/ABI as I will be testing software on that smart phone itself (more about this later). The ‘Hardware keyboard present’ item was also deselected. Notice that the warning message has now changed to ‘No skin selected’. Change the skin to ‘No skin’ by clicking on the down arrow on the Skin item and selecting ‘No skin’ from the list. The screen will now look like this.

If you have a web-cam on your PC, you can use it as your rear camera and/or your front camera. Click on the down-arrow on the ‘Back Camera’ and/or ‘Front Camera’ and select ‘Webcam0’ for the entries. You can safely skip these items or use ‘Emulated’ for both items if you do not have a web-cam on your PC. The RAM size was pre-selected – you can change this if you wish. Also, if you wish to have a SD card on your AVD, specify the size of this card – I have entered 200 as an example here. To make the AVD perform faster, the use of the host GPU is highly recommended – I have enabled this in the screen shown below.

Click the ‘OK’ button to create the new AVD. A log window will appear (see below) informing you of all the settings for the newly-defined AVD. Note that any error messages will also appear in this window – in this case, there are none. Click on the ‘OK’ button to dismiss the window.

You will be back in the AVD Manager window with the newly created AVD already selected (see below).

To start this AVD, click on the ‘Start...’ button then click the ‘Launch’ button on the Launch Options window that appears next (see below). A ‘Starting Android Emulator’ window will appear next (see below also).


The AVD will now load – at a very much slower rate than the Nexus 5 AVD! First, the screen shown below will appear with a flashing ‘android’ sign in the middle of the display.

After a long while, the screen will change as shown below.

Click the ‘OK’ button and the screen will change as shown below.

You can go ahead to play around with this device. Just note that it is very slow to respond to clicks as compared to the Nexus 5 AVD. You can safely close this AVD by clicking on the ‘x’ on the top right hand of the window. You will then be back to the AVD Manager window.
If your PC is using an Intel x86 compatible CPU and you have set up your BIOS accordingly, you can edit the AVD (by clicking on the ‘Edit...’ button) for the newly-created device and change the CPU/ABI to the ‘Intel Atom (x86)’, then click the ‘OK’ button twice, once to re-create the AVD and the other to dismiss the log window (see below).


To start the AVD, select it and click on the ‘Start...’ button then click the ‘Launch’ button on the Launch Options window that appears next (see below).


The AVD will now load – at a very much faster rate than previously. This illustrate the power of using the Intel Atom (x86) CPU/ABI together with a capable Intel x86 compatible CPU and Virtualization Technology plus Window’s HAXM features with Android Studio on your development PC! Just remember that the hardware virtualization feature only works on x86 compatible CPU’s. Also remember that older CPU’s (Intel or AMD) may also not work with these hardware virtualization features. If you are unsure about your CPU’s ability to support hardware virtualization, search the Internet for help.

When the AVD has fully loaded, slide the padlock to the right to unlock the device – just like a regular Android smartphone. The home page will then appear (see below).


Close the AVD when you have finished playing around with it. Then close the AVD Manager and the SDK Manager (use the ‘x’ on the upper right hand of the window). Use the ‘Back’ key on the Android Studio window to go back to the main page. You can also quit Android Studio if you wish.
STEP 6: Create a New Project Using Android Studio
Now that you have successfully installed Oracle’s Java SE and Google’s Android Studio and set up an AVD, it’s time to use Android Studio to develop software for the Android platform. We start off by using Android Studio to write a short and simple ‘Hello, World’ program, which you can run either on your AVD, or your actual Android device.
Launch Android Studio if it is closed. Start a new project by clicking on the ‘Start a new Android Studio project’ item from the welcome screen (see below).

The ‘New Project’ screen as shown below will appear – fill in the details for the ‘Application name’ to ‘Hello World’ and ‘Company Domain’ to ‘anycompany.com’ as shown. The directory in which this project reside can be anywhere on your PC. In the example shown, I have placed the project in my home folder’s ‘Projects’ directory but you are free to use any directory you wish. Then click on the ‘Next’ button.

The ‘Target Android Devices’ screen will appear next (see below). Make sure that the ‘Phone and Tablet’ item is selected. The ‘Minimum SDK’ is pre-selected to be ‘API 15: Android 4.0.3 (IceCreamSandwich)’ and the reason why is as stated in the note below this field. If you are unsure on which minimum SDK to select, you can click on the ‘Help me choose’ item. For this tutorial, leave it at the pre-selected minimum SDK. Then click on the ‘Next’ button.

The ‘Add an activity to Mobile’ screen will appear next (see below). Select the ‘Blank Activity’ item if it is not pre-selected. Then click on the ‘Next’ button.

The ‘Customize the Activity’ screen will appear next (see below). Change the ‘Activity Name’ to ‘MyActivity’ and the rest of the items below will change as shown. Then click on the ‘Finish’ button.

Android Studio (the ‘Gradle’ part anyway) will then start building the project as shown below. Note that, if a Windows 10 Security Alert window should pop up as shown below, click on the ‘Allow Access’ button to dismiss it.


Note that your project is a basic ‘Hello World’ app that contains some default lines so you do not have to enter those lines into the project. Later you can view the the Java source code for this ‘Hello World’ project in the Android Studio IDE.
When completed, Android Studio will display it’s main IDE screen. If a ‘Tip of the Day’ window appears (also shown below), you can safely close it by clicking on the ‘Close’ button. If this is the first time you are using Android Studio, the next screen will take some time to appear while the system will carry out indexing of the IDE – the word ‘Indexing...’ will appear in the bottom of the IDE window (see below).


After the system has finished indexing, a screen similar to the one shown below will appear. Note that it does contain a graphic of a Nexus 4 device with the ‘Hello world!’ text on it. This, however, is NOT the output of the project on your AVD.

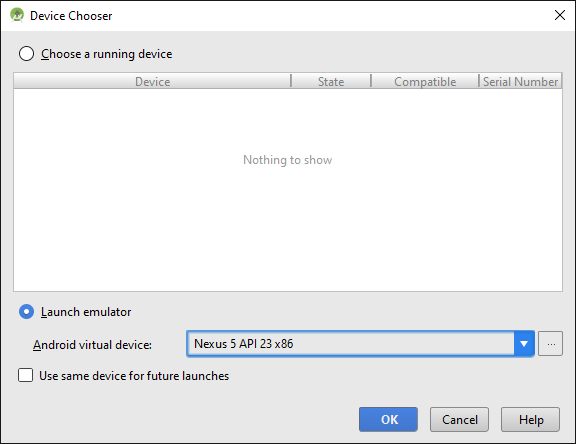
To run this project on the AVD emulator that you have created, click on the ‘Run’ button (the one in Android Studio’s tool-bar that looks like a green-colored right pointing arrow) and the ‘Choose Device’ screen (see below) will appear. Note that the ‘Launch emulator’ item has been selected and that you don’t have any other running device (’Nothing to show’ will be present in the top half of the window). Make sure that the Nexus 5 AVD is selected.
Click on the ‘OK’ button and the AVD will start and the screen will change to the one shown below.


After admiring your handiwork, close the AVD and you will be back at Android Studio (see below). For the time being, just ignore any messages shown in the status area at the bottom of the Android Studio’s screen, and the area where the Nexus 4 device reside previously (click on ‘Clear cache’ to clear these messages and restore the previous screen). Notice that you are now viewing the contents of the ‘activity_my.xml’ tab.


To view the Java source code for this project, just click on the ‘MyActivity.java’ tab and the screen will change to the one shown below.

Switch back to the ‘activity_my.xml’ tab and run the project again but this time, select the Samsung Galaxy Note 2 AVD instead (see below). Then click on the ‘OK’ button.

The screen will change to one shown below.

Unlock the AVD and and you will see the ‘Hello world!’ output on the AVD’s screen. Close the AVD after you are done.


STEP 7: Setting Up The Target Android Device
We have successfully tested the ‘Hello World’ project on the AVD emulator. However, our ultimate goal is that the project should run on an actual Android device (a smart phone, for example). In order to do this, you need to connect that device to our development PC (the PC on which Android Studio is currently running) using a proper USB cable and the proper USB ports.
First you need to enable USB debugging on your device. Usually this setting can found under ‘Settings’ and ‘Developer options’ but it can vary from device to device (indicated by the green arrow below). On some Android devices, ‘Developer options’ may need to revealed as they are hidden by default. If unsure, consult your ‘User’s Manual’ or the manufacturer’s web page for the information on how to enable USB debugging.

If you find an item labeled ‘Revoke USB debugging authorization’ on your Android device, select that and clear all previous authorization by selecting ‘OK’. Note that if this item is not present on your Android device, you can safely assume that your PC is automatically authorized.

Next we have to make sure that the proper USB cable is used. The manufacturer of your Android device usually provide you with one – use that cable and none other. You also have to make sure that the USB port to be used on your PC is working. Test this port out first by plugging in a thumb drive (or any other USB device) and if the PC recognize this device, you can safely say that the USB port is working.
Now start Android Studio (if not already started) and make sure that Android Studio is running the ‘Hello World’ project. Then connect your Android device to your PC using the USB cable. Dismiss any file manager window on your PC if one pops up. You may need to authorize the USB connection to the smart phone for debugging with the PC’s RSA key by selecting ‘OK’ on your smart phone (see below also).

Then click on the ‘Run’ button in Android Studio’s tool-bar. As usual, the ‘Choose Device’ window will pop up as shown below. Note that the ‘Choose a running device’ item is selected and that device is listed as shown (a Samsung GT-N7100 in this case). Click the ‘OK’ button to run the project on your Android device.

If everything is set up correctly, you should see the ‘Hello world!’ message displayed on your Android device’s screen (see below). If not, see if there are any messages on your Android Studio status screen of your PC. If the message mentions authorization (for example), then, most probably you have forgotten to set USB connection authorization on your device. Do it now and retry running the project again. The important thing to note here (if unsuccessful) is that Android Studio will display some message and this usually gives you a clue on what is wrong. If you still run into problems, then I suggest searching the Internet with your problem.

You can now close the window on your Android device (usually using the ‘Back’ key). If you examine the apps on your device, you will find an app labeled ‘Hello World’ (see below). This is, of course, the ‘Hello World’ app file (usually with a .apk extension) which Android Studio has downloaded for you. You can delete this file if you so wish. By the way, before you put your Android device aside after testing more new apps developed using Android Studio, remember to switch off USB debugging first.

To close the ‘Hello World’ project on your PC, click on ‘File’ and the ‘Close Project’ menu items on Android Studio. You will be back to the welcome screen and the ‘Hello World’ project will be listed under the ‘Recent Projects’ column (see below). To restart (or reload) the same project, make sure that the project is selected under ‘Recent Projects’ and then double-click the item (or click on the ‘Open an existing Android Studio project’ item, then select your project file) – that project will then be started.

Final Words:
That’s it. You now have a 64-Bit Windows 10 PC which can be used to develop Android software. What was oulined in this ‘how-to’ is only the ‘tip-of-the-iceberg’ – there are more, lots more that you need to discover and learn!
If you are an experienced Intellij, Android Studio, Java and Android programmer, enjoy! For those people who is new to Android Studio or Java programming, here are some links which I recommend you visit in order to learn about Android programming.
To learn about the Intellij IDE (on which the Android Studio is based), visit https://www.jetbrains.com/idea/documentation/ for a tutorial on this.
To learn how to use Android Studio for developing Android software, visit https://developer.android.com/training/index.html for a tutorial on this.
If you are new to Java, then I would recommend searching the web for tutorials and the books ‘Java For Dummies, 6th Edition’ and ‘Head First Java, 2nd Edition’ as a guide.
If you are new to Java Programming for Android, then I would recommend searching the web for tutorials and the book ‘Java Programming For Android For Dummies’ as a guide. There is also another book by the same author but is more ‘advanced’ and is targeted towards Android developers. The title of this book is ‘Java Programming For Android Developers For Dummies’.
Happy computing!
No comments:
Post a Comment