I do most of my experiments on a small capacity SSD after which, when I complete my experiments and I wish to preserve the result, I normally clone the SSD to a much larger HDD, then wipe the SSD clean and start a new experiment on it.
Basically this document is all about cloning a smaller disk to a larger one. The simple reason for doing this is ‘space’ – a smaller SSD (which currently is costly), although much faster than a mechanical HDD, has a space limitation. The less-costlier mechanical HDD has more space, but is much slower than a SSD. You have to decide whether this trade-off is a worthwhile effort in cloning disks. If you can afford it, you can also use this guide to clone to a larger SSD.
The best part of the tools that was used in cloning the disks is that they are absolutely free – well, maybe the ISP charges are not, because you have to download them from websites. The main cloning tool used in this article is GParted (Gnome Partition Editor), and an auxiliary tool (called ‘tuxboot’) is only use at the beginning to create a GParted USB boot drive. The beauty of this tool is that it can run on both the Windows OS as well as the Debian Linux OS – Mac OS X users may have to resort to using the ‘dd’ command from a terminal in order to create the USB boot drive.
Note that, if done correctly, disk cloning can be done easily without have to mess around with the ‘/etc/fstab’ file in order to fix the UUID of the disk.
One more thing before we proceed to the disk cloning process and that concerns the firmware (the software used to control low-level tasks) on most modern motherboards. Basically there are two types of firmware: one is the old-style type BIOS (Basic Input/Output System) and the other is the new EFI or UEFI ((Unified) Extensible Firmware Interface). While most of us old fogeys are familiar with the BIOS-type firmware, the computer industry, as a whole, is heading towards the UEFI-type firmware. So it very important for computer enthusiast like me, to fully understand UEFI. There are a lot of documents and articles on UEFI found on the web – but they seems to have one goal in mind – confuse the hell out of the computer enthusiast – and they all have succeeded beautifully. However, not all is lost – there is at least one article at http://www.rodsbooks.com/linux-uefi/ that explains clearly what UEFI is all about. I recommend that any computer enthusiast worth his/her salt, read it and give thanks to Roderick W. Smith, the author – Thank You, Roderick W. Smith. Anyway, the method outlined in this article is based on a non-UEFI PC (which is a PC with old-style BIOS firmware) – however, it is quite possible that they may work for UEFI style layouts, although this has not been tested by me. Maybe I will cover cloning disk on a UEFI PC later.
Downloading and Creating a USB Boot Drive
Assuming you have a web browser on your current PC, point them at:
- http://gparted.sourceforge.net/download.php to download the Gparted utility - currently at version 0.24.0-2. Click on the link that says ‘Download gparted-live-0.24.0-2-i586.iso’, wait a few seconds, and the download will start. Save the file (if prompted) and make a note of where the file was saved. This is the main cloning software and uses the Debian Linux OS as a liveCD for launching the GParted utility. Note that what was downloaded is an .iso file – you can burn it to a CD if you so wish, but for this exercise, we shall use the ‘tuxboot’ utility to create a boot USB disk.
- http://tuxboot.org/download/ to download the tuxboot utility - click on the link that says ‘Files on SourceForge’. Depending on the PC's OS, the next screen will show the latest versions.
If you are using Debian Linux OS, click on the link that says 0.8 (the latest version), then click on ‘Linux’ followed by clicking on ‘debian-amd64’ for 64-bit PC’s or ‘debian-x86’ for 32-bit PC’s. Download the .deb file and wait for the download to finish. Then navigate to the Downloads folder using File Manager and double-click on the downloaded file to install it.
NOTE: If you are using any other version of Linux OS or Mac OS X OS, then create the USB boot disk by using the ‘dd’ command from a terminal. DO NOT USE the tuxboot utility.
The full command for creating the USB boot disk is:
sudo dd if=/path-to-gparted-live.x.y.z-w.iso of=/dev/sdx bs=4M; sync
Replace ‘/dev/sdx’ in the command above by the actual USB device – which you can get from the ‘dmesg’ command. Also replace the ‘path-to-gparted-live.x.y.z-w’ with the actual path and the .iso file name.
Make sure that you have a 1 GB (or larger) USB thumb drive for GParted. If you have existing data on the USB drive, make sure that you make a backup copy of the data. Then plug in your USB drive into the PC. If need be, reformat the USB drive – make sure that you use a FAT or FAT32 partition. Then launch tuxboot, select ‘Pre Downloaded’, set it as ISO, then navigate to the Downloads folder and double-click on the GParted .iso image file (see figure below). Make sure that your USB disk is correctly set to the correct device, then click the ‘OK’ button. Wait until the process is completed (see figures below) – you now possess a GParted USB boot drive.


Assumptions
For this article, I will make the following assumptions:
- you wish to clone the SMALLER HDD (or SDD) to a LARGER HDD (or SDD). This SMALLER disk will be referred to as the SOURCE disk in this article.
- the LARGER HDD (or SDD) is unformatted (with or without an MSDOS type partition table) – this disk will be referred to as the TARGET disk in this article.
- the SOURCE disk contains the Linux OS (which you want to clone) on 3 partitions – one of which is an extended partition. Note that this is the standard way for the three most popular Linux distributions (according to Distrowatch) and this article assumes that you have followed suit. The 3 partitions are – root, extended and linux-swap. Note that if you have any other partition schemes, you can tweak this article to suit them.
- the SOURCE disk uses a NON-UEFI type layout – it DOES NOT use a GPT type partition but a plain old MSDOS/MBR scheme. Although, this article is written specifically for non-UEFI layouts, it is possible that they may work for UEFI style layouts, although this has not been tested by the writer.
Procedure
A) Boot From GParted USB Drive:
- Attach both of your HDD's into the PC – old HDD (SOURCE disk) into secondary port and new HDD (TARGET disk) into primary port
- Plug in the GParted USB boot drive into a working USB port
- Switch on the power to the PC
- After the POST beep, press the key to get to the boot menu (F12 for a Gigabyte motherboard)
NOTE: If you do not do press the boot menu key, the PC will automatically boot from the GParted USB drive but in UEFI mode. If this is what you wish, then go ahead and boot this way. - Select the GParted USB drive as the boot device and press the ‘Enter’ key – make sure that the correct NON-UEFI USB drive is selected – not the USB drive that has ‘UEFI:’ as part of the name
- At the GParted Live startup menu (which appears next), press the ‘Enter’ key with the ‘GParted Live (Default settings)’ selected – the actual booting into the Live USB process will start – ignore any warnings and messages on the terminal while booting
- There will be 3 prompts that will appear next – at each prompt, press the ‘Enter’ key for the defaults – booting will continue until the Debian Linux desktop appears
- GParted will then automatically start (see figure below)
- GParted will start with the SOURCE disk identified as /dev/sda and the TARGET disk as /dev/sdb (this is contrary to the physical location of the disks but it's acceptable for cloning - just remember which device is the SOURCE disk and which device is the TARGET disk - see figure below)
- To select either the SOURCE disk (/dev/sda) or the TARGET disk (/dev/sdb), click on the downward pointing arrow on the top right hand corner of the GParted window, and select the required disk from the drop-down list


B) Copy Root Partition (/) From SOURCE to TARGET:
- Select the SOURCE disk (/dev/sda) and then click on the first partition (which is the 'root' partition in our example) of the SOURCE disk
- Right click on the first partition and select ‘Copy’
- Select the TARGET disk and then the unallocated partition – right click on this and select ‘Paste’
- On the window that appears next, resize the partition to suit (leave enough free space for a swap partition – that space must be equal or larger than the actual swap-space on the SOURCE disk)
NOTE: You can do the re-sizing of the partition one of two ways – visually or manually:
- visually: drag the right hand pointer on the re-size window (the mouse pointer will change to a 2 headed arrow) to the desired position – see figure below
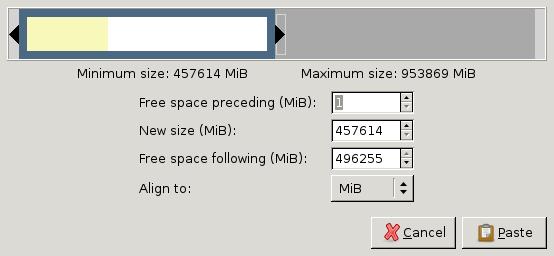
- manually: enter the partition sizes (in MiB – binary mega-bytes) into the respective fields below the re-sizing window – see figure below


The example shown in the figure is for re-sizing a 456.89 GiB (copied from a physical 500 GB SSD) partition to a 921.60 GiB (on a physical 1 TB HDD)
- Click on the ‘Paste’ button – the window will close – click on the ‘Apply’ button in the top menu bar (see figure below), then click ‘Apply’ again in the pop-up window to confirm
- Wait until the operation is finished (depending on the size of the TARGET disk, this process may take a while) – when completed, the ‘root’ partition has been copied – along with the MBR boot loader and whatever UUID that was assigned to the SSD during install – see figure below


C) Create Extended Partition On TARGET:
- Select the unallocated (free) space on the TARGET disk and then click on ‘Partition’ button on the menu and select ‘New’
- On the window that appears next, create an extended partition on the unallocated space by setting the ‘Create as:’ field to ‘Extended Partition’ and then click ‘Add’
- Then click on the ‘Apply’ button on the menu, then click ‘Apply’ again to confirm
- Wait until the operation is finished – when completed, an extended partition has been created on the TARGET disk


D) Copy Swap Partition From SOURCE to TARGET:
- Select the SOURCE disk (/dev/sda) and then click on the swap partition (which is the third partition in our example) of the SOURCE disk
- Right click on the swap partition and select ‘Copy’
- Select the TARGET disk and then the unallocated partition – right click on this and then click on the ‘Paste’ button in the pop-up window
NOTE: If you fail to leave a large enough free space for the swap, the ‘Paste’ button will be grayed out and you will NOT be able to copy the swap. If this happens, try re-sizing the ‘root’ partition on the TARGET disk. - The window will close – click on the ‘Apply’ button in the top menu bar, then click ‘Apply’ again in the pop-up window to confirm
- Make sure that the partition LAYOUT for the SOURCE disk matches the TARGET disk – note that the sizes of the partitions may differ
- Close GParted and perform a shutdown on the PC
- Physically remove the SOURCE disk but leave the TARGET disk on the PC


E) Re-install GRUB On The TARGET:
- Switch on the power to the PC
- After the POST beep, press the key to get to the boot menu (F12 for a Gigabyte motherboard)
NOTE: If you do not do press the boot menu key, the PC will automatically boot from the GParted USB drive but in UEFI mode. If this is what you wish, then go ahead and boot this way. - Select the GParted USB drive as the boot device and press the ‘Enter’ key – make sure that the correct NON-UEFI USB drive is selected – not the USB drive that has ‘UEFI:’ as part of the name
- At the GParted Live startup menu (which appears next), press the ‘Enter’ key with the ‘GParted Live (Default settings)’ selected – the actual booting into the Live USB process will start – ignore any warnings and messages on the terminal while booting
- There will be 3 prompts that will appear next – at each prompt, press the ‘Enter’ key for the defaults – booting will continue until the Debian Linux desktop appears and GParted will then automatically start
- Close the GParted application and start a terminal by double-clicking on the terminal icon (the terminal is required to re-install GRUB on the new disk)
- Execute on the terminal:
sudo fdisk -l
Check the name of the new root partition on the new disk. In this case, it’s /dev/sda1
- Mount this partition by executing:
sudo mount -t ext4 /dev/sda1 /mnt
- Finally, re-install GRUB onto the new disk /dev/sda by executing:
sudo grub-install --root-directory=/mnt /dev/sda
- Then un-mount the new disk:
sudo umount /mnt
- Close the terminal, shut down the PC and remove the GParted USB drive
- Start the PC – if it successfully boots up with no problems, then you have cloned the disk perfectly
- Test the new cloned disk – if OK then congratulations!
A FINAL WORD: This article does not cover cases whereby the OS is NOT Linux - for example, Windows and Macintosh OS. For these, the reader may have to do their own tests with using GParted on these OS's (refer to GParted features for the file system support). Also, as explained, this article does not cover a PC based solely on the UEFI firmware – although this may be covered in a future article.
Hello, thank you for your blog post. It helped me yesterday to upgrade a 9 year old HDD to a smaller SDD in my server. I tried with Clonezilla before but got a lot of errors, GParted worked liked a charm, also installing the bootloader as written in your post. Thank you again!
ReplyDeleteCongratulations! I really do not understand, why this fast and easy way to BACKUP ANY LINUX DISTRO is not more present on the web. For a long time I was searching for a reliable, easy and fast way to create a backup in Linux, so when I stumbled upon your post, I readily tried, what I used to do in Windows. Copy the necessary partitions to the same or to an other drive (no need to copy a possible swap partition) using gparted or any other tool. When needet, just delete the original partition(s) and copy the backup on to the original location. Voala!
ReplyDeleteOne can even boot into the backup(s) after adjusting grub.
Thank you for the hint!
Took me time to read all the comments, but I really enjoyed the article. It proved to be Very helpful to me and I am sure to all the commenters here! It’s always nice when you can not only be informed, but also entertained! SSD Vs HDD: Experts Advice, Know The Difference
ReplyDeletethanks for grub-install instructions!
ReplyDeleteThanks for sharing this manual guideline.v-stilshop
ReplyDeletei like this post,, very useful information
ReplyDeletehttps://suhsai.com/
Good introduction to GParted. I had no problems until the reinstall of Grub. I use Grub2, but after the disc cloning the there was a /boot/grub directory, but no /boot/grub2 directory. Booting an openSUSE rescue and following the instructions in the documentation for openSUSE Leap 15.1 solved the problem. My openSUSE home partition was encrypted, and that is also the case af migration from the HDD to SSD.
ReplyDeleteToday I just got at Year End Questionary from openSUSE, and during that I told them, that their tools for migration from old to newer hardware properly could be improved.
ReplyDelete