If Eclipse from Ubuntu's repository has already been installed it still be used as the Android program development - just ignore the sections on installing and proceed to installing the ADT into Eclipse as outlined in Part 2.
The install process is very straightforward depending on which Eclipse you select to use. For this first part, I will describe the procedure for installing Eclipse from Google's ADT bundle.
- First head over to:
http://developer.android.com/sdk/index.html
and download the latest ADT bundle - make sure you download the correct 32 or 64 bit version:
adt-bundle-linux-x86.zip
or
adt-bundle-linux-x86_64.zip - Start a terminal and unzip the downloaded file:
unzip ~/Downloads/adt-bundle-linux-x86.zip
or
unzip ~/Downloads/adt-bundle-linux-x86_64.zip
This will create a new folder 'adt-bundle-linux-x86' (or adt-bundle-linux-x86_64)in your home directory containing all the unzipped files. Note that by installing ADT and Eclipse in the home directory, only the current user can use them. If, however, you want Eclipse to be accessed by other users, then you may have to install the version from Ubuntu's repository.
To start Eclipse, execute in a terminal:
cd adt-bundle-linux-x86/eclipse
./eclipse
Since this is the first time Eclipse is started, it will prompt you for a workspace directory - I use '/home/(username)/Projects/Android (where username is your login name) but you can place it anywhere you like or accept the default of /home/ (username)/workspace. You can also set this as the default and not ask again - then click OK. 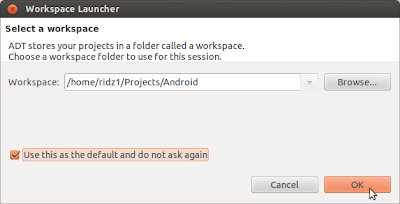 Workspace Launcher
Eclipse will start loading and you will then see a screen like the one shown below. Welcome screen
Read through the welcome message - when done, close it and you will see the actual Eclipse screen as shown below. Eclipse main screen
That's it! Eclipse is already loaded with the Android Developer Tools plugin and the SDK is ready to develop Android software.


If you have started Eclipse from the command line (as above), do not be alarmed by a series of error messages in the terminal (for example: watch_submenu: assertion `GTK_IS_MENU_SHELL(menu)' failed'). These seem to be harmless as Eclipse worked fine - at least it was in my case.
For now, close Eclipse by either clicking on the 'Close' button, or from the menu (File > Exit).
Note that at the moment, you have start a terminal. change to the adt-bundle-linux-x86/eclipse/ directory and execute the ./eclipse command everytime you wish to start Eclipse. To make life easier, you can also place a launcher for Eclipse in Unity's dock. To do this:
Open a terminal and execute:
sudo gedit /usr/share/applications/EclipseADT.desktop
In the gedit editor window, copy and paste the following text:
[Desktop Entry]
Version=21.0.0-531062
Type=Application
Terminal=false
StartupNotify=true
Icon=/home/(username)/adt-bundle-linux-x86/eclipse/icon.xpm
Name=Eclipse ADT
Comment=Eclipse and Google Android Developer Tools
Exec=/home/(username)/adt-bundle-linux-x86/eclipse/eclipse
Categories=Application;Development;
Change the items necessary for your system - for example, the location of the eclipse executable (mine is '/home/ridz1/adt-bundle-linux-x86/eclipse/eclipse' - yours may be different. Also make sure that the location of the icon for Eclipse is valid - use the one found in the /home/ridz1/adt-bundle-linux-x86/eclipse/ directory - the file is called icon.xpm. Save and close gedit.
Now click on the Unity dash and enter 'eclipse' in the search box. The Eclipse ADT will be displayed - click on the icon to start the program. The program will run and the Eclipse icon will appear as an item in the dock. Right-click on that item and select 'Lock to Launcher'. Viola! You now have a Unity dock with the Eclipse ADT permanently present. The screenshot below shows my Unity desktop in all it's glory.

That's it - you are now ready to start developing Android software on your Ubuntu 12.04. My next blog will be Part 2 of Eclipse+Android on Ubuntu 12.04, where I will describe how to install Eclipse from Ubuntu's repository and how to install Google's ADT for Eclipse.
One MAJOR problem (this is with 12.10 Quantal of course -- not so sure if Precise has this same problem), but the "icon.xpm" file in the Eclipse directory is a 256x256 icon. And guess what? At least in 12.10, when the icon is used for the desktop config file, it isn't scaled down, making the icon look HUGE in the dash (and everything around it unreadable)!
ReplyDeleteGood news, there is a workaround:
sudo apt-get install gimp && sudo gimp /path/to/adt-bundle/eclipse/icon.xpm # replace with the actual path to the icon
And, of course, using GIMP, it's possible to scale the icon down to 48x48, which is what it's supposed to be.
when i want to show the icon to the laucher it's doesn't work. i don't understand
ReplyDeleteIf you want the cool (at least, I think it is cool) curly brace icon, then change the Icon path to /home/(username)/adt-bundle-linux-x86/eclipse/plugins/com.android.ide.eclipse.adt.package_some.date.string/icons/adt.png
ReplyDeleteNot two minutes ago I was wondering where that cool little icon was and behold you've answered my question. BTW this looks much better than using the oversized eclipse icon.xpm as stated here.
DeleteThanks man. You're a life savior :) I didn't even know what I googled to get to your answer but you saved me :)
DeleteThanks a lot man ..
ReplyDeleteinstall eclipse in ubuntu 12.04
It actually doesn't work quite fine - those errors indicate that the Eclipse menu bar has failed to load. If you look at the images you posted, you'll see there's no menu bar.
ReplyDeleteI'm looking for a solution to this, but haven't found one yet. One _crappy_ solution is to run as root - at least for me, this makes the issue go away.